This post contains Amazon affiliate links
I love to craft and create in my spare time, and now that the children are older I love the fact that I can continue with my own crafting while they get on with theirs - I don't just have to sit and watch them splash paint and glue about and then clean it all up after them! I thought I'd share some crafts I've found that are really fun to do alongside your child, either working separately or together.
My favourite craft to do with the children is Hama beads. They aren't just for children, and in fact I've written a whole post sharing ten Hama bead projects for adults. All you need to get started is some beads and boards, like this big bucket of Hama beads and boards (affiliate link), then you can add more supplies as you go.
The mini beads are also great for adult crafting projects, as they allow you to create more intricate designs like my tiled Russian Doll picture.
A new craft that I recently discovered is diamond painting, and this is another craft that both children and adults can enjoy. You can either work together on a larger piece, or choose some simpler designs to get children started. I recently bought this diamond painting sticker kit which was a big hit, there are lots of small designs included that can be finished quickly and used as sweet little stickers for phones or notebooks.
Colouring together is lots of fun, and there are lots of different colouring books that you can buy that allow two people to work on their colouring together. I really like this Colour With Mum colouring book (affiliate link) which has designs that vary in difficulty so that you can choose who gets to tackle which picture.
A step up from this is painting by numbers, something else which my children really enjoy. You can find lots of child friendly designs like this one - Pug dog with flowers (affiliate link) , or you could work on a larger piece together with the adult doing the more tricky areas.
All of these crafts leave you with a finished piece that you've worked on together which is a lovely memento of the fun that you've had crafting together!
Pages
▼
Wednesday 30 January 2019
Monday 28 January 2019
New free resources from Twinkl in partnership with the Tate gallery
Twinkl have produced some new, free, resources in partnership with Tate Kids, aimed at introducing children to some famous artists, helping them to learn more about them and inspiring their own creativity. Art is very important to me, and I love sharing my thoughts and feelings about different paintings with my children, so I was looking forward to seeing what my children thought of these resources.
You can find all the new resources here - Tate Kids and Twinkl. Three artists are featured - Gwen John, John Millais and George Stubbs - and resources have been produced for children in both Key Stage 1 and Key Stage 2. The resources are intended to introduce children to the artist, encourage them to do their own research into their lives and features of their work, then have a go at producing their own work based upon the style of the artist. All these resources are completely free, so you don't need a paid subscription to download them.
I decided to look at the work of Gwen John, as she was a new artist to me. We started by downloading the PowerPoint presentation All About Gwen John PowerPoint KS2. The presentation is a really good introduction to the artist, with biographical information, many examples of her paintings, and discussion about her painting style. There is also a Powerpoint presentation aimed at KS1 children which is a little simpler - All About Gwen John PowerPoint KS1. I was really interested to learn about her, and how she managed to succeed as an artist in a male-dominated world, it's a really inspiring story.
Then I downloaded the Gwen John Artist Research Discovery Pack KS2. The pack contains a number of resources - a Comparison Sheet to compare her work to that of another artist, a Fact File containing some key facts, a KWL Grid to complete things that the child knows, wants to know and has learnt, a My Powerful Questions sheet to help focus their research, and a Research Map to to add in and display facts and pictures. I chose the KS2 pack for my older child, but like the PowerPoint presentation this resource is also available in a slightly simplified version aimed at KS1 children - Gwen John Artist Research Discovery Pack KS1
The children really enjoyed learning about a new artist, and next time we are in London I'm planning a trip to the gallery to see some of her paintings in real life!
I have been provided with a Platinum subscription to Twinkl in exchange for sharing these resources on my blog and social media.
You can find all the new resources here - Tate Kids and Twinkl. Three artists are featured - Gwen John, John Millais and George Stubbs - and resources have been produced for children in both Key Stage 1 and Key Stage 2. The resources are intended to introduce children to the artist, encourage them to do their own research into their lives and features of their work, then have a go at producing their own work based upon the style of the artist. All these resources are completely free, so you don't need a paid subscription to download them.
I decided to look at the work of Gwen John, as she was a new artist to me. We started by downloading the PowerPoint presentation All About Gwen John PowerPoint KS2. The presentation is a really good introduction to the artist, with biographical information, many examples of her paintings, and discussion about her painting style. There is also a Powerpoint presentation aimed at KS1 children which is a little simpler - All About Gwen John PowerPoint KS1. I was really interested to learn about her, and how she managed to succeed as an artist in a male-dominated world, it's a really inspiring story.
Download here - Gwen John PowerPoint KS2 |
Then I downloaded the Gwen John Artist Research Discovery Pack KS2. The pack contains a number of resources - a Comparison Sheet to compare her work to that of another artist, a Fact File containing some key facts, a KWL Grid to complete things that the child knows, wants to know and has learnt, a My Powerful Questions sheet to help focus their research, and a Research Map to to add in and display facts and pictures. I chose the KS2 pack for my older child, but like the PowerPoint presentation this resource is also available in a slightly simplified version aimed at KS1 children - Gwen John Artist Research Discovery Pack KS1
The children really enjoyed learning about a new artist, and next time we are in London I'm planning a trip to the gallery to see some of her paintings in real life!
I have been provided with a Platinum subscription to Twinkl in exchange for sharing these resources on my blog and social media.
Wednesday 23 January 2019
Homemade fabric Disney pin trading board for a Disney Cruise stateroom door
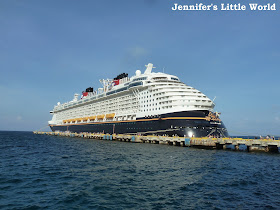
We are very lucky to be going on a Disney cruise later this year. We'll be sailing on the Disney Fantasy around the Caribbean on a Halloween themed cruise, which also coincides very nicely with a big birthday for me.
I've written before about some of the ways that you can add some magical extras to a Disney cruise, and I'm determined to join in with as much on this cruise as I can. I've already signed up for an ornament exchange, a postcard exchange, and the main Fish Extender gift exchange, and I also decided to make a pin trading board to hang on our stateroom door.
I must confess that I know very little about Disney pin trading. I received a few pins as part of a brand collaboration several years ago which I took with us on our last cruise. The children and I had such fun looking out for pin trading boards outside staterooms and choosing which pins to swap that I was really keen to do this again.
Disney trading pins can be very expensive to buy new, but I bought a bundle on eBay of 25 for £18 including postage which I thought wasn't too bad. Many of these pins I'm going to use as part of my Fish Extender gifts, but depending on my group there will be some left to leave on the board. Of course there is an element of trust to this activity - I just hope that we end up with about as many pins as we started with!
My pin trading board is made from fabric because that makes it easy to add and remove pins, and will hopefully be light enough to hang easily from a strong magnetic hook - all door and room decorations on the ship must only be held in place with magnets. I made a separate backing piece from the black fabric, which also has a layer of interfacing in the middle to give it some stiffness. There is a separate panel made from the patterned fabric which is stitched to the front, then I sewed a wooden skewer across the top to help it keep its shape and tied some ribbon to make a hanging hook. The Pin Trading signs are laminated and glued on.
Because it's a Halloween themed cruise I added some foam pumpkin stickers and Halloween ribbon, which can easily be replaced if we are lucky enough to want to reuse it for a cruise at a different time of year.
I do love having an upcoming holiday that I can craft for! I'm also intending to sew some sort of hanging holder where I can leave small gifts like pencils and lollipops for people to take as they go past, as well as the actual Fish Extender itself which is a multi-pocketed hanger that members of our gift exchange can use to leave our gifts. It's going to have a Moana theme with a few Halloween touches - I'll share it when it's finished!
Wednesday 16 January 2019
Upping the jigsaw game - some products for puzzle lovers
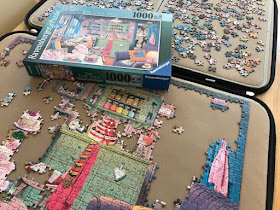
I've always loved doing jigsaw puzzles, and over the last few years as I've had more time to myself I've had fun completing many. But my enjoyment in completing a jigsaw puzzle increased significantly when I treated myself to a large jigsaw mat and holder. I bought the Puzzle Mates Portapuzzle Deluxe and it really has made a huge difference to speed and efficiency with which I can complete a puzzle, meaning that it's not nearly as daunting to start a new puzzle as it used to be.
This board opens up fully, and also contains two removable inserts which are each half the size of the jigsaw building area. If you have the space to leave the board fully open on a large table you can lay out all the pieces from a 1000 piece jigsaw, making it much easier to sort pieces by colour or to hunt for a specific piece. If you leave one of the sides empty you can fold up the puzzle and put it away to clear some space. I would absolutely recommend this board or something similar if you enjoy doing jigsaw puzzles!
I thought I'd do a bit of research into some other products which might make solving jigsaw puzzles easier and more fun. The second most important thing that I discovered was some form of sorting trays. I've been known to improvise by using trays or even paper plates to sort out pieces by colour or type, but the good thing about trays like this is that they can stack to save space, they are stable, and they make it easier to keep track of all your pieces and prevent them getting lost.
If you are really serious about jigsaw puzzle completion then it's great to be able to devote an area of the home to them with a dedicated jigsaw puzzle table. I can't get away with one of these at the moment, but luckily I have a dining table that I can usually dedicate to my puzzle habit.
If you want to display your jigsaw once finished you have a couple of options. Personally I put them away within a day or so of completing them, as for me the enjoyment in a puzzle comes from the assembly. But you can buy special glue - an adhesive that is applied to the surface of your completed jigsaw allowing you to preserve it in its finished state. You can then frame the jigsaw and keep it out on display.
If you don't want to glue your jigsaw (and personally I never would!) there are also frames which you can buy to display a finished puzzle that don't require the pieces to be stuck together.
I hope I've inspired you to give a jigsaw puzzle a go.
If you aren't convinced I've also written about the benefits of doing jigsaw puzzles, it's a great hobby!
Monday 14 January 2019
Paper cut heart card for Valentine's Day
This paper cut Valentine's card was very simple to make, and it can be used to decorate a card or to make a decoration for your home.
You need:
A selection of pieces of pink or red card
A plain piece of cardboard for the background of the card
Cutting mat and craft knife
Bostik Micro Dots
Bostik Foam Pads (small)
Instructions:
First you need to come up with a design for your heart paper cutting. There is plenty of inspiration online, and if you don't feel confident enough to draw your own design you can find plenty of free templates or ones to purchase that you can cut yourself.
If you are coming up with your own design, make sure that you are very clear which areas need to be cut, and leave plenty of space around the edges. If you are new to paper cutting keep it simple to start with. I came up with a freehand design featuring the word Love and a few smaller motifs, and I chose a piece of pink cardboard to cut the design.
I copied the design to my pink card using a pencil. I made sure that I kept the pencil marks light as I'll be rubbing them out when the heart is cut. You can also draw your design on to what will be the reverse of your cut out, but if you are including lettering remember that this will need to be drawn in reverse.
Then cut the design using a cutting mat and small craft knife. It's important to work slowly and carefully on a small area at a time, but don't be afraid to make changes as you go along if you can see ways to make the design balance better. The design will become more delicate as the card is removed, so it is best to start with the smaller sections, like the centres of the letters, and leave the larger areas until last.
Next use an eraser to rub out any visible pencil marks. Work very carefully so as not to pull on the delicate areas of the design.
The paper cut heart is adhered to a piece of card using Bostik Micro Dots. This is a sheet of tiny sticky dots that you press against the item that you want to stick. The dots attach themselves to your item allowing you to stick it where it needs to go. They are perfect for detailed items like this paper cut, as they will coat it evenly with adhesive and you don't need to worry about any glue showing from the front. Just press the paper cut against the sticky sheet then position in place on the card.
Finally cut out some smaller decorative hearts from a contrasting piece of card. I used a heart punch, but you can cut the hearts freehand if you don't have one. I used two different colours of card to make four smaller hearts.
The hearts are stuck to the card using Bostik Foam Pads. I used the small pads which are 5mm by 5mm in size. They are easy to apply and are great for giving some depth to a project.
Your card is finished! It's ready to send to a loved one, or just to keep on display.
This is a collaborative post in association with Bostik
Wednesday 9 January 2019
Making more time for reading
Since I finished Scroll Free September I've definitely become more mindful about my phone use. A few bad habits have started to creep back, but I'm getting much better at putting my phone to one side. I definitely find that I am drawn to it far less when I can't physically see it, so I now try to leave the phone in another room or upstairs whenever I can.
Another really positive outcome from Scroll Free September was that it encouraged me to visit the library again, which has been great for both me and the children. They have so many books of their own that I thought we didn't need to visit the library, but since we've been going weekly they have definitely both increased the amount that they are reading. They can be a bit reluctant to try new authors, but when they find one that they like they become obsessive and want to read every book - luckily our library offers a free book reservation service for children!
I've been reading a huge amount more. I don't tend to keep track of the books that I read, as I remember having to do that at school and hating it, and I don't want to put too much pressure on myself with a reading challenge. Sometimes a book will really resonate with me and I think about it long after it's finished (two recent favourites in this category have been A Thousand Paper Birds by Tor Udall and One Hundred Days of Happiness by Fausto Brizzi). Sometimes it will just divert me for a few hours and I've forgotten the plot by the next week (a fast paced read like The Couple Next Door by Shari Lapena). But if a book doesn't grab me within the first chapter then I'm not afraid to move on to the next - I don't have time to read all the books that I want to read let alone the ones that don't speak to me!
Most of my reading takes place in bed. I'll often retreat early with a book and a hot water bottle, as I find that I can't concentrate while there are other people around or when the television is on. I also read during the day at home - I multitask by walking around the house in circles while I read, to notch up the steps on my Fitbit! I really enjoy reading next to the children in the evening while they read to themselves, I love seeing them become lost in a book.
It's much easier to find the time for reading now that the children are older. Apart from while I was breastfeeding I hardly read at all when the children were small, so it's nice to be back in the habit again. I feel so much more satisfied after a half hour reading than a half hour mindlessly scrolling on my phone. I also find myself thinking about the book I'm currently reading while I'm away from it, which keeps my mind busy. I'm so glad that I've been making more time for reading!
Photo credit - Susan Yin via Unsplash |
Monday 7 January 2019
My crafty projects for last year - an update
This time last year I wrote a post about my crafty plans for the year ahead, and so I thought that I'd share a quick update!
One of my new projects for last year was my ABC Christmas cross stitch sampler. This is a large sampler with a different festive picture for each letter of the alphabet. It appealed to me because I like crafting for Christmas and I love the bright cheerful colours. I always aimed to finish the sampler by Christmas 2019, and having worked hard on it over the last year I'm about where I wanted to be so far. There are 27 boxes to stitch (there's an extra one that says Merry Christmas) and I've finished nearly 21 of them so I'm well over half way through, although there are lots of beads to add which may take me some time as I've not used beads in cross stitch before.
Some of the boxes have been quite complicated, especially those that are predominately green and red as there are lots of similar colours mixed up together. The Poinsettia and the Wreath were particularly challenging! It does look lovely though. I think once its framed I'll buy some kind of stand so that it can be propped up in the fireplace rather than hung on the wall, as I won't want it up all year round.
My other major project I had planned for the year was my Persian Tiles blanket. After a good start I'm afraid that it has rather been left to one side. I've completed eight of the large hexagons, which is half of them, and seven of the square motifs, so I'm not doing badly I just need to get back in to it. As for Harry's crochet blanket which I also intended to work on I'm afraid that I don't think I've picked it up again since, oops!
That's not to say however that my crafting has taken a back seat, I've been working on lots of other projects. I discovered diamond painting which was a lot of fun and produced a satisfying end product.
Towards the end of the year we firmed up plans for a Disney cruise, and that has presented me with many crafting opportunities. I had a lot of fun making some simple Disney themed felt stocking ornaments for an ornament exchange and I've also made a fabric pin trading board which will hang outside our stateroom door for people to swap pins. It's made with a Halloween theme as we are taking a Halloween cruise, but as I've pointed out to the husband it can easily be changed to match future cruises at any other time of year!
I have lots more Disney cruise themed crafting planned, next I want to make a lollipop/pencil holder which hangs on the door for people to help themselves to. There's also the Fish Extender, a pocketed hanger which hangs outside the door as part of a gift exchange. I've bought the organiser and I just need to come up with a fun way to decorate it - the children are keen to go for a Moana theme! I also want to make simple magnets and bookmarks to gift to fellow cruisers.
Finally I have a new cross stitch kit to work on which is an antique map design. I love maps and this one has appealed to me for years so I finally asked for it as a birthday gift and I'm looking forward to starting on it. I just need to finish a few other projects first!
What will you be working on this year?
Friday 4 January 2019
Our travel plans for the year ahead
At the start of the year, I love to look ahead to all the exciting things that we have coming up. As travel is so important to us as a family I particularly like to look forward to the holidays that we have booked. We have a few in the calendar, a couple yet to be scheduled in, and a couple which may or may not end up happening.
Our first holiday is in February half term, when we will be spending just over a week in Dubai. Dubai has been on our wish list for a little while now, as we've heard such good things about it from friends and colleagues. We are staying in a couple of hotels so that we'll be able to spend time in different parts of the city. It will be nice to have some warmth and sunshine, and while we aren't really in to the shopping or the eating I know that there will be lots to keep our family occupied.
A year rarely passes us by without a trip to Center Parcs and this year will be no exception, with a family break to Center Parcs Woburn planned for June. Woburn is a park that we've only visited for the day thanks to my sister who works there, so we are looking forward to spending a bit more time there and it will be lovely to spend lots of time with my family.
In August we are planning a holiday with the other side of the family, with a location yet to be decided although we may return to the Cotswolds where we spent a lovely break last year. Due to children and teachers in the family we have to stick to the main school summer holiday dates which pushes the prices up but we are hoping to find somewhere suitable, probably with Airbnb.
A big holiday next year comes in October, when we are heading to Florida and taking a Disney cruise aboard the Fantasy around the Caribbean. Our cruise departure date conveniently coincides with my 40th birthday and I can't think of a much better way to celebrate! I'm going all out with the Disney for this cruise, and I've signed up for an ornament exchange as well as various other gift exchanges. I may even treat myself to some celebratory decorated Minnie Mouse ears! We haven't firmed up our plans for the rest of the trip but we are thinking about giving the Disney parks a miss this time and heading down to the Everglades or the Florida Keys.
Thanks to our longer school summer holidays we have the potential to book cheaper holidays at the beginning of the summer or in December if we can afford it, so we are keeping an eye out for deals at the moment to see what comes up.
It's going to be an exciting year!
Wednesday 2 January 2019
How to store and organise Hama bead craft supplies
This post contains Amazon affiliate links
Regular readers will know just how much we love Hama beads, both the more popular midi Hama beads which are great for all ages, and the mini Hama beads which are perfect for older children and adult crafters and can be used to create some really intricate designs.
Whether you start out your Hama beading with a kit or a large tub of mixed beads, if you get into the hobby you'll soon find that you amass quite a collection of different colours, and you'll want to find a way to organise them that makes it easy to work on your projects.
Why sort Hama beads by colour?
My preferred organising method for Hama beads is definitely to sort and store them by colour. You can find official Hama bead colour charts here and you can also end up with many other different colours and styles of beads if you purchase beads from different brands such as Perler beads.
Sorting by colour has lots of benefits. You can work more quickly when you don't need to sort through the beads as you go. You can also easily see how many of each colour you have left before you begin a project, so you can work out whether you need to restock and avoid the risk of running out.
Sorting Hama beads by colour - some tips
It's best to colour sort your Hama beads in natural daylight, especially if you have similar colours to sort. I like to spread the beads out in a large tray and sort one colour at a time, starting with the darker and more distinctive colours. I use temporary storage containers while I'm sorting, like plastic bowls or cups, so I can see how many of each colour I have. I also find that my children love helping me to sort, at least for a little while!
I discovered this blog post with a tutorial for making a brilliant Hama bead gadget sorter using a straw, which looks like it would save a lot of time and effort and I'll definitely be trying next time I have a Hama bead sorting session!
Storing midi Hama beads
I like to store these medium sized Hama beads in compartmentalised storage boxes like these (affiliate link). It's best to look for ones with adjustable dividers that you can change to fit the number of beads that you have, as this may change depending on what you are working on. Stackable ones are great too so that you can keep them neatly on a shelf, and if you buy popular branded ones you have a good chance of finding matching ones in the future as your collection increases.
If you have a lot of beads and want something that is nicer to look at when on a shelf, you could opt for a drawer organiser (affiliate link), or for something even prettier you could arrange your coloured Hama beads in a series of small glass jars (affiliate link).
Storing mini Hama beads
I've found it even more important to sort the tiny mini Hama beads by colour, as they are fiddly enough to work with even without having to pick out different colours as you go along. I've also found that it's more difficult to differentiate between the different colours, so it's a job best done in advance in good light.
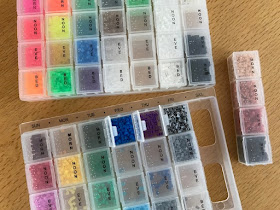
I store my mini Hama beads in these Weekly Pill Boxes (affiliate link). They each fit many of the tiny beads, and a strip of four can be removed from the larger frame to make it easy to work from them.
Storing the Hama bead boards
I have found the Hama bead peg boards quite challenging to store, because they are a variety of different shapes and sizes and because of the pegs they don't stack easily. I use a high sided plastic container and store them upright so that you can flip through them to find the one that you want. The empty large Hama bead tubs (affiliate link) boxes work well, as they are very sturdy. It's also a good idea to use this box to store your spare sheets of ironing paper and any design leaflets and books that you may have collected.
Hama bead crafting inspiration
If you enjoy crafting with Hama beads you can find all other my Hama bead posts here - Hama bead crafts - and I've also shared some helpful tips for ironing Hama beads.
I've also shared projects to cover an entire year of Hama bead crafting inspiration which contains designs to suit both children and adults.
Happy Hama beading!