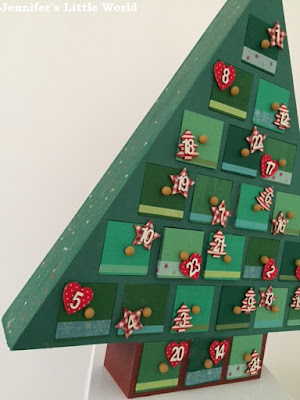
Of course, I jumped at the challenge, and so here is my finished decorated wooden Advent calendar.
Hobbycraft sell several different designs of wooden Advent calendar to decorate along with the accessories to personalise them. You can see the full Hobbycraft Advent calendar range here. My calendar is the Christmas Wooden Advent Calendar Tree which retailed this year for £15. It's a large and stable design with nice large drawers, and comes ready to paint or otherwise decorate.
Here's how I decorated my Advent calendar:
Materials:
Plain wooden Advent Calendar
Acrylic paint in a variety of colours (I used green, white, gold, brown and blue)
Number stickers
Other decorations of your choice - green washi tape, stickers, glitter, glitter paint and so on
Instructions:
I painted the 24 boxes in five different shades of green which I mixed up myself. I was especially pleased with the different colours that were made when I added the gold acrylic paint. The paint covered really easily and dried to a smooth finish. I painted the outside of the trunk area brown, and I only painted the fronts of the individual boxes. The drawer knobs were painted in gold acrylic.
I covered the green painted sides of the tree in the Hobbycraft Confetti Glitter Glue which I loved, it's a much easier way to decorate with glitter and sequins than by sprinkling them onto wet glue separately and it looks really sparkly and festive!
When the individual boxes were dry I dug out the greenest washi tapes that I could find, as well as a couple of tapes with a Christmas design. I had six different rolls, originally I was going to make four boxes using each but some of the colours ended up too similar so I changed it up a bit, trying to spread out the different tape designs and widths evenly across the boxes.
I came up with a rough idea of how I wanted to position the drawers back into the tree, but when I started fitting them back in I found that they didn't all fit as smoothly as I would have liked. With hindsight I should have taken more care when removing the drawers to make sure that the same boxes went back into the same holes. I was able to sort it out by rearranging them a little and sanding down the sides of some of the stubborn ones, but that is something to remember for next time!
I tried to spread out the different colours of paint, washi tape designs and sticker shapes evenly. The number stickers come with a little foam sticker on the back which helps them to stand out a bit, and I used glue too so that they were attached securely. The wooden numbers are slightly too large to fit on the box with the knob in the middle so they need to overhang very slightly but this isn't a problem as there is a gap between the slots in the tree.
I'm so pleased with my finished Advent calendar! The paint covered really well, it looks nice and smooth, and I love all my different washi tapes. It was really quick to complete as well, in total it probably only took a few hours to do although spread over several days.
Now the next thing is to fill it! Fortunately I have lots of ideas, in fact I have an old but very popular blog post packed with ideas for ways to fill a wooden Advent Calendar. This year I think I'll be going with simple chocolates but maybe I'll pop a few little surprises in there too!
If you want to see more of my Advent Calendar, I filmed a quick chat about it as part of Vlogmas 2016:
I received a selection of items from Hobbycraft for this post - the items that you see in the photograph. I purchased the other materials myself as well as using things from my crafty stash.


That looks amazing! We have done one too (the Santa truck) but the children pretty much did ours so it doesn't look anywhere as professional as yours. It is a lovely idea though
ReplyDeleteI think that yours is lovely! I didn't think about getting the children to help with it, perhaps we'll do a family one next year!
DeleteThis looks brilliant-you could sell these! x
ReplyDeleteAw thank you :)
DeleteThis is fab - I've been looking for something just like it and hadn't even thought of Hobbycraft x
ReplyDeleteThank you!,The Hobbycraft ones are lovely and really nice to decorate
DeleteThis looks great' what brand of acrylic paint did you use? As I'm not sure what will work
ReplyDeleteI actually used a variety of brands of acrylic paints, some were new ones that I bought in Hobbycraft and some were old ones that I've had since school! They all worked fine and I only needed to do one coat.
DeleteI am currently decorating a house version of this and want to know if I should use a sealant (like mod lodge or watered down glue)? If so do I use it between the paint and decorations or over the top of everything? quite new to craft so would love some advice, many thanks
ReplyDeleteSorry for the delay I have just seen this. I didn't use any kind of sealant on the house and it has stood up fine, it might give a nicer finish to use some kind of varnish, mine has a matt finish. I hope that helps!
Delete