Thursday 29 May 2014

Our evolving Lego storage system

I've been battling with how to store our Lego for a long time. I've even blogged about it before, when I thought that I'd come up with our ultimate Lego storage solution! Since I wrote that post, quite a lot more Lego has come into the house. We have sets, mainly from the Lego City range, and a large box of bricks and other useful Lego pieces.

I came very close to buying one large box and throwing it all in together, after I saw this solution at a friend's house and noticed how creatively Harry played with all the pieces. So when we bought them a new large box of Lego I began mixing it all together, only to find that Harry was becoming frustrated because he wanted to follow the instructions to build things and couldn't find the pieces that he needed. I realised that the way he currently plays with Lego means that he needs to be able to locate the bits that he needs, as well as using the extra pieces to build his own designs from scratch.

So we've decided to keep all his actual sets separate. They are stored in individual boxes safely on his bookshelf along with the instructions, so that when he wants to build a particular model he knows that he has everything he needs. He can get out a large tray and lay out all the pieces, then easily build the set. I found a photograph on-line of each, and then made a laminated label for the front of each box.

Then we have a large box for plain flat and brick pieces, then a second large box for slanted pieces and 'interesting' pieces. I've also separated out a box of the things that are used to make vehicles, like wheels and windscreens, as we have a lot of those. I'm probably also going to attempt some further sorting of pieces, especially for the really tiny bits that are easy to lose.

How I store our Lego in sets

How do you store your Lego? I'm always looking for new ideas!

Monday 26 May 2014

I don't have a book in me

It's often said that everyone has a novel inside them.

At Blogfest back in November last year, I attended a fantastic session called "Cracking yarns and tall tales: how to tell a better story". Among others, on the panel was Lionel Schriver, one of my favourite authors. I looked at them all in awe and wondered what it's like to be able to call yourself a writer. The most important thing that I learned from the session was that in order to be a writer, you need to write, constantly. Most of what you write will never be read, but you need to keep writing in order to be able to produce the content that will be.

For the last few years, November has come along and I've followed the progress of people that I know taking part in Nanowrimo - National Novel Writing Month, where participants sign up with the aim of completing a novel in a month. I've seen people that I know publish books, for example my brother and his novel Enlightenment. I wonder if I could challenge myself to have a go one day.

I haven't tried it, because I tell myself that I don't have the time to spend hours writing every day. But the truth is that I spend plenty of time working on this blog, not to mention time spent faffing about on social media, and if I made the effort I probably could find the time to write the 50,000 words required.

But I just don't think that I do have a novel in me. I have no idea whatsoever what I would write about. I'm also very self-conscious about what I write. I can write detailed blog posts full of information on places that we've visited, or instructions on how to do a simple craft, but I'm stuck when it comes to fiction. I used to love creative writing at school, and I don't think I was too bad at it, but I'm not sure I could keep the momentum going for an entire novel.

Do you think you have a novel inside you?

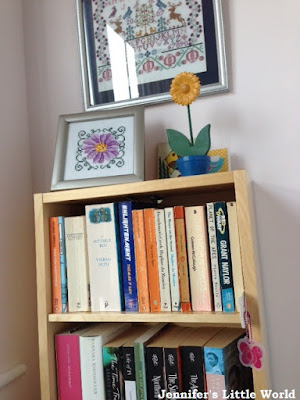
My book corner

Saturday 24 May 2014

Collage England flag craft

With the football World Cup approaching, here in England our flag is already very visible out and about. We're very lucky really to have such a simple flag for our country that is easy to recognise and to replicate! So we made a simple collage England flag collage to hang up in the house.

Collage England flag craft for children

The flag of England is the St. George's cross - a red cross on a white background. The England flag forms a part of the Union Flag, or the Union Jack. You can read all about the history of the flag here - Flag of England.

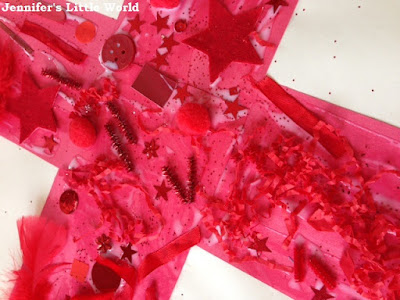
Our collage England flag is a simple colour matching and sticking activity. First I went through my collection of craft and collage materials and picked out anything red that I could find. I gathered red pom poms, feathers, lollipop sticks, pipe cleaners, scraps of paper, ribbon, stickers, foam shapes, shredded paper, sequins and lots more, and put them all together in a bowl.

Collage England flag craft for children

I prepared the base flag beforehand, using a large sheet of white paper and forming the cross by gluing down strips of red paper. I wanted to have the red cross marked out so that it would be obvious where to place the collage materials, and also to make a nice background. Originally I was going to paint the cross, but I could imagine the paint mixing with the glue and smearing all over the white, so I wanted to keep it a nice crisp edge. It was a very quick craft to set up.

Collage England flag craft for children

Then I let the children loose with PVA glue and the red bits and pieces. This was a really great craft for all of us to do together. Harry put a bit more thought into the placement of his objects. Mia just stuck them down, but she's now old enough to understand that she was only sticking them on the red parts of the flag. The size of the flag was large enough for them to both work on it together without getting in each other's way. I took responsibility for a generous sprinkling of red glitter at the end!

Collage England flag craft for children

Now it's all dry it's ready to be hung up somewhere on the wall, probably next to our World Cup poster!

Collage England flag craft for children

We are planning lots of other crafting ready for the World Cup. You might also like my World Cup hama bead designs which you can find over at Red Ted Art.

Wednesday 21 May 2014

Decorating my wooden Ikea magazine files

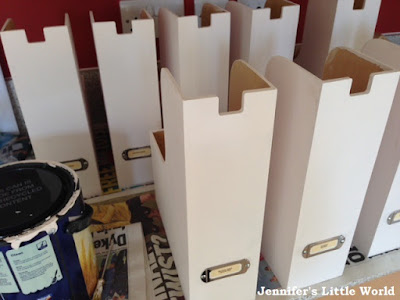
I recently posted a craft of which I was very proud - my Ikea wooden drawers - which I upcycled by painting and covering with patterned paper. It fitted in with decorating our downstairs study which is now pale pink and houses a computer and desk instead of Playmobil. At the same time as I bought the drawers, years ago when we bought our first flat, I also bought some wooden file boxes. They are quite similar to the Knuff magazine files which are now available, but mine have silver label holders instead of a hole in the back.

Ikea wooden magazine files crafty upcycle

I originally purchased these magazine files with the intention of painting or decorating them in some way, but I never got around to it and they have sat their in the plain unfinished state for years. After the success of the wooden drawers I decided it was time to freshen them up a bit. I was a bit daunted by having the empty them out - they are mainly used to store things that I want to keep like old school reports, programmes from festivals that I attended, old leaflets and ephemera that I like to hold on to. But it was also a chance to have a trip down memory lane and a bit of a sort out while I was there!

I gave each file two coats of paint, using the same matt emulsion that we used on the study walls - Dulux Blossom White - which is more pink than white. Two coats were definitely needed, and I painted all down the sides even though only the back will actually be visible.

Ikea wooden magazine files crafty upcycle

The old labels had become rather faded, so I replaced them with some new ones, handwritten onto white card. Then I finished each one off with a strip of washi tape along the bottom. I have some lovely washi tape with musical notes on which I used for the folders of sheet music and musical theatre related ephemera, then I used some co-ordinating tape for the other files.

Ikea wooden magazine files crafty upcycle

The washi tape is so easy to reposition if you get it wrong, and if I want to update the magazine files in the future it will be easy to remove it and repaint. I love how they now all match, and they now fit in really well with our new, lighter study.

Ikea wooden magazine files crafty upcycle

Tuesday 20 May 2014

Sponsored post - Summer Events in Cardiff 2014

Home to literally hundreds of events throughout the year, and an impressive venue in the form of the massive Millennium Stadium, Cardiff is a great place to enjoy a break if you're looking to take in an event this summer. From sporting events to concerts, Cardiff really does have it all. But what can you see this summer? Here are a few suggestions:

FIM Speedway Grand Prix

This Grand Prix is the biggest motorsport event of the year to be seen in Cardiff and attracts over 40,000 fans to the Millennium Stadium each year. On the 12th of July, the stadium will come alive with the sound of engines revving and the smell of motor oil as the best speedway riders in the world compete to win this championship event. Speedway is a real heart in the mouth kind of motorsport and well worth a watch if you aren't familiar with the sport. The competitors race on powerful bikes that have no gears or brakes, at over 120kph, so there are always plenty of moments that have you gasping out loud and ultimately admiring the skill of these talented bikers.

Cardiff International Food and Drink Festival

Taking place between the 11th and 13th of July, the Cardiff International Food and Drink Festival is a great place for foodies to visit. Featuring the finest food, drink and crafts from Wales and around the world, this yearly festival is always a great hit with locals and visitors alike. Why not take a wander between the stalls, buy something delicious to eat and enjoy it while listening to the entertainment. You'll find speciality cheeses, artisan breads, amazing liquors and wines, delicious patisserie and so much more to tempt your taste buds that you'll probably venture back every day just to try something different for lunch.

Cardiff Harbour Festival

Held on the August Bank Holiday, this Cardiff favourite returns again and this year it brings the UK leg of the Extreme Sailing Series with it. You'll get to watch 40 foot catamarans racing each other around the bay at tremendous speeds, enjoy the British Fishcraft Championships and visit the continental market. There's music at the bandstand and the beach will be transformed into a traditional seaside style beach, with donkey rides, candy floss and lots of stalls and entertainment to enjoy. It’s a great weekend away for all the family.

Music

Look no further than Cardiff for a huge list of performances from some of the world's best loves singers and bands. This year Cardiff plays host to Kylie, Little Mix, the Pet Shop Boys, Dolly Parton, Paul Weller, Chris Rea and The Vamps. With so many musical genres represented, you will find it easy to find the perfect concert to see while staying in this vibrant city.

Cardiff is historic, modern, beautiful, interesting and home to a wealth of entertainment events and facilities, so why not take a look at what it offers you and book that well deserved break to Cardiff today (you'll find some great deals on a Travelodge in Cardiff online).

This is a sponsored post.

Monday 19 May 2014

Review - 3D Taj Mahal puzzle from Ravensburger

I do love doing jigsaws, but because the amount of time that I have to do them is quite limited, I also like trying out something different. I remember my brother enjoying 3D jigsaw puzzles when we were younger, and so when I was offered the chance to try the 3D Taj Mahal puzzle from Ravensburger I thought it would be a fun challenge, and also something that I could involve Harry in.

The Taj Mahal puzzle has 216 pieces and has a RRP of £35.39. When I opened the box I was quite surprised, as there didn't seem to be that many traditional jigsaw pieces inside! Quite a lot of the structure is formed from shaped plastic pieces that slot together, with only the central building and dome being formed from actual puzzle pieces. There is an instruction booklet that takes you through all the steps, and the parts are packaged individually so simple to identify.

3D Taj Mahal puzzle from Ravensburger

I was a bit daunted at first, but quickly worked out what to do. The instructions were easy to follow, and because the design is symmetrical it doesn't matter which way some of the pieces go in.

3D Taj Mahal puzzle from Ravensburger

The puzzle pieces themselves are made of strong plastic and they click together nicely. Some of the pieces are hinged, so you need to fold them to bend around the corners. Each piece is numbered on the back, and then arrows show you the order that you need to put the pieces together in. This makes it very easy to assemble. To be honest, this puzzle was more like putting together a model kit than doing a jigsaw. I think it would be possible to complete the puzzle without looking at the numbers, although I did find that sometimes the wrong pieces fitted together so you'd need to be careful.

3D Taj Mahal puzzle from Ravensburger

I sorted out the pieces into the correct numerical order, and then Harry (5) pieced them together. He absolutely loved this, his number recognition is good enough to be able to follow through the numbers, and he was so pleased that he was able to complete it all by himself. It was a fantastic project for us to work on together.

3D Taj Mahal puzzle from Ravensburger

When assembled the finished model is lovely to look at, and a nice way to appreciate the symmetry and design of the Taj Mahal. It came apart easily too, and the box is only the same size as a normal jigsaw puzzle box so it doesn't take up too much storage space.

Although the puzzle is aimed at builders aged 12 and older, I think that a younger child could easily manage the puzzle with a bit of adult help. Some of the parts are a bit fiddly to slot into place, particularly the hinged pieces, but the actual putting together of the jigsaw pieces is quite straightforward. I do think that an adult puzzler would probably find the puzzle very easy and quick to complete, unless of course they attempted it without using the numbers and the instructions!

Harry certainly has the bug now, and I can see that we'll be trying out a few more 3D jigsaw puzzles together.

We received this puzzle for the purpose of this review.

Thursday 15 May 2014

Harry's new Space themed bedroom

Over the Easter weekend we had both sets of Grandparents visiting at separate times, so we decided it was the ideal opportunity to decorate Harry's bedroom! We've been living in our house for over two years now, and Harry has waited very patiently with a wonky curtain rail and cluttered, marked walls, so it was definitely time for an update.

This is how his room looked before:

Making a space themed bedroom for a child

Making a space themed bedroom for a child

The walls had quite a lot of things stuck on them with blu-tak which had marked the walls quite badly. His bookshelf was originally an Ikea DVD rack, and only holds smaller books, which wasn't really suitable. The old curtains were left behind in a different room by the previous owner, and they didn't really fit the window. It was just generally looking a bit tired and cluttered.

We wanted to do a themed room, and it was a trip to our new Dunelm down the road that helped us decided on the Space theme when we saw their Space Mission themed bedroom items. I'm not normally one for everything matching, but Ram was very taken with it all and so we ended up buying many of the items in the range - curtains, duvet covers, lampshade, picture frame, hooks, small canvases and we'll be buying the rug when it's back in stock. Fortunately most of it was 20% off when we bought it, although the offer has ended now. He already had a few Space themed things in his room anyway, and it's something that really does interest him, so he was very excited about the theme.

So here it is, his new space themed room!

Making a space themed bedroom for a child

Making a space themed bedroom for a child

We painted three of the walls in light blue (Dulux Mineral Mist) and we made the fourth wall a feature wall in dark blue (Dulux Sapphire Salute). The ceiling and paintwork are white. We bought some Solar System wall decals stickers to replace the old Solar System poster that we made. There were lots of sets to choose from, but I liked these because they were more realistic and the planets are named. This set still contains Pluto too, I just can't bear to leave it out even though I know it's not a planet anyore!

Making a space themed bedroom for a child

My Mum bought him the rocket poster above his bed when we visited the Kennedy Space Center in Florida. It was already stuck on the wall, but we bought a nice large frame for it in Ikea so that it could be displayed properly.

My favourite part of the room is his new Ikea Billy bookcase. It seems a large bookcase for a little boy, but he's going to be in this room for a few years yet and I love how versatile the system is. He can use it for books and toys now, and then as he grows up it will work for school books (if they haven't all gone electronic by then!) or for displaying any collections that he might have. My favourite storage element is for his Lego sets - we bought some nice plastic boxes and I laminated little labels with a picture of the finished model. We're also using the shelves to store some of the construction sets, jigsaws and games that are just his and that he tends to play with by himself. It is also large enough to store all his picture and non-fiction books which had been kept in various different places all over the house, it's nice to have them all together in one place.

Making a space themed bedroom for a child

Because his room has so much storage it's easy to keep it tidy and also means that we can store some of the other toys here that were taking up lots of space downstairs. We've had a clear out too, and also moved some of his things into Mia's room now that he has outgrown them. I'm really pleased with his lovely new room!

Wednesday 14 May 2014

Review - Bergere de France yarn

I was recently contacted by Bergere de France and asked if I'd like to review some of their new yarn, available now in popular shades for the Spring/Summer season. I'm not an experienced knitter at all, but I thought that I could probably manage something with a bit of help from my Mum, so we decided that we would knit me a summer sweater using the new Estivale yarn.

Estivale yarn is a blend of hemp fibres which is blended with sparkly sequins and available in bright summer colours. The yarn that I chose was Estivle abyss, a lovely bright blue. It costs £4.95 for a 50g skein and is 21% hemp, 29% polyester and 50% acrylic. It is labelled as machine washable (but I don't trust myself when it comes to putting knitted garments in the washing machine, so I'll probably hand wash it!)

Review - Bergere de France yarn

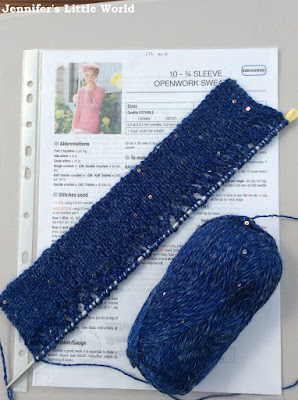
The pattern that we chose was the 3/4 Sleeve Openwork Sweater from the Mag. 172 Spring/Summer Collection. We knitted it in the medium size and it just went into seven balls of yarn. It was quite a difficult pattern for me to follow and I must admit that I needed a lot of help from my Mum. She's a very experienced knitter and even she didn't find it that easy! She also modified the design a little to make the length slightly shorter and to add some shaping.

Review - Bergere de France yarn

The yarn itself is soft and slightly silky, with a bit of a string feel due to the hemp content. The sequins in the yarn add an unusual, quirky touch. It was enjoyable to knit with, and the texture works really well with this open work pattern, meaning that the detail shows up with some nice, crisp definition.

Review - Bergere de France yarn

I was very pleasantly surprised with how pretty the yarn looked when it was knitted up. You can see the detail in the picture below, and see just how clear the patterning is. You can also see that the sequins are dispersed liberally throughout. The beautiful cobalt blue colour is very bright, it's difficult to do it justice in the photographs.

Review - Bergere de France yarn

This is probably a yarn that needs something worn underneath it to feel comfortable against the skin, but with a pattern like this I'll have a vest top underneath anyway, so it's not a problem! The sequins add a real sparkle to the sweater.

Review - Bergere de France yarn

I very much enjoyed the opportunity to try out a yarn that I wouldn't have otherwise chosen, and I'm really pleased with the finished sweater, even if I can't honestly say that it was all my own work!

I received the Bergere de France yarn to knit this sweater in exchange for a review, as well as some extra for a future project!

Monday 12 May 2014

When are children old enough for Hama beads?

Mia has been playing with Hama beads since she was about two and a half. Although you can buy a range of Hama beads called Maxi beads which are aimed at older toddlers, we've only ever had the Midi beads which are the more common size of Hama bead. They are pretty fiddly at first, but even toddler Mia has been able to manipulate them onto the pegboards without too much trouble.

Toddler playing with Hama beads

She started out by just placing a few beads onto each board, then she progressed to filling up an entire small pegboard with a random selection of coloured beads. Just this week, as she approaches three, she has learned about creating patterns by alternating lines of different colours. Harry was following simple designs as soon as he started with them at the age of four, so I'm interested to see when she picks that up too.

Playing with the Hama beads has been a fantastic activity for Mia, and she really loves them. It's been great for her fine motor skills. She does get cross when they don't go where she wants them to or if she tips the board and dislodges them, but her concentration has improved. We've also used them as an opportunity to talk about the different colours, to count them, and to start introducing ideas like patterning of the colours, and encouraging her to make decisions about which colours to choose.

I think that as long as a toddler is old enough to understand not to put the beads in their mouth (or indeed any other unsuitable place) then they are old enough to be introduced to Hama beads. I'd recommend starting with the smaller sized pegboards, so that they are able to complete something fairly quickly, and don't feel that every creation needs to be ironed otherwise you'll quickly run out of beads! When you do iron the beads, make sure that you iron well on both sides so that they stay sturdy and don't fall apart.

Simple Hama bead coaster craft

A circular board is a good one to start with, then you can turn the finished works of art into coasters. It's also a nice shape that you can use to make a simple striping pattern, or use half of the board to make a rainbow. I also have lots of ideas for displaying finished Hama bead creations. I'm not quite sure that I'm ready to let Mia near my lovely boxes of sorted beads yet though!

If you have a little one that you'd like to introduce to Hama beads you might like to see my Pinterest board where I collect together all sorts of Hama bead inspiration for little ones.

Follow Jennifer Jain's board Hama bead ideas for young children on Pinterest.

Saturday 10 May 2014

A Disney Frozen themed day

Today I'm delighted to welcome my sister Anna to the blog. She has a fantastic post to share all about their Disney Frozen themed day.

Since we got Frozen on Blu-ray, the girls have needed to watch it approximately 289379843 times. So when I wanted to make a themed day of activities for them to finish up the school holidays, it was an obvious choice. A bit of thought, and some time on Pinterest with words like 'ice' and 'snowman' and 'reindeer', and here's what I came up with.

Holding a Disney Frozen themed day

Ice Cube Painting

This is the activity that needed the most preparation. I mixed up some water and food colouring, and froze it overnight in a bun tray (an ice cube tray would have worked better but I don't have one). Then I gave the girls some paper and let them have it.

Holding a Disney Frozen themed day

There was a small amount of complaining that the ice was cold, but that didn’t last long. The pictures were lovely and watercolour-y, and they both enjoyed mixing the colours. The black, green and blue stained everyone’s hands something awful so maybe we should have done this last but no matter. After a while little fingers got too cold so I put the tray back in the freezer for another day, we scrubbed our hands and moved on.

Playdough Snowmen

I made the playdough the night before, using this great recipe - no cook playdough recipe. I didn’t add any colour so it just looks like dough – I’m not sure how you’d make it properly white, maybe using a different kind of flour? No one cared, anyway. I also supplied some buttons from my button tin, some cocktail sticks for arms, and some rolled up bits of orange paper for carrot noses.

Holding a Disney Frozen themed day

This activity was a big hit, and the bowl of buttons/sticks/noses has become a permanent playdough accessory (Emily is always asking to ‘make Olafs’). They made a whole line of snowmen, and we had to find a picture of Olaf on my iPad so that Laura could make hers as close as possible.

Holding a Disney Frozen themed day

Colouring Pages

Next up was the easiest one, Frozen colouring pages and print-outs. These can be found all over the web – it seems Disney was quite liberal with them.

Holding a Disney Frozen themed day

After this it was time for lunch. I’m afraid to say I didn’t get creative with that; there are some lovely snowman-shaped sandwiches on Pinterest but to be honest I couldn’t be bothered, and carrot sticks would be a good snack choice but no one but me would eat them. So we just had our normal lunch, I’m afraid.

Reindeer Antlers

This was also very popular. I cut up a cereal box, first of all cutting some long narrow pieces to make two headbands. Then I drew round the girls hands on the flat side of the box, and let them colour them in with lots of different shades of brown.

Holding a Disney Frozen themed day

Cut out the hands, tape them onto the headbands, and there you go. Two little reindeer.

Holding a Disney Frozen themed day

Popcorn Snowballs

The last item on my list was of course a viewing of the film, so a popcorn snack to eat while watching it seemed like the thing to do. We made popcorn snowballs from approximately this recipe - Popcorn snowballs.

Since it’s an American recipe using packet sizes I had to guess at quantities. I used a whole bag of marshmallows and about two tablespoons of butter, melted it all together, and mixed in a bowlful of popcorn. Then we attempted to roll it into balls and roll it in icing sugar.

Holding a Disney Frozen themed day

But oh goodness me it was sticky. So, so sticky. You had to really squash it together to make it into balls, then it stuck to everything and the icing sugar didn’t take much of the stick off. Everyone got very frustrated and I ended up doing most of it. I don’t know if I got the quantities wrong or if it would always be like that. It did set harder after a while but they were still pretty sticky when we were eating them (fortunately, it’s the kind of sticky that washes right off with water).

So then it was time to put the film on, while I tidied everything up.

So we all had a good Frozen day. Doing the themed day was a certain amount of work, but thinking of the ideas was also fun, and it kept everyone happily occupied nearly all day. I will definitely do another, with a different theme, next time we have a spare day like that.

Anna is a mum and knitting pattern designer and lives in Bedfordshire, UK. She is married with two daughters, Laura (5) and Emily (3). You can find Anna on Twitter @beepbeepdesigns

If you feel inspired, here you can find the posts about our other themed days:

Space Day
Antarctic Day
Under the Sea Day
Dinosaur Day
Transport Day
Australia Day
Roman Day
Beach Day

And some tips on how to hold a themed day at home for children.

Wednesday 7 May 2014

Crafting with children to celebrate a football tournament

Not long to go now until the football World Cup 2014! The first game is on Thursday, 12th June 2014, and everyone in this family is very excited. This year is the first year that Harry can really show an appreciation for football, so my husband is very keen for me to come up with some crafts and activities to help develop that interest.

Crafting with children to celebrate a football tournament

To kick us off (pun fully intended!) we made a World Cup 2014 poster together. I found a large piece of paper and printed off several resources that I found on-line. I included a blank world map, a list of the fixtures, and a list of the 32 teams by group. I cut out the name of each country and then helped Harry to draw a line from the name to that country on the map. Then Harry coloured in the map and stuck some pictures and stickers all around.

World Cup poster craft for children

The pictures that Harry cut out to decorate the poster all come from a spare Panini World Cup 2014 sticker album. They have been giving these out for free in many supermarkets across the UK so it's worth trying to get hold of one if you want to do some football related crafting. You can usually find them in a special cardboard display along with the other magazines and we've seen plenty around. You can also find lots of similar images on-line that you can print out.

Of course Panini are  making their money from the stickers not the albums (even if you had no duplicate stickers it would cost £64 to complete an album!). But my son has been having a lot of fun with the Panini Online Sticker Album and I'd definitely recommend giving it a go if you have football mad children. I'm not exactly sure of the details as it's been my husband that's been helping him with it, but do I know that you can earn plenty of virtual stickers and swap them with other players across the world. He's managed to almost complete his album in a fairly short time and has really enjoyed it.

If you are looking for more football related craft, you might like to make a collage England flag to support the team, or have a go at making flags from some of the other countries taking part

Wembley Stadium Photo by Mitch Rosen via Unsplash

Monday 5 May 2014

Bank Holiday shopping as a #MorrisonsMum

Although we have a new Morrisons close to us in Littlehampton, we don't tend to shop there regularly. Ram is very good at comparing prices between the supermarkets, and he has always found Morrisons to be on the more expensive side. This week however, Morrisons have cut the prices on over a thousand of their products - not as promotional prices but as new everyday prices. We were given some Morrisons vouchers so that we could see how the prices compare on some of the things that we usually buy.

It was easy to spot the products that had been reduced in price, as they were very clearly marked in the aisles with bright yellow stickers. Not all of the shelves were as packed with labels as the one below, but there were plenty throughout the store.

Review - Saving money by shopping at Morrisons

Morrisons really stands out from the other supermarkets in the presentation of fruit and vegetables. I'm sure that I won't be the only blogger posting a photograph of the salad misters, seen here keeping the fresh herbs moist. I also liked that a lot of the produce was displayed in wicker baskets, really attractive to browse through.

Review - Saving money by shopping at Morrisons

With it being the Bank Holiday weekend, we went shopping for the food that we'd need for a family barbecue in the sunshine.

Review - Saving money by shopping at Morrisons

We bought:

Charcoal briquettes - £5
Pack of four veggie burgers - £1.50
Pack of six Linda McCartney veggie sausages - £2
Six white rolls - £1
Sweetcorn cobs - £2
Cucumber - 49p
Pack of tomatoes - 52p
Cheese slices - £1.75
Potato salad - 65p
Heinz Ketchup - £1.99
2 litre bottle of diet Coke - £1.85 (two for £2.50)
1 litre bottle of Robinsons squash - £1.49
Cadbury Mini Egg cakes (reduced after Easter!) - £1.19

Total - £21.43

This is our usual barbecue meal. Being a vegetarian meal I'm guessing that it probably comes to less than a proper meaty barbecue would be, but it satisfies us. I reckon that each full meal (a veggie burger, a veggie sausage, two bread rolls, two cheese slices, a dollop of ketchup, a little bit of cucumber and tomato, half a tub of potato salad and a drink) came to a little over £2 per head not including the charcoal, not bad!

Ram is quite particular about his veggie burgers. Fortunately the Morrisons own brand burgers that we'd not tried before were delicious! Our usual branded veggie sausages were cheaper, and I was very impressed with the taste of the Morrisons brand potato salad, which was nice and creamy. The fresh produce that we bought was in great condition too.

It was a lovely sunny day, and although it wasn't quite warm enough to sit outside while we enjoyed our food, we did have a lovely walk along the seafront afterwards!

Review - Saving money by shopping at Morrisons

As a sweet treat, I've also been trying out a few new baking recipes this weekend, and so in the afternoon I made some delicious chocolate orange biscuits. The ingredients that I needed to buy were:

Unsalted butter - £1.70 (two for £3)
Caster sugar - 99p
6 free range eggs - £1.75
Plain flour - 40p
Icing sugar - 99p
Orange juice - £1
Plain chocolate - £1.02

Total - £7.85 (of course as I only used a fraction of some of these products this isn't a cost per batch, and I've got plenty of ingredients left over for next time!)

Chocolate orange biscuits

We also shopped for our weekly staples. I was pleased to find that our usual branded sliced bread was the same price that we are used to paying, as were many of our other regular items.

We definitely noticed a difference on this visit to Morrisons with the new prices. Although the prices weren't necessarily cheaper than the supermarket where we do our regular weekly shop, they were more likely to be the same price, and several things that we bought were on special offer. It's very good to know that the prices are now more in line with those seen elsewhere.

You can read about the experiences that others have had while shopping at Morrisons this Bank Holiday weekend by following the #MorrisonsMum hastag on Twitter or Instagram, or pop over and read the posts at the #MorrisonsMum linky over at Britmums.

I received £80 of Morrisons vouchers in exchange for sharing my experiences and opinions in this post

Saturday 3 May 2014

After school busy boxes

For a long time I've struggled with making dinner in the evenings. We all eat together at around 6pm when my husband arrives home from work, and so from around 5.15pm I need to be making lunchboxes and dinner. Both children are tired, getting hungry, and generally one of them is screaming. I find it all very stressful, and although things have improved over the last few months it's still a struggle. Harry would probably quite happily sit down and do something quietly, but Mia won't sit still and she's always interrupting what he's doing.

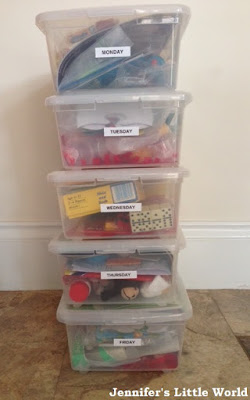
After school busy boxes for children

So I've put together five boxes, one for each week day evening, packed with things that will hopefully keep them entertained while I'm busy. Each plastic box is about the size of a shoebox, and they are all filled with things that we had around the house anyway, I didn't buy anything new. I collect activity books from restaurants and I put aside small things that they receive in party bags. Several of the boxes have a small Lego kit in which Harry has been given at some point.

After school busy boxes for children

I do still need to be involved with helping them, for example filling up Aquadoodle pens or blowing up balloons, but there is usually something new to them in there that keeps them occupied, at least for a few minutes. I set a few rules - the boxes are to be played with on the kitchen table only, everything goes back in the box at dinnertime, no fighting over the contents and not too much input from me. I also only get one out if they are not occupied with anything else.

After school busy boxes for children

Here are some of the things that I've put in the boxes:

Aquadoodle mats and pens
Colouring books and small packs of crayons
Balloons
Bubbles
Mini highlighters
Small jigsaws
Golf tees
Mini activity books
Plasticine
PlayDoh
Letter and number flashcards
Stickers and coloured paper to stick on
Small Lego kits
Card games
Simple craft kits
Small bottles and dried pasta
Finger puppets
Beads and string

I have also kept a few things in reserve to add into the boxes to keep it fresh, and I'll probably also put some seasonal things in there too. It has worked really well, there is great excitement when I produce a box with some forgotten toys in, and it's a great way to rotate some of those smaller toys and activities.