Thursday 29 December 2016

Sky Blanket - What I would do differently next time

You can see my completed Sky Blanket here - My crochet Sky Blanket

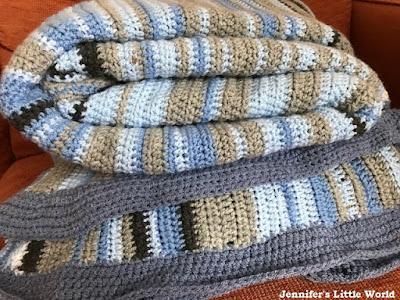
As the end of the year approaches, my Sky Blanket project draws to a close. Although I'll finish my daily rows at the end of December, I'm planning a big border so I've a way to go yet before I share a picture of the finished blanket. I love my blanket, but working on this project over the last year has given me a few ideas about what I would do differently next time, and so I thought I'd share them.

Completing a Sky Blanket - what I would do differently next time

Firstly, I would use a wider range of colours. I was adamant that I wanted to stick to the basic sky colours of blues and greys, but with hindsight I could have made a much more colourful blanket if I'd chosen some pinks and oranges for the sunsets, or a rainbow yarn. Having said that I do quite like the simple palette of my blanket so perhaps too many colours would have been a bit much.

Next time I'd definitely use a wider variety of greys though, and I'd also look for some sparkly grey yarn to make all those grey rainy days a bit more interesting!

I could have also varied my stitches a bit. I did this to a certain extent, and I do like the uniform quality of my blanket, but I've seen some fantastic examples of blankets that are almost like samplers with all sorts of different stitches.

Next time I wouldn't get too hung up on which exact colour to use. In a country like the UK with such a variety of weather, to be honest on most days I could have chosen any colour to represent the sky. As I went through the project I tended to lean towards a colour which represented the colour of the sky for most of the day, rather than looking at the sky at a strict time that day. If I'd spent a reasonable amount of the day outside, for example if we'd had a day out or I'd been for a run, then I chose a colour that represented the sky at that time.

It was a very rare day when the sky stayed the same colour for the majority of the day. I've seen some blankets where the knitter or crocheter has used a couple of different yarn colours for each row or square, and I think that works really well, I was just worried about how much yarn the blanket would end up using!

My blanket did end up very long and skinny. This meant that it was very easy to keep on top of, as each row only took me about 10-15 minutes to crochet. Perhaps next time I'd add in a few extra stitches. My blanket had a starting chain of 200, perhaps I'd up that to 250 or 300.

I could have got around this by making a blanket with different squares instead of rows. Then I could have planned the blanket right from the beginning and I would have been able to work out the rough size of the finished blanket. It would also have been more portable to take away with me. I would have to sew them up as I went along though, I can't imagine trying to sew together 365/6 squares all in one go!

Completing a Sky Blanket - what I would do differently next time

In order to show the year more clearly, I would have liked to include a plain coloured row in between the rows for each month. This would have divided the blanket up nicely and perhaps made it more obvious how it related to the year as a whole. Similarly I could have done a plain row at the beginning and end, and perhaps tried to find a way to make it obvious which wintery end was which.

Finally, I would have kept a close eye on my stitch count as I went along. Being relatively new to crochet I'm still learning, and discovered at the beginning of November that I'd lost almost 40 stitches from the row. Having only started with 200, there was a significant difference between the two ends of the blanket. I was able to catch up and add them back in, but it would have been better if I'd checked every month or so and sorted it out as I went along!

I hope that these tips were helpful! I posted about the progress of my Sky Blanket monthly throughout 2016, and you can links to each monthly post here - My completed Sky Blanket.

If you are looking for a long term craft project to keep you busy for a year but aren't sure whether a Sky Blanket is the one for you, you might like the different projects that I rounded up in my blog post Ideas for a Long Term Craft Project

Tuesday 27 December 2016

Taking part in Vlogmas 2016

On the 30th November this year, in the early evening, I first learned about Vlogmas. I must have been living under a rock, because since then I've seen references everywhere! But if you're like me and it's a new thing to you, basically it means that for every day in the run up to Christmas, or even every day during December, you upload a video to your YouTube channel. It doesn't need to be a Christmas themed video, although most seem to be, and there are no rules - it can be long, short, a straight vlog to camera, a day in the life, craft or recipe tutorial - anything goes!

Taking part in Vlogmas 2016

Because I was coming in at the last minute, some of our Christmas preparations were already underway. The tree and decorations were up, present shopping was mainly done, and cards were written. But I decided that I wanted to give it a go, and once I set myself to a challenge I generally see it through.

I kept my videos quite short, often only 2-3 minutes, and many of them are done by theme rather than specific event, for example my Elf on the Shelf and Gingerbread House videos were filmed over several days. Some were very quick to put together and some took a little longer. I always aimed to have the next day's video finished and scheduled before I went to bed, and if I knew that I was going to be away or busy I set up a few general videos in advance.

I'm not very confident in front of the camera so you won't see very much of me, and I'm also a bit shy about filming when out and about, I'm always trying to make sure that I'm not filming too much of other people. I don't tend to take much video day to day. So I did feel self-conscious when taking some of the footage, and it was a real effort to make myself film things.

But I'm so glad that I did! I captured many moments that I wouldn't have otherwise - like my son in his costume talking about his carol service, the children getting excited before the pantomime started, the opening of the boxes that our Elf on the Shelf arrived in, as well as a few glimpses around our house which I'm sure will be fun to look back on in years to come. I also made an effort to do more festive things so that I would have something to video and include, like a trip to the garden centre and going to visit Christmas lights and decorations.

Below is my first video - Advent Calendars - and you can find all my videos in my Vlogmas 16 playlist - Jennifer's Little World Vlogmas 16 Playlist. I'm going to edit all the videos together into one long one which we can keep to look back on in years to come!


I'm already planning for next year!

Friday 23 December 2016

Gingerbread House crafts

Every year I make a gingerbread house with the children, a tradition that started back in 2012 - My First Gingerbread House for Christmas - and with this year's house currently in progress I thought I'd share some of the lovely gingerbread house crafts that I've spotted while browsing around online.

A gingerbread house crafts round up

I have shared some of the different Hama bead houses that we've made using the house pegboard, and one of my favourites was the Gingerbread House below. It's quite simple and there is a lot of scope there for adding extra sweets and so on, it's definitely something that I need to revisit!

Hama bead gingerbread house

The next year I stepped it up a bit and made a 3D Gingerbread House from Hama beads. My first attempt at a 3D Hama bead project and I think it worked really well, it's quite small so it fits nicely on the mantle piece and you could also pop a battery powered tea light inside so that it glows.

3D Hama bead gingerbread house

If you are looking for something much larger, I've seen some amazing child size gingerbread houses made from large cardboard boxes. I'm a little bit  reluctant to give this a go (we did end up with a cardboard box rocket in our dining room for four years) but they do look amazing and I know that the children would have so much fun making one. You can see some fantastic examples here - Life Size Gingerbread House and Life Size Cardboard Gingerbread House.

Another bake that I first discovered via Pinterest was these gorgeous tiny gingerbread houses that perch on the side of your mug. If you follow the link you can download a free pattern so that you can make your own, a great way to use up the left over gingerbread pieces from making a larger house.

I love the idea of making a permanent gingerbread house decoration, like a felt gingerbread house with velcro embellisments that could be re-designed each year. 

Finally this year we used a Baker Ross kit to make some Gingerbread House frames. Using a kit meant that they were really simple to make, but you could easily make your own using coloured paper and cardboard, and they would be great with a magnet attached to the back so that the photograph can be displayed on the fridge.

Gingerbread house with photo craft

I hope that you enjoyed my round up of Gingerbread House crafts, are you inspired to try any?

Wednesday 21 December 2016

My homemade Christmas decorations

I love it when the house is decorated for Christmas, and being a crafter over the years quite a number of our decorations are things that I've made myself. I love these homemade touches, and I enjoy bringing things that I've made out again year after year, as well as adding to them each year. So I thought I'd share some of my favourite homemade decorations that we display around the house.

A selection of my homemade Christmas decorations


The first Christmassy thing that comes out is my Wooden Advent Calendar. I made it a couple of years ago when I was working with Hobbycraft, decorating one of the plain wooden Advent Calendars with boxes, using acrylic paints, washi tape, and some number stickers. I was really pleased with it and we love using it each year. The boxes are nice and big so you can fit plenty inside (this year it's tiny Pokemon figures).

When you enter our hallway you are greeted with my Crochet Wreath, which I think looks a lot more impressive than it is! It was so easy to make, just a strip of crochet wrapped around a wire frame, and as it was one of my first crochet makes it's full of mistakes, but it looks cosy and the little robin is very sweet.

Crochet Christmas wreath with robin

Another wreath which I made this year was my Fabric Strip Wreath, another craft that looks impressive considering how easy it was to make. All you need is a wire wreath frame and lots of strips of fabric which are tied around the frame so that it is completely covered. Both my wreaths are hung indoors though, I'm not sure that I trust them to the elements!

Wreath made with strips of fabric

Around our fireplace I hang our two Tapestry Stockings. They were made using a kit from Jolly Red - I bought one kit for Harry then I purchased some extra wool and canvas to make a second one for Mia. There are even more designs available now than there were when I made them, I'm very tempted to make a couple more!

Tapestry Christmas stocking

We have quite a lot of Hama bead Christmas crafts around the house (you can find many of them rounded up here - Hama bead Christmas crafts for children) - and I particularly love my Scandi Inspired Battery Tea Light Holders. I also have my Mini Hama Bead Christmas Decorations stuck up above my desk which are very sweet.

Scandi themed Hama bead craft

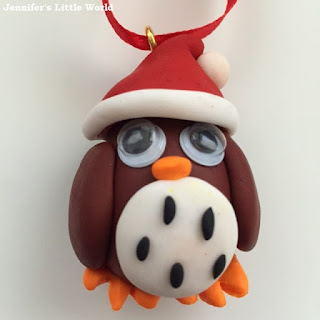
Finally I have a few little decorations on the tree which make me smile when I see them. I was very proud of my Fimo Owl Decoration, although Mia has taken him for the tree in her room this year! I was also very pleased with my Wooden Decorations which were decorated with acrylic paint and detail added with pen.

Polymer clay owl Christmas decoration

You can see these homemade decorations and more in this little video that I made for Vlogmas 2016:

Tuesday 20 December 2016

Our yearly Gingerbread House

It's that time of year again - time to make the Gingerbread House! This is a tradition that I started back in 2012, and after the first year I used the same recipe to make two smaller gingerbread houses so that the children could decorate one each. I always use the Tesco Gingerbread House recipe which is fab, it comes with a template to print out (print it out at 75% if you want to make two houses) and a video demonstrating each step, perfect if you are attempting to make one for the first time.

Here is this year's effort!

Making yearly gingerbread houses for Christmas with children

Making the house takes a couple of days. I make the gingerbread pieces in advance and leave them to harden overnight, as if you try and put the house together straightaway the sides are too soft. I usually assemble the house myself, I'm quite good at it but I do need to concentrate. I find that if I make the icing nice and thick the pieces stick together well, and when the icing has set the house is nice and sturdy.

Then I lay out a variety of different sweets and let the children decorate.

Making yearly gingerbread houses for Christmas with children

For Mia I squeeze the icing where she would like it, but Harry can now use the icing nozzle himself. They are always so proud of their houses!

Making yearly gingerbread houses for Christmas with children

I captured our efforts on video as part of Vlogmas 2016, see below:


And here are our efforts from previous years!

Making yearly gingerbread houses for Christmas with children


Top left - Christmas 2012
Top right - Christmas 2015
Bottom left - Christmas 2014
Bottom right - Christmas 2013

Do you make a Gingerbread House at Christmas?

Making yearly gingerbread houses for Christmas with children

Monday 19 December 2016

Review - Yvolution Y Flyer Scooter

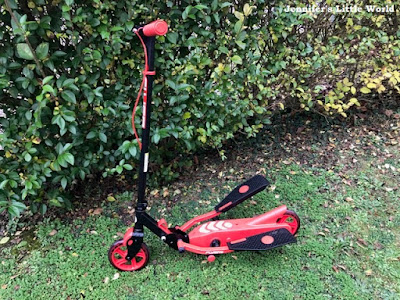
The Y-Flyer Scooter is a brand new product from Yvolution this Autumn. Aimed at children aged 7+, the Y Flyer is a unique way for children to travel and keep active at the same time. Unlike traditional scooters, instead of kicking yourself off from the floor, the Y Flyer Scooter is propelled by stepping up and down on the pedals, and once you've got going you can build up quite a bit of speed.

Review - Yvolution Y Flyer Scooter

There's a bit of a knack to using it at first, as you need to start yourself moving before you can start with the pedals, and trust in your balance to stay upright. You also need to get used to the movement of the pedals which is used to propel yourself along. Harry has only every had a three wheeled scooter which is a lot more stable, so it took a bit of practice for him to work it out. You also need to have quite a bit of strength in your legs to be able to push the pedals down, so it's definitely more suited to older children, especially those that are already used to a two wheeled scooter or bike and are used to keeping their balance and steering.

Review - Yvolution Y Flyer Scooter

Assembling the scooter was quite straightforward and very quick, you just need to put the upright bar in place, screw on the handlebar and screw the plastic pedals to the metal frame. You need to make sure that all the screws are in tightly and that you've got the brake on the correct side. It's quite large once put together, but fortunately the strong steel frame easily folds down for easy transport and storage.

There is a small fold out stand for the scooter which is really handy for when you want to jump off it for a few minutes and not leave it lying around on the floor. The quick response handbrake is really handy too.

The weight limit for the scooter is quite high at 70kg, meaning that many adults would also be able to use the scooter. I couldn't resist having a go, and although it took me a minute or two to get into it, once I'd got going I loved it! It's a brilliant workout with moving the legs up and down, and it's a really speedy way to get around.

I was sent the scooter in exchange for this review.

Friday 16 December 2016

My unfinished craft projects

I'm pretty sure that even the most productive of crafters have a long list of unfinished projects, and I'm no exception. Whether they are things that have been started and need to be finished off, craft kits that are yet to be opened, or materials that have been purchased but the craft is not yet started, I have quite a list of things to work on. I keep that list written down in my Smash Book, my list is dated February 2015 so some things have been on the list for that long (and hanging around the house for even longer!)

A list of my current unfinished craft projects

So with the New Year on the horizon, once the Christmas rush is out the way I'm determined to knuckle down and tick some of these off. Here's my list, and with a bit of luck this time next year I'll be writing an update post with some of them completed!

I'm starting near the bottom of the list with my Sky Blanket. Just because I don't want to lose momentum on it, it would be nice to have it finished as early into the New Year as possible. Making the border is going to be a lot of work!

Next I intend to move onto my Crochet Pink Bunting. Again it's at the bottom of the list, but it's been hanging around for a while and I really want to get it finished, I know that it won't take too long.

The Hexagon Knitted Blanket on my list was replaced with the Granny Square Crochet Blanket, and I used up all the yarn that I'd set aside. I do however have a little pile of knitted hexagons so I need to find a project for them, perhaps a cushion cover or something smaller, as it's a shame to waste them and I can't face unpicking them all.

The Mini Hama Bead Cats are a project that I definitely want to get going with as I received them a while ago. It's a really lovely kit and I want to make a framed picture with it. I think I've been putting it off because I know that it will take a little while to complete and the mini Hama beads are very fragile when they are a work in progress! It might be a good one to work on over the Christmas period if I can find somewhere out of the way to store it.

The Poppy Mosaic kit also needs finishing. It's a lovely kit and matches my sunflower mosaic, so it would be nice to get it finished for the summer so it can go outside. I was delaying it because I needed some mortar and concrete, but I think I've got that sorted now so there is no excuse. It needs to be done outside really so perhaps when the weather starts to warm up a bit.

I have a lovely Wooden Box and some Ladybird pictures from an old book which fell apart. I really want to use the pictures to cover it and make it look prettier. The pictures would also be good for brightening up lots of other things like my Ikea magazine holders, I really want to get them out on display!

A new project to add to the list is something to fill this Ikea frame that I picked up a few weeks ago. I'm thinking a seashell picture, perhaps painting the frame or the background in pale blue, or several different shades of blue, then filling with some of the seashells from my collection (I have quite a few) glued onto the background. I'd like to have more beach themed decor around, considering that we live so close to the sea.

Ikea Ribba frame empty

I'm hoping that writing this post will give me the motivation that I need to get these projects finished - check back for an update hopefully not too far in the distant future!

A list of my current unfinished craft projects

What do you have on your unfinished projects list?

Thursday 15 December 2016

How to make embroidered felt bunting

I have partnered with Brother Sewing to share a seasonally themed project post. As a Christmas craft, I decided to make some simple felt bunting to decorate our mantle piece, with embroidered snowflake and star detail. See below for instructions!

How to make embroidered felt Christmas bunting


You will need:

Felt in festive colours
Contrasting embroidery thread
Contrasting cotton thread
Ribbon

How to make embroidered felt Christmas bunting

Instructions:

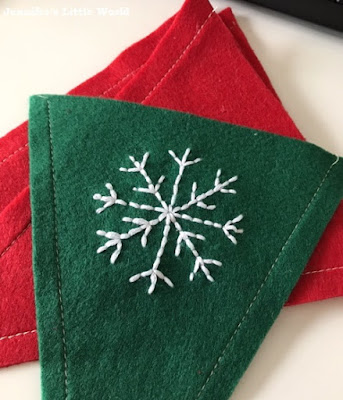
First cut out your bunting pennants from the felt. I measured across the top of our fireplace to work out how many I needed, and decided that six would look best. I made a template from thin cardboard that I used to cut out the felt triangles.

How to make embroidered felt Christmas bunting

Then use the sewing machine to make a border for the triangles using a contrasting thread. I used a slightly cream colour.

How to make embroidered felt Christmas bunting

It doesn't matter if your lines are a little uneven as you can always trim the felt once your are finished! When you reach the point of the pendant, move the needle into the down position while you turn the felt around to do the other side, this will leave you with a nice point at the bottom.

How to make embroidered felt Christmas bunting

Then you can embroider a simple design onto each triangle. I found a simple snowflake and star design on PicMonkey that I printed out to the correct size and traced onto parchment paper. There are various ways of transferring a design onto fabric, but I find that this method works well. Pin the paper into place and sew on top using embroidery thread.

How to make embroidered felt Christmas bunting

Then when you have finished, tear away the paper to leave the embroidery. You might need to pull through some of the thread from the back to make sure that it's nice and tight.

How to make embroidered felt Christmas bunting

Repeat this process for each triangle.

How to make embroidered felt Christmas bunting

Then select some ribbon to use to hang the bunting. I used a cream coloured ribbon. I measured the width of the mantle piece, and added a bit extra each side for hanging. Then I worked out how far apart my triangles needed to be so that they were evenly spaced across, I ended up with a 9 cm gap.

How to make embroidered felt Christmas bunting

Use the sewing machine to sew each triangle to the ribbon. I used a cotton that matched the ribbon, but you could also use a contrasting colour for a bit more interest. Take care to line everything up so that it looks neat.

How to make embroidered felt Christmas bunting

Then the bunting is ready to hang! I've just used tape to secure each end to the mantle piece, as the bunting is quite light.

How to make embroidered felt Christmas bunting

How to make embroidered felt Christmas bunting

This blog post was written in collaboration with Brother Sewing.

Wednesday 14 December 2016

Gift ideas for young Pokemon fans

I love putting together gift guides, and it helps to give me some inspiration for things when I'm doing my own shopping! So after the Pokemon Go craze of a few summers back that still continues in our house, here are some fab gifts for the young Pokemon fan in your life. None of these ideas are sponsored in any way, they are all things that I've found while hunting around for gift ideas myself. 

Christmas gift ideas for young Pokemon fans


If you know someone that enjoys playing Pokemon Go, then they will definitely be speeding their way through their phone battery while they are out and about. A portable charger would be a great gift, and if you want to stick to the Pokemon theme then why not get them a Pokemon Pokeball Power Bank

To get children away from the electronic devices, how about trying a Pokemon themed card or board game that the whole family can join in with. My children love Monopoly and so they would love to play this Pokemon Monopoly, a fun twist on the popular classic.

There are plenty of Pokemon books and guides which children will love poring over to increase their knowledge of the Pokemon universe. A good start would be the The Official Pokémon Encyclopedia, and if they want to up their Pokemon Go game there is plenty of information in the Pokémon Go Unofficial Field Guide to study when they can't be outside playing.

And while you are out and about, I know that my children at least would love to have a Pokemon cap to wear to make sure that they look the part!

For our Advent calendars a few years ago we bought the children some mini Pokemon figures to go inside the wooden boxes. There are lots of companies selling these little toys on Amazon, so make sure that you check the reviews and where the product will be shipped from as some have quite a long delivery time. The quality also varies, and you will most likely get some duplicates. Be warned, they are cheap and they aren't official figures, so may not pass muster with true Pokemon fans. But our children loved them and at 2-3cm tall they are a nice size and would also be great for party bags or as prizes for party games.

Selection of little Pokemon toys

I hope that you've found some fun inspiration for your little Pokemon hunters!

Monday 12 December 2016

Snowglobe Christmas card tutorial

How to make snow globe Christmas cards

You need:

Craft foam sheet
Clear cellophane or plastic - printed with snowflakes if you have any!
Small star sequins
Bostik Fine and Wide Glu Pen
Wadding or cotton wool
Silver card or a card blank to mount it
Blu Tak Glitter Pens to decorate

Instructions:

Using the craft foam, cut out a snow globe shape. I drew around a bowl and a cup to create the shape of the globe, and made a stand at the bottom. Then cut out enough of the printed cellophane to cover the circle in the middle. Use the Bostik Fine and Wide Glu Pen to make a circle of glue around the edge and press the cellophane down firmly. Add a small sprinkle of tiny star sequins into the centre, then make another ring of glue and add a circle of clear cellophane. Wait until the glue has completely dried.

How to make snow globe Christmas cards

On the front of the snow globe, cut some wadding to size and glue into place to make snow at the bottom. Then mount the snow globe onto a card blank or some silver cardboard. For a bit of extra sparkle, squeeze some glitter from the Glitter Pen around the outer edge and spread it around evenly with a paintbrush.

How to make snow globe Christmas cards

This festive season I'm taking part in Vlogmas, and aiming to publish a video each day to my YouTube channel. Today's post marks Day 12 of Vlogmas, and I've created a video tutorial for this craft which you can see here!


The box of craft materials was provided to me free of charge by Bostik as part of the Tots100/Bostik Craft Bloggers Club.

Saturday 10 December 2016

Peter Pan at the Pavilion Theatre, Worthing

This week we were invited to the Pavilion Theatre in Worthing to watch this year's pantomime - The Pantomime Adventures of Peter Pan. The pantomime stars Richard McCourt (Dick from duo Dick and Dom) as hilarious pirate Smee, Patrick Monahan as evil Captain Hook, Amelia Lily as Tiger Lily and Lloyd Daniels as Peter Pan, and it's the classic tale of the boy who refused to grow up and his adventures in Neverland.

We all loved it! There are some great special effects in the show, I really enjoyed the flying sequence when Peter Pan and the children left London and flew through the clouds. Harry's favourite character was Dame Able Mable (yes, of course they managed to fit in a pantomime Dame!), especially the comedy baking scene, and Mia loved looking for Tinkerbell sparkling her way around the stage.

Children at the pantomime in Worthing

Harry was in stitches all the way through, and even though I'm sure some of the jokes must have gone over his head, he found the whole thing completely hilarious. Mia was dazzled by the singing and the dancing, and was stood reaching up trying to catch bubbles during the mermaid scene. All the classic pantomime elements were there, and it was a great family show.

Peter Pan is the best-selling pantomime that has ever been staged by Worthing Theatres, with a record breaking opening week. This year the pantomime has partnered with Chestnut Tree House to raise funds for the local children's hospice.

Family at the theatre

In the run up to Christmas I'm taking part in Vlogmas and publishing a daily video to my YouTube channel showing what we've been up to. You can see my short video about our trip to the pantomime here:


We received complimentary tickets to the press night of the pantomime.