Showing posts with label child activity. Show all posts

Tuesday, 11 June 2024

Craft ideas for a teen girls sleepover or craft afternoon

This post contains Amazon affiliate links

My daughter has hosted several sleepovers over the last few years, and I always like to have an activity or two that will keep the girls busy and away from their screens for a little while. My requirements for a sleepover craft - a project that can be completed ready to take home, something that doesn't require too much supervision or cleaning up, not too expensive or too many materials needed, and a finished product that will be a nice reminder of the sleepover and their friends.

Of course these craft ideas are perfect for groups of boys as well, I'm just writing about my own experiences! These are all crafts and activities that have been tried and tested with great results.

Mini diamond painting kits or stickers

I love all the different diamond painting kits that you can buy, and a small project is perfect for a sleepover. We've had many different kits over the years, and the sticker kits are particularly good because they are inexpensive, really quick to complete and come in all sorts of designs. I would choose something like this Diamond Painting Sticker Set (affiliate link) because there's a wide range of designs and everyone can complete several. We've used them to decorate notebooks and storage boxes.

Diamond painted sticker decorating a notebook

Pottery painting

Hobbycraft sells a great range of pottery painting kits, and they are often on special offer during the school holidays - there's usually a big display near the entrance and sometimes they are as cheap as £2.50 each. They come with a few paints but I usually get out our own acrylic paints for a wider range of colours, you can buy some great value sets of acrylic paints from The Works Save up a few old margarine tub lids for paint mixing, and gather paintbrushes in different sizes for large and small areas. Just make sure that everyone is wearing older clothes, or provide aprons!

Bracelet making

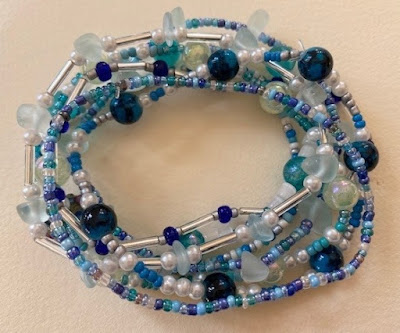
There is some adult supervision required with this one to avoid bead spillage disaster! Hobbycraft is a great place to buy beads as they have a pick and mix selection so that you can pick out some special beads that are themed to the girls' interests. Teenagers at the moment love making beads to wear and swap at concerts, and they like to include words so some letter beads are a great type of bead to include. Clay beads (affiliate link) are also really popular and come in a huge range of colours.

When it comes to putting a bracelet together I like to keep it really simple. I buy some clear stretch elastic thread (affiliate link) and cut a length that fits easily around the wrist with some extra at each end. I use a bulldog clip on one end to stop the beads slipping off, and then the girls thread on the beads that they want. When it's long enough to go around the wrist, tie it really tightly with a triple knot, then secure with a big blob of superglue before snipping the ends. You can read how I made some bracelets for myself here - simple stretch beaded bracelets.

Simple stretch beaded bracelets

Bath bomb making

This is a fun one for younger children, with some adult supervision! You can keep things easy and buy a bath bomb making kit like this one (affiliate link) or else there are lots of recipes online for making your own. The only drawback to this is that you do need to have some moulds to use, and some of the ingredients might not be ones that you have in the cupboard.

Shrink plastic keychains

We've been playing with shrink plastic for years, it's a lot of fun! We recently used shrink plastic to make some cute keyrings. You just need to buy a set of the shrink plastic sheets (affiliate link) and draw on your designs. We printed out some Sanrio characters that could be traced over and then coloured - follow the instructions on the packet to check how much the image will reduce in size and what type of pens or pencils to use. If you are making keyrings, the most important part is to punch a hole in the design before you put it in the oven! Then when it has shrunk and cooled you can attach a keychain or coloured ball chain (affiliate link) so that it can be attached to a school bag or notebook.

Decorated letter shapes for room decorations

A wooden initial letter is a great keepsake and looks great on the wall. Hobbycraft sell some pretty ornate wooden letters which are easy to paint or colour using marker pens. You can also buy fun wooden fillable letters which can be decorated with fake flowers and pom poms or choose simple mache letters which can be covered with decopatch paper and glue.

Decopatch letter decoration

Wednesday, 1 November 2023

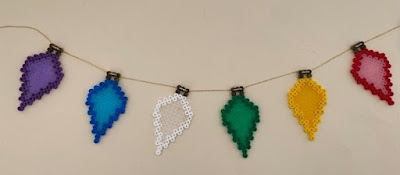
Hama bead Christmas fairy light bunting craft

Recently I wrote about how I had been sorting out my Hama beads, and that seeing all my beads gave me some new craft ideas. I discovered that I had acquired quite a few transparent beads in different colours, and so I came up with a Christmas Hama bead craft! I designed a simple Hama bead fairy light pattern which can be made in lots of different colours and strung up to make fairy light bunting.

Hama bead fairy light bunting for Christmas

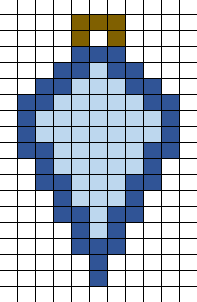
Below are my beads laid out on the board, and underneath you can find the printable image which you can use to work on your own designs. I used a solid colour for the outline and a transparent colour for the inside. If you don't have any transparent beads you could use beads in a lighter shade, or otherwise simply make them all in one solid colour. For the top I used some gold beads from my stash but many colours would also work, for example yellow, light brown or black.
Hama bead fairy light design template

Hama bead fairy light pattern to print

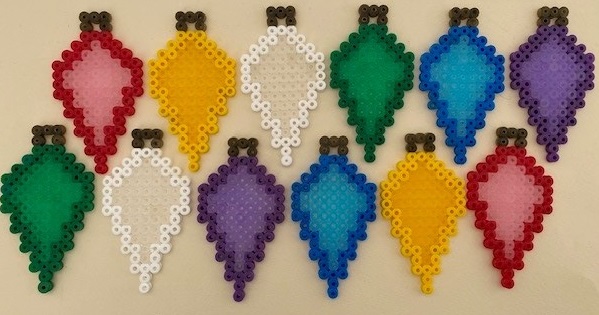
I made twelve lights in total, in six different colours. The Hama beads need to be ironed to fuse the beads together. It's a simple process, but if you need some help with ironing the Hama beads then take a look here - Ironing tips for Hama beads.

Hama bead Christmas fairy lights

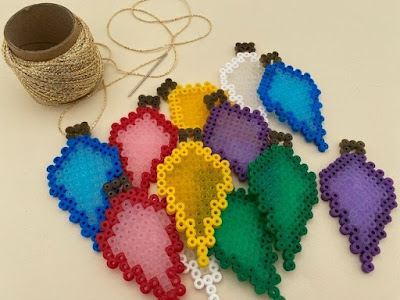
Finally I used some gold sparkly thread to string the Hama fairy lights together. I don't over iron my designs, so I was able to use a large needle to thread the string directly through the beads in the corner of the gold top part. They stay in place along the string pretty well, but you might want to make a knot on either side of the light to make sure that it stays firmly in place. 

Hama bead Christmas fairy light diy tutorial

The bunting is light, so it can easily be strung up wherever you'd like. I have some small suction hooks which I use to hang decorations. The transparent beads mean that this bunting string would look really good on a window so that the light can shine through during the day!

Hama bead fairy light bunting craft tutorial

If you are looking for more ideas for Hama bead Christmas crafting then you might like these posts:


Wednesday, 11 October 2023

Hama bead diwas for Diwali, with stands

Today I'm sharing a simple Diwali craft using one of my craft materials - Hama beads! Diwa are small oil lamps which are traditionally lit during the festival of Diwali. They symbolise the triumph of light over dark and good over evil. My Hama bead lamps are all made using the same simple template but can be customised using different colours and patterns.

Hama bead diwa lamps for Diwali craft

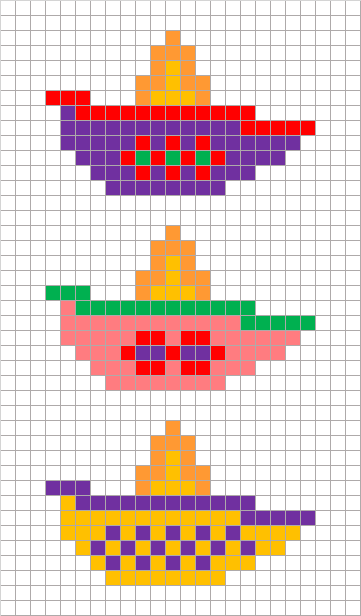
Here is the pattern that I used for my lamps:

Hama bead Diwa Diwali designs and patterns

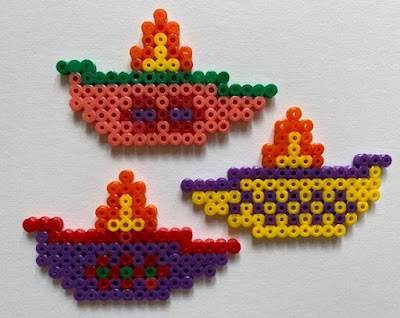
And here are the finished Hama bead pieces. They are made on the square Hama bead pegboard, and can be displayed facing in either direction. If you are new to crafting with Hama beads then you might find this post helpful - Ironing tips for Hama beads

Hama bead diwa lamp designs

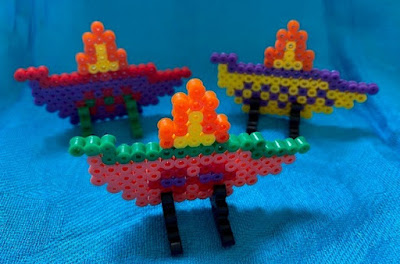
I decided that my Hama bead diwas would look best if they were standing up for display. You can buy simple Hama bead stands, and I've put a link to some at the bottom of the post. I have a few around that I've collected as part of various sets, but they are quite expensive, and it's very easy to make your own simple stands using Hama beads. 

The pattern for a Hama bead stand is below. You can use beads in colours which co-ordinate with your projects. Smaller designs may stand up with just the one stand if you are careful, but generally you'll want two stands per item.

Simple Hama bead stand pattern

This photograph shows my two homemade stands at the top, compared with one of the Hama branded stands underneath. My stands work just as well as the official ones, but the items will stand slightly higher off the ground. I don't think it's noticeable though, and the homemade stands are also easier to use when it comes to sliding in the beaded projects.

Hama bead stands, official and homemade

Here are my finished Hama bead diwa lamps! They will look lovely on the mantelpiece this Diwali alongside our simple salt dough diwa lamps.

Hama bead diwa lamp designs craft for Diwali

If you are looking for more Diwali craft ideas then you might enjoy this post - Simple Diwali crafts for young children.

Friday, 8 April 2022

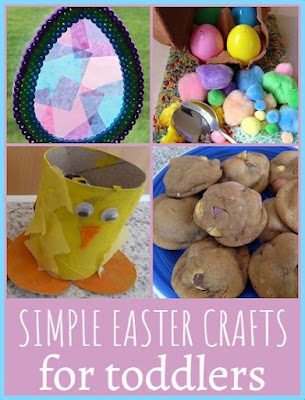
Simple Easter crafts for toddlers

Simple Easter crafts for toddlers and pre-schoolers

With Easter and the Easter holidays fast approaching, today I'm sharing some of my favourite Easter crafts for toddlers and young children. Some of the very earliest crafts that I shared on this blog were Easter crafts, and so it's quite nostalgic for me looking back at them! Even though my children are a little bit older now I think that they would still enjoy some of these crafts and activities, especially the papier mache bowls and the Mini Egg cookies!

Click on the links to find a full tutorial.

Papier mache gift bowls

For these papier mache bowls I used some small plastic bowls from Ikea as a template. This is a fun craft that can provide some craft time each day over several days, as there are several different steps to the process. When finished they make a lovely Easter gift filled with Easter chocolates, or they can be used to store small items in the bathroom or bedroom.

Simple papier mache bowl craft for children

Simple paper plate baskets

All you need to make these little baskets is a paper plate, a stapler and a strip of cardboard for the handle. We painted ours and decorated them with fake flower petals, then the children had fun collecting flowers and grass in the garden. You could also use them as personalised gift baskets for Easter.

Simple Easter basket from a paper plate


Easter bunny egg holders and Easter chick egg holders

These simple bunnies and chicks are made from old cardboard tubes and they are the perfect size to hold a small egg like a Cadbury Creme Egg or similar. I remember making these for family members as Easter gifts when I was little!

Easter egg chick holders from toilet roll tubes

Easter sensory tub

I loved putting together sensory tubs for my children when they were toddlers, I made them on all sorts of different themes. This Easter sensory tub has plenty of rice dyed in bright colours then coloured pom poms, shredded paper, tiny Easter chick toys and some spoons. In a plastic tub along with an old egg box and some plastic eggs there is plenty to keep young children busy!

Homemade Easter sensory tub for children

Hama bead Easter egg suncatchers

If you read this blog regularly you'll know how much I love crafting with Hama beads! These Easter egg suncatchers use the large Hama bead Easter Egg pegboard to make frames which are then filled with coloured scraps of tissue paper. You could also use the frame for an Easter drawing or photograph.

Hama bead Easter egg suncatcher frames

If you like crafting with Hama beads then you might also enjoy this post - Easter crafts using Hama beads.

Mini Egg cookies

Finally a delicious Easter recipe! These Easter Mini Egg cookies are very easy to make and don't need an egg. I make them all the time with different chocolate but the Mini Eggs are definitely my favourite.

Mini Egg cookies simple recipe

Happy Easter crafting!

Monday, 28 March 2022

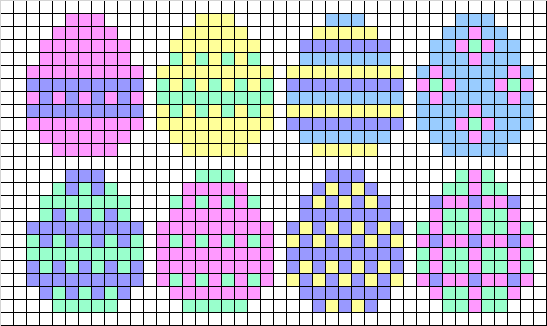
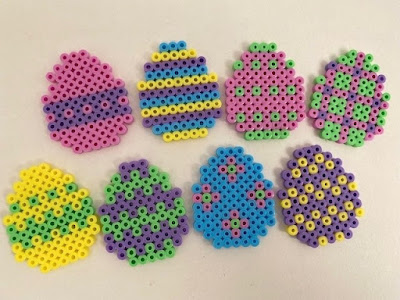
Hama bead and cross stitch Easter egg designs

Today I am sharing some Easter egg designs which are perfect to use with Hama beads, or else they would also work really well for any cross stitch or other pixel art crafts.

These designs can be made using a square Hama bead pegboard, which most Hama bead crafters will have in their collection as it is easily available and comes with many Hama bead sets. They are a good way to make Easter egg designs if you don't have the specially shaped Easter egg pegboard (affiliate link).

To make my designs I used beads from a pastel mix of beads. I have used a slightly darker shade for the pattern so that the colours will show up well when printed. You need beads in pastel pink, blue, green, yellow and purple. But of course you can always mix and match with whatever coloured beads you have available.

The designs would also look good made up with the tiny mini Hama beads. You can see some of my mini Hama bead Easter eggs here where I have used a darker colour palette and used them to decorate some Easter nest cakes.

Hama bead and cross stitch Easter egg designs and patterns

To make the designs you just need to lay the beads out on the pegboard before covering with ironing paper and ironing so that the beads fuse together. If you are new to Hama beads then you might find this post helpful - Ironing tips for Hama beads.

These Hama bead Easter eggs can be used for a range of crafts and I have a few ideas in mind which I will be sharing here shortly!

Hama bead Easter egg designs

If you have enjoyed this post then you might also like to see some other Easter crafts using Hama beads. Some of these Hama bead Easter crafts are made using the Easter egg shaped pegboard.

Monday, 20 December 2021

Last minute Christmas crafts for children

Last minute Christmas crafts for children

It's not long now until the big day! But these last few days of Christmas school holiday before actual Christmas can be tricky to fill when you are trying to keep over excited young children happy as well as getting on with everything that needs to be done. So today I'm sharing some of my favourite last minute Christmas craft ideas

Most of them are simple enough for children to work on by themselves using bits and pieces from the craft box, and they will produce some gorgeous decorations that can be enjoyed for years to come.

Click on the links to find the full tutorial, and happy festive crafting!

Pipe cleaner snowflake ornaments


All you need are some pipe cleaners and beads, this one is great for fine motor skills with little ones, just make sure that they are fully supervised.

Simple pipe cleaner Christmas ornaments craft


Salt dough Christmas hanging decorations

Salt dough does admittedly require a little more effort, but the finished results are definitely worth it and salt dough ornaments will last for years.

Salt dough Christmas hanging ornaments


Glitter and button Christmas tree decorations

These simple Christmas tree ornaments made using glitter card are super simple to make and look very festive when lit up with sparkly fairy lights. You can also pop a battery powered tea light inside so that light shines out through holes punched in the card.

Glitter card and button Christmas tree decorations


Lollipop stick and button snowflakes

Another way to repurpose some of those old buttons in the button tin with a simple snowflake made from lollipop sticks.

Lollipop stick and button Christmas ornaments


Hama bead mini Christmas wreath ornaments

I couldn't put together a list of Christmas crafts without including Hama beads! These little Hama bead wreaths use the small circle pegboard and can be left empty or backed with a Christmas picture or a small picture of a child or pet. And if your children love crafting with Hama beads then take a look at some more of my Hama bead Christmas crafts for children.

Hama bead mini Christmas wreath ornaments

Friday, 29 October 2021

Review - The Curse of the Burial Dagger - a family-friendly interactive graphic novel murder mystery game

I received a complimentary link to enable us to try out this game.

The Curse of the Burial Dagger is an interactive puzzle game presented in the style of a graphic novel. It's a family-friendly game, and we were sent a link so that we could try it out together over half-term. 

Here's the premise of the game:

When everyone is a suspect, and a killer is on the loose, is anybody safe?

A mansion near Dundee, 1923. Susie Sato finds herself investigating a murder when her great-uncle and host Lord Hamilton is found dead in his private museum, an ancient Egyptian burial dagger protruding from his back. Could it be the curse of the dagger, an object Lord Hamilton was warned not to remove from the tomb? Or could something else have caused his death?

Can you uncover the events leading up to Lord Hamilton’s death and deduce how he died… before the curse strikes again?

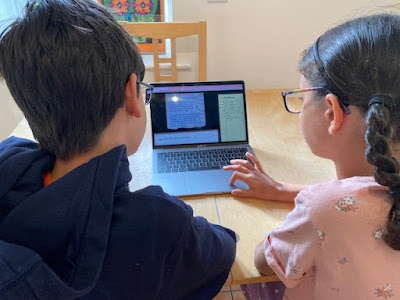
We decided that the children and I would play the game together around one device, but you can use the game link for up to six people playing on different devices at the same time. This means that it's a perfect activity to do with friends and family remotely if you aren't able to meet in person. In total the game took us 80 minutes to play.

The story is presented as a graphic novel, with images and subtitled narration. We meet the narrator, Susie, who is staying at the house and investigating the death of Lord Hamilton. She's studying forensic science, so we learn some interesting information about different techniques which can be used to solve crimes, for example chromatography and fingerprinting.

In between detailed information about motives and alibis given by the different characters, there are a variety of different puzzles which need to be solved in order to move to the next stage. Among others there are maths puzzles, logic puzzles, and puzzles where you need to look for clues based on the images.  

Some of the puzzles were simple but others were quite hard! In particular there was a maths problem which Harry and I both had different ideas about how to solve, so we tackled it separately and compared our final answers which were very different. And yes, despite my confidence his answer was the correct one - luckily we entered his result in first! If you are stuck with a clue at any point you can ask for help or skip it.  

Interactive graphic novel murder mystery game for families

As well as solving the puzzles you also need to pay attention to the story as it unfolds, as there are plenty of clues revealed in the spoken dialogue between characters. This is where we came unstuck - we solved all the puzzles correctly first time but got the final answer wrong as we couldn't decide between two suspects! 

As you go along you are encouraged to fill out a notebook on the screen where you decide how likely various different hypotheses are, and this helps you to think about who committed the murder. But we didn't mind that we didn't get the answer exactly right, we definitely felt like we had given the game a good go! And as Susie says during the game, it's putting together the clues that was what we were most concerned with, when it comes to convicting the murder it's up to a judge and jury.

We really enjoyed playing The Curse of the Burial Dagger, and I would definitely recommend it. The game was family friendly and aimed at ages 10 and up, although I think you'd want an adult or two playing, as some of the puzzles did require a bit of thinking about. But perhaps I'm doing mine (aged 10 and 12) a disservice to think that they needed me, especially after my failure at the maths task!

I'm really glad that we had the opportunity to play the game, and I'll definitely be looking out for similar things to try in the future. 

Playing The Curse of the Burial Dagger

If this review has sparked your interest, you can watch the trailer below to get a good sense of how the game works, and visit The Curse of the Burial Dagger for more information or to purchase.

The Curse of the Burial Dagger game is priced at £20. All you need to play the game is a computer or tablet with internet access, using either Chrome on a computer or Safari on a tablet. When you buy a ticket you will be sent an email with a link to the game which can be forwarded to other players to play at a time agreed amongst you, or you can play as a group using a shared device. If you are playing with others remotely then it's recommended to set up a Zoom call or similar so you can discuss it together. You can play the game at any time, and take as long as you need to play.

Saturday, 29 May 2021

A year of Hama bead crafts - part 2

A few years ago I published a long post containing an entire year's worth of Hama bead crafts and projects - one for each month. I've published so many more ideas since then that I thought it was time to publish part two! 

So here goes, twelve more Hama bead projects, one for each month of the year.

A whole year of Hama bead projects, part two

January - Hama bead snowflake buntingThe Christmas decorations might have been tidied away but you can still decorate seasonally and we are often lucky enough to see some snow in January! These snowflake patterns were designed to be strung up as bunting, but would also make lovely coasters or as a small mat underneath a candle or ornament.

Hama bead snowflake pattern designs

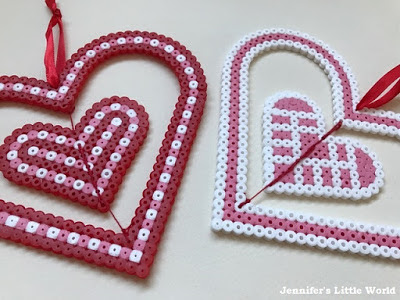
February - Spinning Hama bead heart decorations. These spinning hearts are made using the large and small heart pegboards, with the smaller heart suspended inside the larger one. When they are hung up the hearts spin really prettily. You can also find more Hama bead Valentine's themed crafts here - Hama bead crafts for Valentine's Day.

Hama bead spinning heart decorations

March - 3D layered Hama bead Easter eggs. I used the large Easter egg pegboard to make Easter eggs in different sizes which are then layered together to make some unique Easter decorations. 

Hama bead layered Easter egg craft

April - Easter egg Hama bead sun catchers. A second Easter themed craft, these sun catchers also use the large Easter egg pegboard with coloured tissue paper stuck to the inside. They look lovely when they are stuck up in a sunny window! You can find more Hama bead Easter crafts here - Easter crafts with Hama beads.

Hama bead Easter egg sun catcher craft

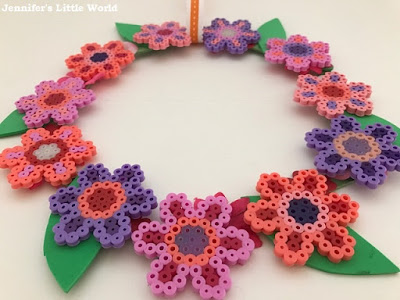
May - Hama bead flower wreath. I love decorating with flowers for spring, and I used the small flower pegboard and some foam shapes to make this simple and colourful wreath.

Hama bead simple spring flowers wreath craft

June - Hama bead flower bouquet craft. The small flower pegboard was used again to make these Hama bead flower bouquets which would make a great front piece for a greetings card or a simple decoration for a mantlepiece or window.

Hama bead flower bouquet craft for children

July - Tin can pots with Hama bead flowers. Finally I used the small Hama bead flower pegboard to decorate these old tin cans to make little planters for the garden. 

Hama bead tin can flower craft project

August - Mini Hama bead decorative plant markers. This craft uses mini Hama beads which are very tiny and allow for some really intricate designs. I created some small designs which are glued to small lollipop sticks and can be used to add some pretty colour to flower pots around the house.

Mini Hama bead plant stick decorations

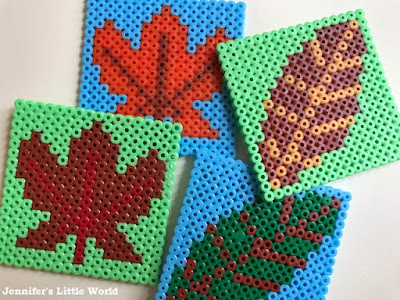
September - Autumn leaf Hama bead coasters. These Autumn themed coasters are inspired by fallen leaves and can be customised with all different colours to make a unique design.

Hama bead Autumn leaf coasters design patterns

October - Halloween Hama bead coasters. I love crafting for Halloween and I was really pleased with these Halloween themed Hama bead coasters, also perfect for placing underneath candles or small ornaments. You can find more Hama bead themed Halloween crafts here - Hama bead crafts for Halloween.

Hama bead Halloween themed coasters

November - Small Hama bead rangoli for Diwali. These mini rangoli are made using the small circle pegboard and using bright colours. They make lovely coasters, or you could string them up as bunting, scatter them around the dining table, or stick them to walls or windows as decoration.

Small Hama bead rangoli for Diwali

December - Hama bead mini Christmas wreaths. These little Christmas wreaths are made once again with the small circle pegboard. I've used Christmas pictures from cards but you could also use photographs of family and friends. They can be hung from the Christmas tree or you could attach a magnet to the back to display on the fridge. You can find more Hama bead themed Christmas crafts here - Hama bead Christmas crafts.

Hama bead mini Christmas wreaths craft

I hope that this has given you plenty of inspiration for Hama bead crafts!

Thursday, 9 July 2020

The start of the summer holidays

The end of term felt like a bit of anti-climax this year. Normally I'm desperate for the holidays to start, but although Harry was at school part-time for the last few weeks of term it still felt like a bit of a novelty with a traffic-free school run, no uniform to wash and no extra homework.

I do feel for Harry, he has missed out on a huge number of Year 6 milestones - among other things his first residential, a day trip to the Isle of Wight, a talent show and leavers disco. But at least he was able to catch up with friends for a few weeks, poor Mia had a one hour transition session with her class last week but apart from that she has hardly seen anyone else since March.

We were very lucky with the remote learning provision from the school, and the children definitely benefited from the routine that gave us. They were up and dressed by 8.30am each day to respond to a morning message, and then had regular morning Teams calls with their classes. I'm very keen to keep a little bit of that routine going over the summer.

I'm intending to get them to spend a few minutes each day using the Times Tables Rockstars app. I also discovered the Quizlet app while doing their French remote learning and it's brilliant. I'm getting them to spend some time daily going through some of the vocab that they were introduced to this term. The other thing I'm keen on is reading, but luckily I don't need to force them to do that!

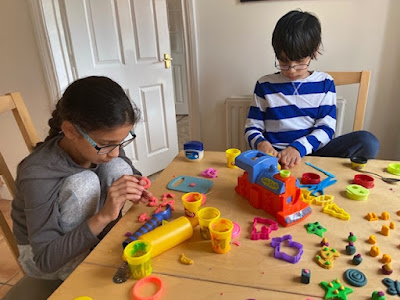
I'm also trying for some daily exercise, even if it's just a scoot around the block, and some form of shared creative time. This week it's been all about the play dough! I nearly decluttered it all a few months back thinking that they were too old for it, but it has kept them (and me!) happily occupied for ages, and I'm even wondering if I need to buy some more!

Older children playing with play dough

We are still trying to stay at home as much as possible, and there are many weeks stretching ahead of us without the usual places to visit or playdates with friends. Luckily we've managed to book a week away -  even if we can't get out and about on holiday as much as normal at least we'll have a change of scenery. And we will have a few meet ups with friends and family in gardens and down the beach. 

Fingers crossed we will be back to some sort of normality with back to school in September, I think that we will all be ready for it!

Thursday, 11 June 2020

Top tips and tricks for crafting with Hama beads

I've been crafting with Hama beads for a long time, and over the years I've shared many of the Hama bead projects that I've made, both with the children and for adults. I thought I'd share a quick guide to crafting with Hama beads, the essential supplies, and a few tips and tricks for new Hama bead crafters.

Hama bead crafting tips and tricks

Hama bead supplies and equipment - what you need


To create a Hama bead project you need some Hama beads and a pegboard to lay out your design. You will also need an iron and some ironing paper. There are many Hama bead kits available that contain everything you need along with themed inspiration and ideas, but personally I prefer to buy my supplies separately and use them to work on my own projects. This means that you can buy the extra colours that you need (I seem to use a lot of black and red!) and over time you can build up a collection of different shaped boards. As for the ironing paper, baking or parchment paper that you can use for baking both work perfectly.

Hama beads are available in three different sizes - Maxi, Midi and Mini. The Maxi beads have a diameter of 10 mm and are aimed at young children completing their first Hama bead projects. The Midi beads measure 5 mm in diameter and are the most common size of bead. These are the beads that I most often work with, and they are suitable for both children and adults to use. The smallest beads are the Mini beads, and with a diameter of 2.5 mm they really are very tiny. It's easiest to manipulate them with tweezers, and they are definitely more suited to teenagers and adults as they are very fiddly to use.

If you are new to Hama beads I would recommend starting with the Midi beads. You can buy these beads in large tubs of beads in a range of colours, and the tubs often include a few pegboards to get you started.

If you are looking to buy a pegboard or two I'd recommend starting with a square, hexagonal and circular board as these will allow you to create a wide range of designs. The pegboards can be used over and over again, as long as you are careful not to over iron your projects (see more ironing tips for Hama beads below)

You might also want to take a look at my Hama bead gift guide for some more Hama bead inspiration.

Hama bead supplies and equipment - where to buy


I used to buy most of my supplies in my local craft store until they discontinued the range. Since then I buy most of my beads on Amazon as I find that they are the most reasonably priced, especially for the larger boxes. It's definitely worth keeping an eye out as the prices can fluctuate widely.

Hama beads can be expensive and sometimes it's tempting to look at the cheaper non-branded alternatives. In general I'd advise steering clear of these imitations, as the quality is very poor and they can be difficult and disappointing to work with.

However an exception is the Picture Beads sold by Hobbycraft. I've used lots of these Hama style beads and found that they are nearly as good as branded Hama beads. Hobbycraft sell their beads in mixed bags of related colours, like blues and greens, and they are much cheaper, especially if you catch them on special offer. They are exactly the same size as branded Hama beads and can be used interchangeably with your Hama beads and Hama branded pegboards.

I have also bought Perler branded beads when on holiday in the US and found that these work very well, although they are slightly more brittle in texture once ironed. Perler beads are available in a wider range of unusual colours as well as striped beads, so they are good for adding a bit of interest to a piece.

Hama bead kits


If you don't want to commit to buying too many supplies, or you are buying a gift for someone as an introduction to Hama beads, you might want to think about starting with a kit. There are so many available, and I've put a selection below. Some of the kits have very specific theming, for example based around Disney characters, and others are more general. In my experience the kits contain far more beads that you will need for the projects suggested, so if you find a kit on sale then it can be a good value way of building up your Hama bead collection.

Tips for working with and ironing Hama beads


To create a Hama bead project you just position the beads on the pegboard in your design. There is plenty of inspiration online including lots of projects right here on this blog. For example my entire year of themed Hama bead crafts! If you are creating your own design, make sure that all the beads touch each other, and preferably on more than one side. This is particularly important if you want to create a more durable item like a keyring or coaster.

Hama bead project ideas for all different seasons and holidays

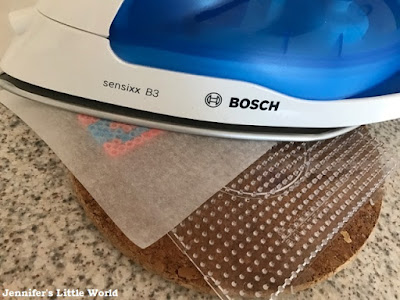
Then just lay a sheet of ironing or baking paper over the beads and press lightly with an iron to fuse the beads together.

I've shared some detailed tips for ironing Hama beads here - Ironing tips for Hama beads. In general you want to make sure that the iron is not too hot, that you keep the iron moving continously over the beads, and that you don't iron the design for too long - just a few seconds is enough before doing a quick check. When you can see the colour of the beads showing through the paper then that's a good indicator that it is ready.

It's a matter of personal preference as to how much you iron the beads. I like to leave the holes in the beads visible but some people like a smoother look. Just be careful not to over iron as this will make the beads impossible to remove from the board, and may warp and damage the board.

I like to iron my designs on both sides to make them more sturdy. Once I've ironed my design I place it underneath something heavy for a few minutes. This ensures that the finished design lays flat, which is particularly important for larger pieces.

How to iron Hama and Perler beads

How to store your Hama bead supplies


I like to sort my Hama beads by colour, and I store them in segmented storage boxes. I like the ones that can vary the sizes of the compartments, depending on how many beads I have in that colour. You can find some more of my tips here - How to organise Hama beads. If you want to sort your beads by colour it can be quite a tedious task, albeit a satisfying one! I found a brilliant tutorial for a simple Hama bead sorter which definitely looks worth a try!

I store my Mini Hama beads in pill organiser boxes which I find are the perfect size and make it easy to remove the beads.

I store my pegboards upright in a shoebox so that I can easily flip through to find the one that I need.

Hama beads sorted by colour in compartmentalised box


Some simple Hama bead projects to start with


I have loads of ideas for Hama bead projects right here on my blog! You can take a look at my dedicated Hama beads page for some inspiration.

You might like to make a start with some Hama bead mandala style patterns on a circular board, maybe experiment with some different Hama bead coaster projects or perhaps have a go at some Hama bead emoji magnets.

Hama bead emoji magnets

Hama beads for adults - Mini Hama beads


If you are an adult looking to craft with Hama beads you might be interested in taking a look at the Mini Hama beads. I've written a full guide on working with the Mini beads which you can read here - Mini Hama bead crafts - a guide

Because the Mini beads are so small they allow you to create some really detailed and intricate projects, and are a very satisfying craft to work on.

Selection of Mini Hama bead projects

I hope that this article has been helpful if you need some help using Hama beads, or if you are thinking about trying them!