Tuesday 26 May 2015

Our love affair with Duplo

I feel like I'm constantly trying to keep on top of the children's toys. I keep a close eye on what they are playing with, rotate out things that have been pushed to the back of cupboards, and remove unloved toys to a holding area for a few months before passing them on to the charity shop. As part of this process I notice the toys that they play with over and over again, and the toy that has easily had the most play value in our house between both children has been the Duplo.

We have a large box of Duplo. There are bricks which were mine when I was little, a couple of new boxes we bought of plain bricks, and Mia has recently acquired a couple of the Disney Princess Duplo sets. They literally have this Duplo box out everyday.

When we go on holiday I pack a bag with just a small pile of bricks, a couple of cars and some people, and it can keep them both happily entertained in their spare time for ages. I sometimes wonder if I should just empty out the toy cupboard and just let them keep their Duplo. Even Harry at 6, much as he loves his Lego, will play with it for ages. I think it's more satisfying as he can build something larger more quickly, and he uses his imagination brilliantly to expand on the basic bricks.

Large box of Duplo Lego

What has really fascinated me over the last few years is seeing how differently Harry and Mia play with the Duplo. Harry has always been about the vehicles, he had a Duplo fire station and he drove the fire engines around and built cars. He's never shown much interest in the people that came with the sets. For Mia on the other hand it's all about the role play. She builds houses and a pre-school for her people, and she only uses the cars to transport them about. Especially now she has a couple of Disney princess people, she plays long involved games with them. I'm sure it's nothing to do with how I've raised them, it's just their natural instincts showing through!

Tuesday 19 May 2015

Setting up a library role play area with Twinkl

The other day Harry decided that he was going to turn his room into a library. He made some little library cards and stuck some labels on his shelves, it was very sweet. So while he was at school I stepped it up a notch and got out the printer and the laminator to surprise him.

Library role play area with Twinkl

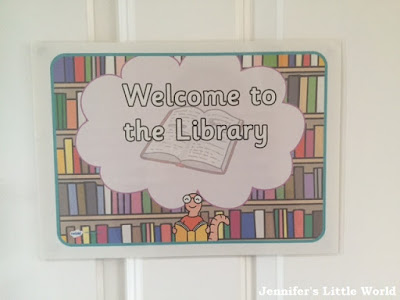
I turned as always to Twinkl, and found plenty of resources to get me started. I began with a Welcome to the Library sign for his bedroom door, part of a pack of Library Display Signs (Twinkl subscriber resource). I'm so glad that we now have a working colour printer as previously I was always printing in black and white (I'm afraid that it's going to cost us a fortune in printer cartridges though as I do have a tendency to get carried away!).

Library role play area with Twinkl

I also printed out a poster for the wall which says Please be Quiet in the Library from a pack of Library Display Posters (Twinkl subscriber resource). I also couldn't resist this gorgeous poster with the words "Reading gives us somewhere to go when we have to stay where we are" (Twinkl subscriber resource).

Even though I'm pretty good at weeding through his books and passing on the ones that are no longer suitable or review books that didn't really grab us, Harry still seems to have a lot of books. But each child has a large Ikea Billy bookcase in their room so they have plenty of book storage. Mia has a couple of shelves of books in her room too of course, but the majority are in Harry's room simply because he has quite a collection of books that both children have yet to grow into, and as he's the oldest it seemed the logical place to store them. I'm awful for picking up copies of books that I enjoyed when I was little, and many of the books are my old books, as well as lots that are my Dad's old books!

Library role play area with Twinkl

Harry's books were vaguely sorted into categories, but to help with the organisation I used the free Editable Book Shelf Labels (free download) so that I could come up with my own categories. I kept it simple for now, I might return to make more if he starts to collect more books on particular topics. One of the shelves is labelled By Harry, where I'll put the holiday scrapbooks that he loves making, and his own notebooks of stories. Twinkl also have some lovely Library Role Play Book Labels (Twinkl subscriber resource) with some simple categories and pictures.

Library role play area with Twinkl

So that we could actually play libraries I made each child a Librarian Role Play Badge (Twinkl subscriber resource) and made us each a Role Play Library Card (Twinkl subscriber resource). Harry is very proud of the library card that he has for the school library so I tried to make it look similar and decorated it with a sticker.

Library role play area with Twinkl

Harry really loves his new library! He's desperate for us all to borrow his books, and he very carefully ensures that we are each selecting books at the appropriate reading level. It's great for role play, and also for helping him to work his way through all his lovely books!

I'm a Twinkl blogger and have been provided with a free Premium subscription. Twinkl are amazing though, and I'm always writing about them with no obligation, just because I want to share their fabulous resources.

Tuesday 12 May 2015

Mini cupcake cross stitch in a Cricut frame

As part of working through my unfinished craft projects I recently stitched up a little cupcake cross stitch that I bought in the Hobbycraft sale probably about a year ago. They sell lots of little cross stitch kits, often seasonal ones, usually on 3 for 2, and always displayed in the baskets by the tills so that you spot them while you're waiting to be served and can't help picking them up. Very clever and I've been tempted (and caught!) many times!

Mini cross stitch cupcake

This little cross stitch only took a couple of hours to do and it's very sweet, but I never really know what to do with these tiny cross stitch pieces when they are finished. I suppose they are designed for cards really, but everyone that I know who would appreciate the work that has gone into a home made card is perfectly capable of making their own lovely cards!

Mini cross stitch cupcake

So I decided to make a little frame for it using my Cricut Mini so that I can stick it up somewhere and enjoy it. Both pieces are cut from the free cartridges included with the Cricut Mini. For the frame I just used the rectangle shape from Cricut Craft Room Basics. I made a larger rectangle then a smaller square positioned over the top, then a matching back piece. The overlay (cut in pink) is the Emblem Border from the Elegant Cartridge, glued across the bottom of the frame.

The cross stitch has been cut to size and secured to the back of the frame with tape, then the second rectangle glued onto the back. It's currently up next to my desk, although I wouldn't be surprised if it finds its way into Mia's room!

Friday 8 May 2015

Embroidered keepsake canvas using children's drawings

I am really enjoying being a Bostik Blogger and receiving a fab pack of crafty goodies each month to create with. This month the theme is Scrapbooking, and when I saw that the box included a canvas I decided to use the theme of preserving memories to make a keepsake canvas which included some of the children's drawings. Mia has just started to produce recognisable art, and I love the way that both children draw.

Embroidered keepsake canvas to make with children

The box included felt and embroidery silks, and as I love sewing with felt I decided to make an embroidered canvas, decorated with some colourful crafty embellishments which the children could choose and help to arrange.

Embroidered keepsake canvas to make with children

You need:

Small canvas (mine measures 20cm x 20cm)
Coloured felt for the background
Embroidery silks in contrasting colours
Bostik foam pads
Embellishments - for example buttons, paper cutouts, stickers etc.
Thin tissue paper
Willing children!

Instructions:

See numbered notes below for the detailed instructions.


Embroidered keepsake canvas to make with children

1 - Gather together all your materials. Plan the layout for your canvas and what you would like to include. I used a picture drawn by each child and their name as written by them, for a younger child you could draw around their hands and write their name yourself.

2 - Take your child's drawing and trace it onto thin tissue paper. It's a good idea to simplify the drawing a little at this point, if of course you can do so without losing the essence of the child's work!

3 - Cut your felt to the same size as the canvas., then cut out all the elements on tissue paper that you want to use and spend some time finalising the arrangement. Make sure that you leave enough space for a border around the edge.

4 - Pin the pieces of tissue paper firmly to the felt, then take your embroidery thread and sew through both the tissue paper and the felt. I used three strands of the embroidery silk and I chose the children's favourite colours - pink and green. It doesn't matter if your stitches aren't that neat, my stitches are often all over the place but it doesn't matter as you are trying to achieve a childish look to your work!

5 - When you have finished sewing, very carefully tear away the tissue paper to leave the embroidery. You might need tweezers to remove all the tiny pieces, and if the stitches have lifted you may need to rearrange them by pulling from the other side. I won't lie, it's quite a fiddly and time consuming process which is why simpler designs work best. You need to be careful not to pull too hard and make your stitches too loose. But I think it looks pretty cool when it's done!

6 - Admire your finished work!

7 - Repeat this process for each piece of tissue paper until the sewn part of the canvas is complete.

8 - When you have finished the embroidery, glue the felt piece to the canvas. I used white glue, and used just a thin line of glue around the edges.

9 - Gather the materials that you would like to use to decorate around the border. I used a mixture of brightly coloured buttons and flower cut outs. I like them because they are the sorts of embellishments that I use with the children when we are crafting together - it's like a snapshot in crafting time to go along with the ages that they are when I created this canvas! The children enjoyed choosing which bits and pieces I should use and where they should go.

10 - To adhere the embellishments to the felt I used Bostik foam pads. These little pads are extremely sticky and easily stuck to the felt. They are also small and neat, and I was able to place them around the edges of the buttons, sometimes using a couple, without them being visible through the holes in the button.

11 - The Bostik foam pads add a nice raised texture to the canvas. They are also squashy enough that the embellishments can be overlapped slightly. I did vaguely plan the arrangement of the border in advance so that I could achieve a good mix of colours and shapes.

12 - The finished canvas! All it needs is the date added on the back. I'm so pleased with it!

Embroidered keepsake canvas to make with children

The box of craft materials was provided to me free of charge by Bostik as part of the Tots100/Bostik Craft Bloggers Club. I have been compensated for providing this tutorial.

Friday 1 May 2015

Simbrix - a new creative toy

Recently I received a press release which really caught my eye - an introduction to Simbrix, a new creative craft and construction toy, which is billed as a cross between fusion beads and Lego. As regular readers of my blog will know, I blog all the time about how much we enjoy creating with Hama (fusion) beads, so I was really interested to try out Simbrix.

Simbrix beads

I was sent a small selection of prototype beads for the children and I to play with. My beads were in ten colours - red, orange, yellow, green, blue, pink, black, white, grey and brown. The little square beads slide smoothly together to create your design, and they even slot firmly enough together that you don't need to have your work resting flat on the table. This means that you can easily carry your partially finished design around without the worry of dropping it and ruining all your hard work.

Simbrix, a new creative toy for children

The beads can be easily ironed in the same way as fusion beads, but I only ironed one of the finished designs as part of our testing as I found to my surprise that the children were quite happy to take their creations apart and use the beads again for different designs.

Simbrix are aimed at children aged 5 and above, but with supervision Mia (nearly 4) was easily able to use the beads, with no problems putting them together or taking them apart. They are a great way to encourage younger children to develop colour matching and patterning skills.

Simbrix, a new creative toy for children

Simbrix was invented by Assim Ishaque at home as a way of improving the play experience of his own young children when they made patterns with small fusion beads, and in particular looking for a more robust way to connect the beads together. As a family we really love Hama beads, but they do have their problems. You need a pegboard to lay out the beads which is very easy to knock, and as I've found out it can cause a lot of upset and frustration when a carefully put together creation is damaged before it has been ironed. A design made with fusion beads is also not very satisfying to admire until it has been ironed, which means that we get through a lot of beads.

I was pleased to see how well Simbrix addresses these issues. The design is sturdy as you build it and almost impossible to knock apart. You can re-use the beads easily, and as I said I was surprised by how readily my children took their designs apart once they'd finished with them - perhaps I don't need to iron every single thing that they make after all! The only big difference from Hama beads is that you are limited to designs which can be formed on a grid shape as the beads are square. But on the plus side you don't need to worry about running out of space on the board, so it's easy to make much larger pictures.

Here are some of our first creations! They are all made by Harry apart from the 'rainbow' stripy design which is Mia's work.

Simbrix, a new creative toy for children


I've left the beads out on the table for a couple of days now, and Harry has been asking to play with them as soon as he comes in from school, sitting there for ages playing with them. I was very impressed with this particular creation - he's made larger versions of the Simbrix beads that lock together (he was a yellow bead short so decided that the brown bit could be a bit of dirt!).

Simbrix, a new creative toy for children

We've really enjoyed playing with the beads and I think that they are a fantastic, creative product.

We received a prototype bag of Simbrix in exchange for this review.