Thursday 31 July 2014

Review - Medieval House 3D Puzzle from Ravensburger

A few months back Harry and I had a lot of fun reviewing the 3D Taj Mahal Puzzle from Ravensburger, so when I was offered the chance to try another puzzle from the range I knew that we'd enjoy it. Harry was so excited to see the parcel, and he wanted to get started immediately!

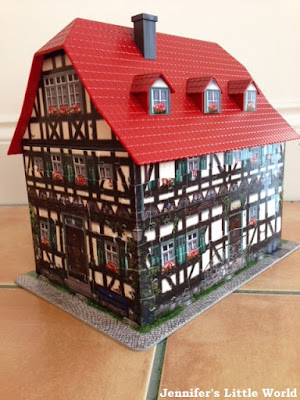
The Medieval House 3D Puzzle has 216 pieces and is aimed at builders aged 10 plus, although I think that children younger than that could definitely complete it with some adult help. The house is mainly put together with numbered plastic puzzle pieces. There is also an instruction booklet to help you with the order of assembly that you need to follow.

For a more difficult challenge you could complete it using just the picture side, but you do have to be careful that you've got it right, as sometimes the pieces can be put together in several different ways.

Review - Medieval House 3D puzzle from Ravensburger

The main part of the house is built using the jigsaw pieces, then there are additional plastic pieces to slot in for the roof and chimneys. It all fits nicely onto a base board, and it didn't take us too long to put the house together. It's a fantastic exercise for Harry to practice his numbers. I helped him to sort the pieces out into tens and then he put them together in the correct order. He loved joining all the pieces together, and then I helped with bending the corner pieces and fitting it all onto the board.

Review - Medieval House 3D puzzle from Ravensburger

This model was a lot simpler than the Taj Mahal with not nearly as many extra pieces. It perhaps doesn't represent much of a challenge for an adult puzzler, but it is a lot of fun for an adult to do with a child. The finished cottage is sturdy, lovely to look at and it would look nice on display, I know we'll have it out for a few days before packing it away for next time. Harry has also been having fun just playing with it, and flying it around like a spaceship!

We'll definitely be looking out for more of the puzzles in this range.

Review - Medieval House 3D puzzle from Ravensburger

We received this puzzle to review.

Wednesday 30 July 2014

Review - Wool and the Gang Knit Kit

I was recently contacted by Wool and the Gang, and asked if I would like to review one of their Knit Kits. Wool and the Gang is a diy fashion brand making knitting cool and fun again. You can buy yarn to make your own projects, try a Knit Kit which has everything that you need to complete a project, or buy the items ready made by a member of the team.

I'm not the most confident knitter, but I had a browse of the website and decided that I could easily manage a simple scarf. I chose the Lil' Foxy Roxy Scarf Knit Kit. You can choose the colour scarf you'd like to knit from a huge range of colours, both brighter and more subdued. I chose Shacklewell Grey, a black/grey striped mix of yarn. The kits come with everything that you need apart from the knitting needles, which you can easily add to your order.

My order arrived in a couple of days in a personalised box, what a lovely touch!

Wool and the Gang knitting kit review

I was very relieved to see that the pattern was indeed very simple, and I was easily able to manage it. The scarf is knitted on 15mm needles, so it knitted up really quickly. I managed to complete it across a couple of evenings and it was a very satisfying project (although it did feel odd to be knitting a chunky, super warm scarf over the hottest days of the year!).

Wool and the Gang knitting kit review

I really like the colour that I've chosen. I deliberately chose a more muted colour because I have coats in several different colours and I wanted to make sure that it matched everything. I'm hoping to be able to wear it for a long time so it needs to continue to match with a variety of coats! My progress below is after just one hour of knitting. As you can see the yarn itself is striped, but when it is knitted up it all mixes together nicely.

Wool and the Gang knitting kit review

The yarn is called Crazy Sexy Wool and is grown by Peru's finest Andean sheep! It's certainly lovely and soft, and it will definitely keep me warm this winter.

Wool and the Gang knitting kit review

Here I am, proudly wearing my finished scarf, don't I look nice and snug!

I received the Lil' Foxy Roxy Knit Kit to review.

Tuesday 29 July 2014

Ladybird Tuesday - Prehistoric Animals and Fossils

Ladybird book Prehistoric Animals and Fossils

I'm slowly working my way through my new haul of vintage Ladybird Books, and this one caught my eye. Harry, like many children, has always been fascinated by dinosaurs and fossils, and so I knew that he'd enjoy looking at this book, even though the actual text is far too complicated for him!

Prehistoric Animals and Fossils is from Series 651, a series of natural history books which are definitely aimed at older readers or adults. I've also looked at another book in this series - Plants and How They Grow. It was published in 1974.

Ladybird book Prehistoric Animals and Fossils

The book begins with an introduction to fossils, what early people thought about them (perhaps that they had fallen from heaven, or were the remains of animals that had died during Noah's flood). It's only been during the last two hundred years that scientists have really understood what fossils are and how they were formed, fascinating stuff. I learn so much from these books - did you know that the word fossil comes from the Latin word 'fossilis' which means something dug up?

The book describes how fossils are formed, the different types of fossil that are found, and has some tips if you want to go fossil hunting yourself. Then it takes us through various periods in Earth's history and the different types of plants and animals that lived in each era.

Ladybird book Prehistoric Animals and Fossils

It finishes with some ways to further develop your interest in fossils. I really liked this page about making your own museum for the fossils that you have found. I did something similar with Harry the other week with some small fossils that he has collected from various places, although his wasn't quite as advanced as the example in the book!

If you love Ladybird books, do pop over and visit Ladybird Tuesday, where Being Mrs C is assembling a really comprehensive catalogue of Ladybird books and reviews.

Below you can find links to all my Ladybird Tuesday book posts.

Snow White and Rose Red
Hansel and Gretel
Ali Baba and the Forty Thieves
The Three Little Pigs
The Old Woman and her Pig
Little Red Riding Hood
The Ugly Duckling
The Railway Children
A Little Princess
A First book of Aesop's Fables

A Ladybird Book about Knitting
More Things to Make - For Special Occasions
Easy to Make Puppets
Learning to Sew
Stamp Collecting
Tricks and Magic

Prehistoric Animals and Fossils
Dinosaurs
Stone Age Man in Britain
Great Civilisations - Crete
Charles Dickens
Nelson
Lives of the Great Composers Book 1
Lives of the Great Composers Book 2
The Story of Music

Plants and How They Grow
The Ladybird Book of the Night Sky
Sea and Air Mammals
The Farm

The Story of Nuclear Power
The Motor Car
How it Works - The Computer
How it Works - The Rocket
The Story of Ships
The Postman and the Postal Service
People at Work - The Nurse

Understanding Numbers
Talkabout Clothes
Going to School
Teaching Reading

Stories of Special Days and Customs
Christmas Customs

Girls and Boys - A Ladybird Book of Childhood

Monday 28 July 2014

Felt and ribbon purse for carrying little treasures about

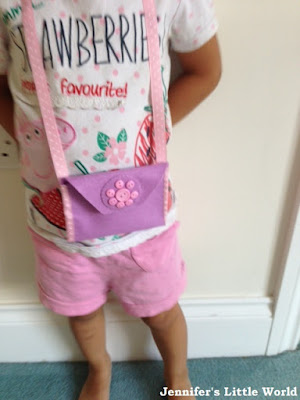
In this post I'm going into more detail about the felt, ribbon and button purse that I made for Mia, using some ribbon that I received from Fantastic Ribbons. It's really simple to make, and she is loving using it to carry her little treasures around the house while she goes about her role play. 

How to make a felt and ribbon purse for small treasures for a child

I should mention that this isn't a toy and you should always supervise your child while they are using it as the ribbon around the neck could be dangerous.

All you need is a piece of felt, some cord or ribbon, some velcro and some buttons. I chose purple felt to go with the pink dotty ribbon and buttons.

First work out how large you want the purse to me. Mine measures about 12cm wide by 9cm high. Your felt needs to be three times the height that you want the purse, then cut the top section so that it is shaped like a flat topped triangle. I made a template in paper first to cut out from the felt.
Fold up the bottom half of the purse and sew down each side. Then sew the ribbon down each side so that it covers up the sides. I suspect that there is a better way to do it than the way that I did it, possibly involving an iron, I did find it rather fiddly! Then sew in a small piece of velcro so that you can close the purse.

How to make a felt and ribbon purse for small treasures for a child

For the button embellishment I sewed the buttons onto a piece of felt first, then cut around it. It is sewn over the part of the flap where you could see stitches from the velcro underneath.

Finally, measure a long length of ribbon so that the purse will either sit over the recipients tummy or hang to about their waist, then sew in securely at each side. I twisted the ribbon so that the dotty side is always showing. Make sure that it is sewn as firmly as you can, as the purse is bound to be swung about while full!

How to make a felt and ribbon purse for small treasures for a child


And here's a photo of it in use! I'm sorry that it's a bit blurry, she doesn't stay still for long, and I've cropped out her head because (as usual) her hair desperately needed a good brush!

How to make a felt and ribbon purse for small treasures for a child

Sunday 27 July 2014

Paradise Park, Newhaven, East Sussex

We have a busy summer ahead, and with some saved up Tesco Clubcard vouchers we have lots of days out planned. We have our favourite places to visit, but we tried to come up with some new attractions and picked out Paradise Park near Newhaven. We'd never been before, and didn't know anyone that had, but we took a chance and I'm so glad that we did, as we loved it!

The visit starts with The Planet Earth Museum. It's the life story of planet Earth from the very beginning, in particular with lots of ancient fossils. There are also some fab dinosaur displays with dinosaur models that move and that you can control yourself using the buttons. Harry has an interest in fossils and he loved picking out ones that he recognised.

Paradise Park, Newhaven, East Sussex

Then we moved onto the Plant House. You start in the desert zone, filled with cacti, then move through different collections of plants before finishing in an Oriental garden with a huge collection of Koi carp. We had arrived early so they were empty, and it was really peaceful. Then you come outside into the main gardens.

Paradise Park, Newhaven, East Sussex

At this point the children saw the play area and there was no distracting them from that, so we let them loose. Some of the areas were designed for older children but there were some swings and slides just right for them. There was also an undercover sand pit where they spent ages digging for plastic dinosaur 'fossils', then we spent quite a bit of time in the large indoor soft play area. They had also spotted the Crazy Golf and so we treated them to a round  for £1 each.

Paradise Park, Newhaven, East Sussex

Then we explored the gardens. There is a Sussex History Trail to follow as you walk around the gardens which was very interesting, with lots of little models to look at, some with buttons to press to make appropriate noises. There are also several large fish ponds, so we bought some fish food for the children to feed them which they loved. You can choose a longer or a shorter trail to follow.

Paradise Park, Newhaven, East Sussex

Part of the gardens is a Dinosaur Safari, with cheerfully coloured, roaring dinosaurs to wander past. The children were fascinated, although a bit timid when it came to the loud noises.

Paradise Park, Newhaven, East Sussex

We finished our visit with another trip to the indoor soft play area. Unfortunately the miniature railway driver was on his lunch break as we were leaving, so we had to distract the children away. The little train did look like a lot of fun, it kept passing us as we were walking through the gardens and the driver looked as though he was really enjoying himself!

We spent about four hours at Paradise Park and could probably have spent longer on a cooler day. If we lived nearer I'd definitely be thinking about an annual pass!

We visited Paradise Park using Tesco Clubcard vouchers. Individual entry is £9.99 per person, with children under 3 free, or you can buy a family ticket (2 adults and 2 children for £29.99. An annual family park pass is £69.99. See more information on the Paradise Park website.

Saturday 26 July 2014

Ribbon crafts with Fantastic Ribbons

A selection of simple ribbon crafts

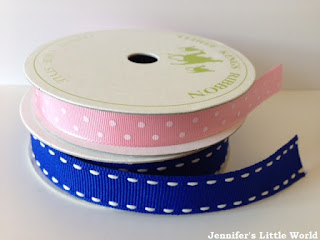
I was recently chosen to review some products from Fantastic Ribbons. Fantastic Ribbons sell a great selection of ribbons, and also many other crafting products like buttons and washi tape. I've never actually bought ribbon before (I scavenge it from boxes of chocolates, clothes and so on) so it was lovely to be able to browse the website and choose some ribbon to use in my crafting. I chose a roll of pretty pink ribbon with dots (5 metres) and some bold cobalt blue side stitch ribbon (4 meters). Each roll cost £2.50, which seems pretty good value to me.

A selection of simple ribbon crafts

I love the colour of the blue ribbon, and I decided to use some to create a simple ribbon bookmark. There are more complicated ways of making these, but all I did was cut a length of the ribbon and secure in a loop at the bottom using a large bead. The bead can then be slid up and down the ribbon to suit books of different sizes.

A selection of simple ribbon crafts

Then I moved onto the pink spotty ribbon. This ribbon really appealed to me, it matches some washi tape that I have! I found this small cardboard box treasure chest on special offer in our local craft shop and painted it pale pink with poster paint. When it was fully dry I used double sided sticky tape to glue the ribbon to the box. Really simple, and it's a great place to keep some of my smaller crafty bits. At the moment it's filled with buttons!

A selection of simple ribbon crafts

I used some of these buttons for my third Fantastic Ribbons craft - a Felt Ribbon Purse. Mia loves playing going to pre-school/going to the shops/going for a picnic games around the house, and she has a variety of bags that she uses to transport everything that she needs. I thought I'd make her a little purse to keep some of her smaller treasures in. (Remember that if you are making this for a small child it's important to supervise them while they are playing with it as it may go around their neck). I cut a long piece of purple felt which is folded over and stitched up the sides. Then some ribbon is added along the sides. It closes with velcro, hidden by a small design made from an offcut of felt and decorated with buttons. You can find more detailed instructions here - Felt Ribbon Purse.

A selection of simple ribbon crafts

I received the ribbon to make these projects from Fantastic Ribbons.

Thursday 24 July 2014

A day at Butlins with Beechdean Scooby Doo Ice cream!

We got the summer holidays off to a fantastic start with a day out at Butlins Bognor Regis! It's just down the road from us, but I haven't been since I was a child, so I was delighted to be invited along to try out some new Scooby Doo Ice Creams from Beechdean Ice Cream. We also had the chance to see the Scooby Doo Live show, which is new this season at Butlins.

Day trip to Butlins with the family

We were greeted by this enormous deckchair, and of course we had to stop and take a photo! Then we had some time to explore. The children were a bit too timid for the rides in the fairground but we had a great time on the smaller rides and the indoor soft play in the Skyline Pavilion.

Day trip to Butlins with the family

Then we headed for the conference centre to find out more about the new Scooby-Doo ice creams. When we arrived, first we attempted some Scooby Doo themed dressing up to take a "Scooby Selfie". 

Day trip to Butlins with the family

Then there was plenty of ice cream to try! There are three new flavours - Chocolate Snack, Honeycomb Snack and White Chocolate and Strawberry Snack. Of course in the interests of fairness we had to try one of each. My favourite was the Honeycomb, but Mia was quite fond of the White Chocolate!


Day trip to Butlins with the family

After that it was off to Centre Stage to watch the Scooby-Doo Live show. It was packed inside, but we managed to find seats on the floor near the front. It was quite a relaxed atmosphere fortunately so it didn't matter that the children were a bit restless. Harry loved the show, and although a bit shy at first he was soon shouting along and pointing out the baddies to the cast. Mia was a bit more fidgety though so we only made it through the first half of the show, but we all still enjoyed it very much!

Day trip to Butlins with the family

Finally we returned to the Skyline Pavilion, and spent some more time on the little rides and soft play. We were all a bit hot and bothered by this point so it was time to head back home, but I'm hoping that we can return to Butlins at some point because I know there was plenty that we didn't have time to see!

We were invited along to Butlins by Beechdean and so we received complimentary entry.

Harry's first year of school is over

In the blink of an eye, Harry's first year at school is over. It started off slowly, but the last few months have gone so quickly, and now I can hardly remember a time when I had two little ones at home all day. The school run has become a fixture of our routine. I know exactly what time I need to leave the house for drop off and pick up, I know where to park and I know all the different routes that we can walk. We've even managed to work it all around our gym trips. 

Child finishing his first year of school

Harry has come on so well. He started school not recognising all his letters and he has finished the year as one of the top readers in his class. He's desperate to learn, he takes in everything, he loves school and he's made lots of new friends. He had his first Sports Day last week, took part in a class assembly and performed with the Infant Choir. We are so proud of him.

Although Harry seems happy about his move to Year 1 it's a big change for him. The classes are mixed up, so he's only going to be with a few children from his old class. They also don't mix as much between the classes. His classroom is at the other side of the school, not kept separate like the Reception classes, and I'll no longer be taking him into his classroom in the mornings. I've not met his teacher, or even seen inside his new classroom.

Harry is definitely ready for a break, these last few weeks have been hard work. And I'm so looking forward to having him home for the holidays. I've got lots planned - we have our Summer List to work through and I've been arranging plenty of trips out. Mia will still be at nursery for two mornings a week so there will be some time for just the two of us.

I'm trying very hard not to think about the fact that once he's back at school in September it's not going to be long before we receive our application form for Mia to start school next year. I just can't imagine it!

Wednesday 23 July 2014

Sponsored post - NISAs - the new name for the ISA

Did you know that ISAs have changed since the 1st July 2014? 

At the moment we don't always have a great deal of money left over at the end of the month to put into savings. But when we do, we always put it into our ISAs. It's the obvious place to save money without needing to worry about paying tax on it. Until the 1st July 2014, the maximum amount that could be invested in a cash ISA was £5,940, increasing to £11,880 if you invested the rest into a stocks and shares ISA.

However from the 1st July 2014 this all changed. ISAs are now known as New ISAs, or NISAs, and have an increased annual allowance of £15,000, which can be saved either entirely in cash, in stocks and shares, or in any combination of the two. Existing ISAs will change to NISAs, and any contributions made since 6th April 2014 will count towards the 2014-15 allowance.

In theory this is great news because it offers opportunities for larger tax free savings. But Scottish Friendly has warned that savers need to be wary of automatically holding all their ISA funds in cash and instead to consider the alternatives that are available.

The reason for this is that banks and building societies have already started lowering their interest rates, rates that are already low, in anticipation of the NISA launch, and it's important to think about whether savers that invest all their money in cash are really receiving the best deal. 

Neil Lovatt, Scottish Friendly’s Director of Financial Products, said:

“For every one investment ISA taken out, three cash ISAs are opened. 

“Cash is easier to understand as it offers security and access to the savings without penalty that investment ISAs do not. People are being put off by what they think is pure equity investments and instead are opting for accounts that offer poor returns on their cash. 

“The changes introduced in the budget gave savers a glimmer of hope and incentivised people to put more money aside each month. However, the Cash ISA market has not risen to the opportunity, instead choosing to offer low rates of interest on cash ISAs and in some cases actually reducing their rates for fear of overly high inflows”.

I must admit that we've only ever invested money in a cash ISA. Like many people, we want the security that the cash ISA offers, and we all know that with a stocks and shares ISA the value of an investment can go down as well as up. But if you are prepared to look at the long-term picture when it comes to savings, there are ways of investing that will still mean that your savings are secure. 

So if you have some spare funds to invest at the moment don't necessarily think that a cash NISA is the best way to see some return on your investment, it's worth doing some research into the alternatives. You can find out more information in the video below: 


This is a sponsored post in collaboration with Scottish Friendly. 

Review - Aquabeads Deluxe Set

I was recently given the opportunity to review some Aquabeads. Regular readers will know that Hama beads are a crafty favourite in this family, and so I was very interested to try out the Aquabeads to see how they compare. I received the Aquabeads Deluxe Set (affiliate link) to review.

Aquabeads Deluxe Set review

The Aquabeads Deluxe Set contains over 1200 beads in eight colours in a divided case, a base tray, eight template sheets, three base boards to place the beads on (each with a different configuration for the beads), a bead pen to help you place the beads, a sprayer to fix the design and full instructions. With this set you can make a small photo frame, a desk tidy and a variety of different pictures.

The Aquabeads are small, round, solid beads. They are placed on the tray, either with fingers or with the clever little bead pen that picks up a bead and drops it when you press a button on the side. The base boards fit nicely onto the base plate with the template underneath, and they are clear so that you can see exactly where to place the beads. When your design is completed you simply spray it with a fair amount of water and leave it to dry. The coating on the beads dissolves slightly in the water which sticks the beads together before you remove your creation from the base plate.

The beads are very small (and bouncy!). Harry (5 1/2) found them a bit fiddly to place at first but he soon worked it out, and he loved using the bead pen. Because he was placing the beads directly onto the template he had no problems making his designs.

Aquabeads Deluxe Set review

Once you've sprayed your design you need to wait at least an hour for the beads to dry, meaning that you can't make another design straight away on the same board. This pack includes three boards though, so you don't need to stop creating. The finished piece peels away from the board quite easily once dry, and then you can respray it on the other side just to make sure that it's solid, and they feel very firmly stuck together.

Aquabeads Deluxe Set review

The huge advantage that Aquabeads have over Hama beads is that children can complete the whole process themselves, they don't need to wait for an adult to iron their creation as they can just spray it themselves.
It's also very easy to make 3D designs, either by layering up different flat pieces or making small boxes. All the pieces can be packed down quite small so it's easy to store (although the divided storage tray for the beads didn't keep the colours separate for too long!).

Aquabeads Deluxe Set review

Harry has really enjoyed doing this set, it's something that he can easily get on with by himself while I'm making dinner which is great. Mia is a bit young yet (it's recommended for age 4 and above) and it's too fiddly for her at the moment, but it won't be long before she's able to have a go. Harry has had several crafting sessions with the box and he hasn't completed all the projects yet, so there's plenty in the set to keep children occupied.

You can buy refill packs for the beads and also a variety of themed sets with different designs and project ideas.

I received this kit to review, Amazon link is affiliate.

Tuesday 22 July 2014

Ladybird Tuesday - Stories of Special Days and Customs

You may have noticed my absence from Ladybird Tuesday lately. This wasn't because I had lost interest. The truth was that I'd actually worked my way through my meagre collection of Ladybird books, and hadn't had the opportunity to search for any more! I've been finding the really vintage ones that I love harder and harder to track down, and when I did find them I couldn't really justify the cost.

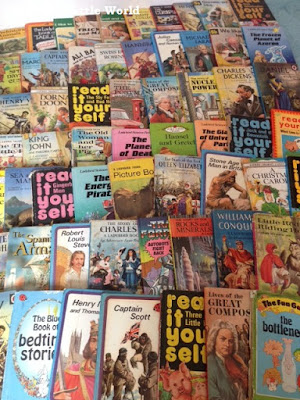
And then at the weekend, this happened:

Large collection of vintage Ladybird books

We were visiting my husband's parents and they had retrieved three boxes of old books from their loft for him to go through. Well, as you can imagine, I was in Ladybird book heaven. I was so excited to see books that went with books I already had, and so pleased to find so many books that Harry will be able to read and enjoy now and that both children will be able to read and refer to as they grow up.

It was so difficult to choose one to start with for this week. In the end I chose Stories of Special Days and Customs. It was published in 1972 and is from Series 644. This series only contains two books, and I wrote about the other one a few months back - The Stories of our Christmas Customs. I'm quite chuffed that I've managed to complete a series!

Ladybird book of Special Days and Customs

Stories of Special Days and Customs takes us through a variety of special days which are celebrated throughout the year. They are the occasions that we celebrate in this country and are mainly based around the Christian calender, but it also covers days like April Fools Day and Bonfire Night. It's actually a really good reference book to have around, as I really enjoy doing seasonal crafts and activities with the children.

Ladybird book of Special Days and Customs

A page is devoted to each special day, accompanied by a gorgeous picture. Some are of people celebrating the day itself, others are of some of the Gods and Goddesses or historical figures that are the reason for the celebration.

Ladybird book of Special Days and Customs

In the introduction, the book boldly states that the most important anniversary in the year is Christmas, although this may just be because they have inserted a plug for the Christmas Customs book. Once again the Ladybird book manages to present plenty of information in an easy to read and understand fashion.

I learned a great deal from reading this book, especially about how the pre-Christian festivals were adopted by the church. The children will learn about and celebrate a lot of these occasions at their school, and it will be nice to be able to share this book together at those times.

If you love Ladybird books, do pop over and visit Ladybird Tuesday, where Being Mrs C is assembling a really comprehensive catalogue of Ladybird books and reviews.

Below you can find links to all my Ladybird Tuesday book posts.

Snow White and Rose Red
Hansel and Gretel
Ali Baba and the Forty Thieves
The Three Little Pigs
The Old Woman and her Pig
Little Red Riding Hood
The Ugly Duckling
The Railway Children
A Little Princess
A First book of Aesop's Fables

A Ladybird Book about Knitting
More Things to Make - For Special Occasions
Easy to Make Puppets
Learning to Sew
Stamp Collecting
Tricks and Magic

Prehistoric Animals and Fossils
Dinosaurs
Stone Age Man in Britain
Great Civilisations - Crete
Charles Dickens
Nelson
Lives of the Great Composers Book 1
Lives of the Great Composers Book 2
The Story of Music

Plants and How They Grow
The Ladybird Book of the Night Sky
Sea and Air Mammals
The Farm

The Story of Nuclear Power
The Motor Car
How it Works - The Computer
How it Works - The Rocket
The Story of Ships
The Postman and the Postal Service
People at Work - The Nurse

Understanding Numbers
Talkabout Clothes
Going to School
Teaching Reading

Stories of Special Days and Customs
Christmas Customs

Girls and Boys - A Ladybird Book of Childhood

Monday 21 July 2014

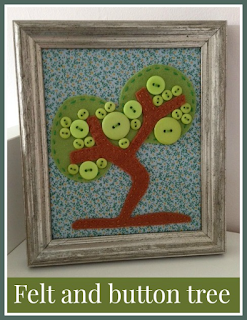
Green felt and button tree framed picture

I love crafting with felt and buttons (see my felt and button embroidery hoop art here!), and having recently come into possession of a lovely new silver frame that I picked up in our local craft shop on the school run, I made this little button tree picture with a patterned fabric background.

Green felt and button tree framed picture craft

Here's how I made it:


Materials:

Frame (mine has no glass)
Patterned background fabric
Green felt
Brown felt
Green buttons
Fabric glue
Scissors, needle, green thread, brown thread

Instructions:

I bought the frame in our local framing and stitching shop, they usually have a box outside with small frames for £1 each. It has no glass or backing to it, but that's fine for this project. You can easily buy cheap frames from Ikea or the large supermarkets.

Green felt and button tree framed picture craft

The first thing to do is to plan the design for the button tree on paper by drawing around the frame and creating an outline for your picture. You also need to choose the buttons that you want to use and plan where they will be positioned. I decided to stick to round buttons in the same colour, but I found loads of inspiration on Pinterest with all different shapes and colour of button. When your design is completed, take a photograph that you can refer to later as you sew on the buttons.

Green felt and button tree framed picture craft

Cut a piece of thick card to the same size as the frame. Then cut out the background fabric a couple of centimetres larger than the card. Iron if necessary.

Use your paper drawing to trace templates for the felt pieces (the trunk and leaves) and cut them out. My one tip for cutting felt - buy some decent, sharp scissors and only use them for cutting felt and other fabric to keep them sharp. Use pins to secure the template to the felt when cutting. The tree trunk shape was quite fiddly to cut, I found it easiest to cut a little outside the template, and then neaten up once the paper template was removed.

Green felt and button tree framed picture craft

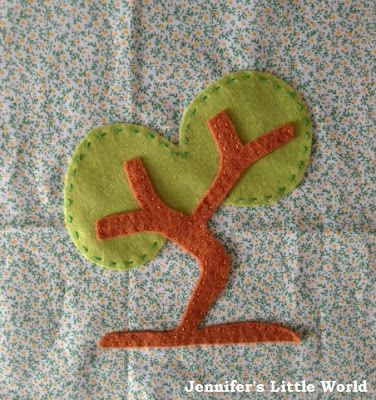
Using the frame as a guide, position the felt pieces on the background fabric and secure in place with some small dots of fabric glue. Don't use to much as it will make it harder to sew through the fabric later.

Green felt and button tree framed picture craft

Then stitch around the trunk and leaves. I used contrasting colours and large stitches because that's the way I roll, you could match the colours so that the stitches aren't visible.

Green felt and button tree framed picture craft

Then it's time to sew on the buttons. You don't need to be as diligent as you do for buttons sewn onto clothes. Make sure that the buttons are all the same way up and decide how you want to align the centre holes, I went for random directions. I stuck pretty closely to my original design, but I did make a couple of changes.

Green felt and button tree framed picture craft

Then you need to mount the fabric design onto your piece of cardboard. Check the positioning carefully, then fold over the edges and secure them with some long stitches across the back. Sew down the corners for extra security.

Green felt and button tree framed picture craft

Then I found that my picture just rested neatly in the frame. If you have a more substantial frame you'll have a backing to hold it into place. I think it works better without glass as it's such a three dimensional piece. Here's the final piece!

Green felt and button tree framed picture craft

I loved it so much that I went on to make a second button felt picture which you can see here - Brown and pink felt button tree picture. They both look great hung up on the wall just above my desk!

Friday 18 July 2014

Salt dough beaded fairy wands

I've been meaning to make fairy wands for a while. Mia loves dressing up in her princess and fairy costumes, and by calling it a magic wand I was able to interest Harry in the craft too! They are great for imaginative play, and with the streamers they look fab when they are being waved around.

Sugru beaded fairy wands craft for children

These pretty salt dough wands with their ric rac streamers are perfect for waving and twirling about. They take a few days to make as you need to wait for the different parts to dry, so you need to work on them in stages.

You need:

A length of bamboo garden cane or similar stick
Tape
Ric rac or ribbon
Strong glue or Sugru
Small wooden beads
Glitter/sequins/other decorations

To make the salt dough:

Two measures plain flour
One measure salt
A few drops food colouring
Water to mix to a dough

Each wand is made with a stick of bamboo from the garden, cut to about 30cm and with the ends sanded smooth. I decorated the entire length of each one with coloured ric rac. The easiest way that I found to do this was to secure one end of the ric rac to the end of stick with tape, and then paint a line of fabric glue along the side of stick. Twirl the stick on one end while you feed out the ric rac so that it covers round, then secure at the other end with tape. Leave to dry.

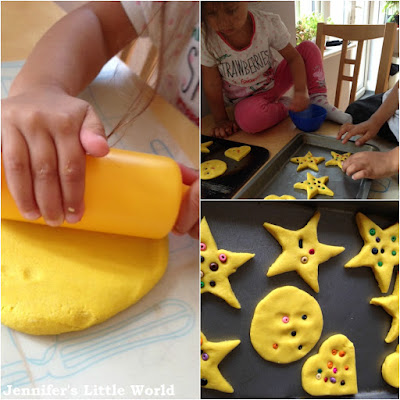
The toppers for the wands are made with salt dough. I used a very basic recipe - two parts of plain flour to one part salt, with a few drops of yellow food colouring and enough water to mix it to a dough. I used a heaped tablespoon as my part measure and it made enough for about eight toppers.

Sugru beaded fairy wands craft for children

I sorted out some small wooden beads for the children to use to decorate the salt dough. I've seen enough crafts on Pinterest using melted plastic beads to be wary of using plastic beads in the oven! Then we made up the salt dough and cut out shapes, placed them on a baking tray and pressed in the beads. This amount of salt dough made enough for about eight shapes, so the children could choose their favourite when they were dry.
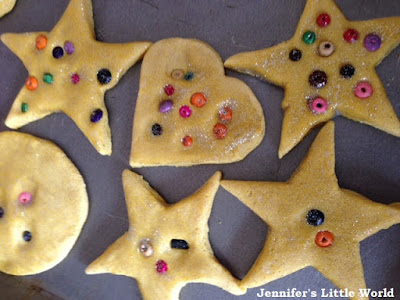
Sugru beaded fairy wands craft for children

When it came to baking the salt dough, I kept a very close eye on the oven and checked them at ten minute intervals, as I was a bit wary about burning the beads. In the end I baked it at a low heat (100C) for just over an hour, turning the salt dough half way through, and it was absolutely fine. Then I kept the salt dough pieces in the warm airing cupboard for a few days to make sure that they were thoroughly dried out and also placed them on a sunny windowsill. When they were dry I painted them with some silver glitter paint which makes them really shiny and sparkly.

Sugru beaded fairy wands craft for children

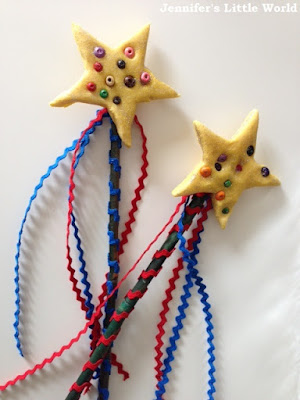
I cut some long lengths of ric rac to make streamers for the wand. The salt dough pieces are quite heavy, and so I chose to use Sugru to attach them to the top of sticks. I reviewed Sugru recently and was very impressed at how well it stuck different materials together. I used one 5g pack of yellow Sugru which was enough to stick both the salt dough and the long pieces of ric rac firmly to the stick. If you don't have any Sugru then you'd need to use some very strong glue, and perhaps tape the pieces of ric rac to the stick first.

Sugru beaded fairy wands craft for children

When the Sugru or glue has dried, the wands are ready to be played with! Children can invent all sorts of role play games, and these wands should be sturdy enough to last for a good amount of time.

The beads and ric rac that I used for this project were part of a review bundle from The Bead and Button Company.