Showing posts with label buttons. Show all posts

Monday, 24 July 2023

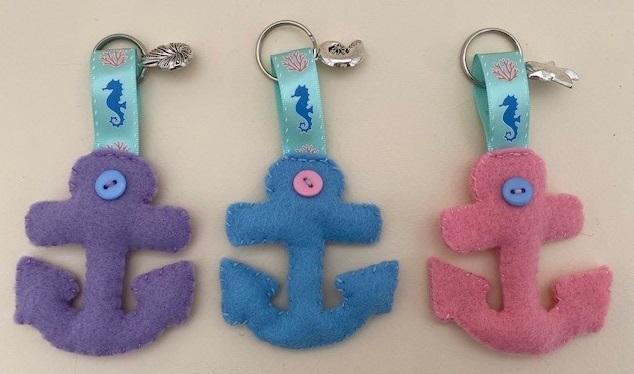
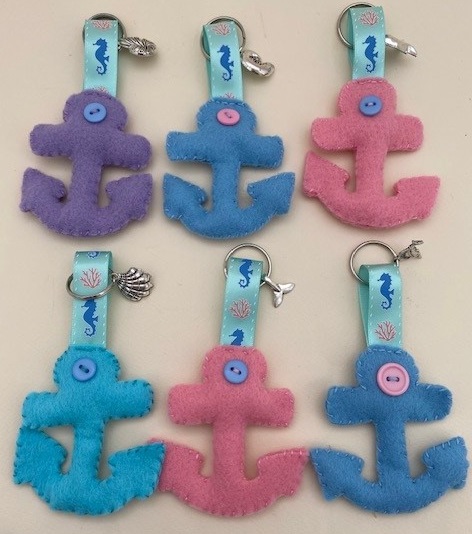
Felt anchor keyrings with an ocean theme

I've been a bit quiet with the crafty posts recently, but I've still been crafting away busily in the background! I am making a determined effort this year to work through some of my fabric and felt stash, and as we have a Disney cruise coming up I've been thinking of ways that I can use my stash to create some Disney cruise themed crafts. 

I decided to make a dent in my felt stash and make some simple anchor themed felt keyrings. I already had the keyring rings and some sea themed charms leftover from previous projects, and I picked up the gorgeous marine themed ribbon on my holiday craft shopping spree last year. It works perfectly for this project because the designs are vertical!

Felt keyring craft with anchor and ocean theme

The keyrings were very simple to make. I created an anchor paper pattern using Google image search for a simple anchor design and modifying it to fit what I wanted. I made sure that the top of the anchor was wide enough to fit the ribbon, then I cut out two anchor shapes for each keyring. I chose pastel shades because I have plenty in my stash and they co-ordinated well with the ribbon.

Felt anchor keyrings craft

I sewed the two halves together, adding stuffing into the bottom as I went along as it was quite fiddly to do it afterwards. The ribbon is sewed in firmly along the top, with the keyring and charm already in place. As a final touch I added a contrasting button to the front.

Marine themed felt keyrings in the shape of an anchor

I'm planning on using these along with some drawstring bags to present the gifts for my Fish Extender exchange.

Monday, 10 October 2022

Homemade Halloween felt bunting

I love making seasonal bunting to string from our mantelpiece and decorate for the season. A few years back I made some embroidered felt Christmas bunting, and as I'm currently trying to work through my felt stash I decided to make some similar Halloween felt bunting using felt, buttons and scraps of ribbon. 

Halloween homemade felt bunting

I made a simple cardboard triangle template for the flags which I used to cut out the felt. Because I was working from my stash I was a little limited when it came to my colour choices, so I chose to alternative black felt with a dark orange mustard shade. I first used my sewing machine to go around the edges of each flag and to sew them each to a length of thin black ribbon. The patterned ribbon and ric rac along the top of each flag covers up the stitches.

I love working with felt, it's so forgiving and so satisfying to sew on by hand. 

Halloween felt bunting embroidered flags and buttons detail

Each flag is different, with a different felt cut out picture as you can see in the pictures above. I either made up my own templates or adapted designs that I found online. The basic shapes are cut from felt and sewn into place, then the flags are embellished with scraps of ribbon, ric rac and buttons. I used co-ordinating embroidery threads for the sewing. The spider is sitting on some gorgeous spiderweb fabric and the cauldron is spouting tiny star shaped buttons.

Homemade Halloween bunting on mantelpiece

The scariest thing about this bunting is that I was able to make it entirely from my craft stash! Between past blog collaborations, supplies that I've treated myself to over the years and leftovers from past projects I have a sizeable stash of crafty bits and pieces. Although I'm not sure that I've made much of a dent, it was nice to be able to use up some things that I've had around for a while!

Homemade felt Halloween bunting with embroidered flags

I'm really pleased with my spooky Halloween bunting!

Saturday, 8 November 2014

Brown and pink felt button tree picture

A little while back I made a framed felt and button tree picture for my study and I loved it so much I decided to make a second one. I wanted to make a picture that was similar to the original yet also different, so I kept to a similar design but changed the colours quite a bit.

Felt and button tree picture in pink and brown

For my first picture I used a cheap silver frame that I picked up in my local craft shop, and while I was there I also picked up a second frame, but this time in black. The fabric that I used for the background was part of a bundle that I received to review, and the fabric that I used for this picture has the same pattern as the first but in different colours.

Felt and button tree picture in pink and brown


I chose to go with a dark red background and a pink tree and pink button blossom. I made it in exactly the same way as the first picture, planning out the placement of the buttons in advance, using a small amount of fabric glue to hold the felt in place, and then sewing everything else together.

Felt and button tree picture in pink and brown


It didn't take long to make at all, and I'm really pleased with it! Now I just need to find somewhere to display it, as I'm not sure that they look quite right when placed next to each other. Luckily we have lots of wall space in our house! I have so many buttons now in a huge range of different colours that I'm always thinking of crafts that I can use them in.

Felt and button tree picture in pink and brown

Monday, 28 July 2014

Felt and ribbon purse for carrying little treasures about

In this post I'm going into more detail about the felt, ribbon and button purse that I made for Mia, using some ribbon that I received from Fantastic Ribbons. It's really simple to make, and she is loving using it to carry her little treasures around the house while she goes about her role play. 

How to make a felt and ribbon purse for small treasures for a child

I should mention that this isn't a toy and you should always supervise your child while they are using it as the ribbon around the neck could be dangerous.

All you need is a piece of felt, some cord or ribbon, some velcro and some buttons. I chose purple felt to go with the pink dotty ribbon and buttons.

First work out how large you want the purse to me. Mine measures about 12cm wide by 9cm high. Your felt needs to be three times the height that you want the purse, then cut the top section so that it is shaped like a flat topped triangle. I made a template in paper first to cut out from the felt.
Fold up the bottom half of the purse and sew down each side. Then sew the ribbon down each side so that it covers up the sides. I suspect that there is a better way to do it than the way that I did it, possibly involving an iron, I did find it rather fiddly! Then sew in a small piece of velcro so that you can close the purse.

How to make a felt and ribbon purse for small treasures for a child

For the button embellishment I sewed the buttons onto a piece of felt first, then cut around it. It is sewn over the part of the flap where you could see stitches from the velcro underneath.

Finally, measure a long length of ribbon so that the purse will either sit over the recipients tummy or hang to about their waist, then sew in securely at each side. I twisted the ribbon so that the dotty side is always showing. Make sure that it is sewn as firmly as you can, as the purse is bound to be swung about while full!

How to make a felt and ribbon purse for small treasures for a child


And here's a photo of it in use! I'm sorry that it's a bit blurry, she doesn't stay still for long, and I've cropped out her head because (as usual) her hair desperately needed a good brush!

How to make a felt and ribbon purse for small treasures for a child

Monday, 21 July 2014

Green felt and button tree framed picture

I love crafting with felt and buttons (see my felt and button embroidery hoop art here!), and having recently come into possession of a lovely new silver frame that I picked up in our local craft shop on the school run, I made this little button tree picture with a patterned fabric background.

Green felt and button tree framed picture craft

Here's how I made it:


Materials:

Frame (mine has no glass)
Patterned background fabric
Green felt
Brown felt
Green buttons
Fabric glue
Scissors, needle, green thread, brown thread

Instructions:

I bought the frame in our local framing and stitching shop, they usually have a box outside with small frames for £1 each. It has no glass or backing to it, but that's fine for this project. You can easily buy cheap frames from Ikea or the large supermarkets.

Green felt and button tree framed picture craft

The first thing to do is to plan the design for the button tree on paper by drawing around the frame and creating an outline for your picture. You also need to choose the buttons that you want to use and plan where they will be positioned. I decided to stick to round buttons in the same colour, but I found loads of inspiration on Pinterest with all different shapes and colour of button. When your design is completed, take a photograph that you can refer to later as you sew on the buttons.

Green felt and button tree framed picture craft

Cut a piece of thick card to the same size as the frame. Then cut out the background fabric a couple of centimetres larger than the card. Iron if necessary.

Use your paper drawing to trace templates for the felt pieces (the trunk and leaves) and cut them out. My one tip for cutting felt - buy some decent, sharp scissors and only use them for cutting felt and other fabric to keep them sharp. Use pins to secure the template to the felt when cutting. The tree trunk shape was quite fiddly to cut, I found it easiest to cut a little outside the template, and then neaten up once the paper template was removed.

Green felt and button tree framed picture craft

Using the frame as a guide, position the felt pieces on the background fabric and secure in place with some small dots of fabric glue. Don't use to much as it will make it harder to sew through the fabric later.

Green felt and button tree framed picture craft

Then stitch around the trunk and leaves. I used contrasting colours and large stitches because that's the way I roll, you could match the colours so that the stitches aren't visible.

Green felt and button tree framed picture craft

Then it's time to sew on the buttons. You don't need to be as diligent as you do for buttons sewn onto clothes. Make sure that the buttons are all the same way up and decide how you want to align the centre holes, I went for random directions. I stuck pretty closely to my original design, but I did make a couple of changes.

Green felt and button tree framed picture craft

Then you need to mount the fabric design onto your piece of cardboard. Check the positioning carefully, then fold over the edges and secure them with some long stitches across the back. Sew down the corners for extra security.

Green felt and button tree framed picture craft

Then I found that my picture just rested neatly in the frame. If you have a more substantial frame you'll have a backing to hold it into place. I think it works better without glass as it's such a three dimensional piece. Here's the final piece!

Green felt and button tree framed picture craft

I loved it so much that I went on to make a second button felt picture which you can see here - Brown and pink felt button tree picture. They both look great hung up on the wall just above my desk!

Sunday, 13 July 2014

The Bead and Button Company

I was recently asked to review some items from The Bead and Button Company. Such a treat! I spent ages browsing the site to choose a selection of products, and I was so excited when they arrived. I was completely spoilt for choice, as they sell not just beads and buttons but also fabric, jewellery supplies and all sorts of other crafty bits and pieces. Here are the goodies that I chose:

The Bead and Button Company craft products review

I wanted to come up with a few projects to showcase some of the things that I received. Even though I love buttons, and my button tin is filled to overflowing, I couldn't resist a few more mixed packets.

The Bead and Button Company craft products review

These buttons only actually come from two bags - the multicoloured and wooden buttons were from the 75g Random Mixed Assorted Buttons pack (and that's not all of them!) and the plastic buttons in the bottom right are from a bag of 50g Mixed Buttons (available in various mixes of colours). I now have enough buttons to fulfil my button crafting needs for a long while yet!


I've long been inspired by button tree craft pictures that I've seen on Pinterest, so I had a go at making my own felt and button tree picture using a selection of green buttons from each pack. For the background of the picture I used some gorgeous patterned material from the Jasmine Fabric Bundle, , the same basic pattern in six different colour combinations. I'm also going to use a darker version of the pattern to make a different tree picture, perhaps with pink buttons this time.


Felt and button tree picture craft


Then I moved onto crafting with beads. I ordered a pack of Random Mixed Beads, again excellent value for the number of beads that I received. A lovely selection of wooden, plastic and metal beads in all shapes and sizes. 


The Bead and Button Company craft products review


First, I pulled out some of the Sugru that I've been crafting with for a few weeks now, and upcycled an old keyring with Sugru to create a beaded keyring. It was so easy to do, and the beads just press straight into the Sugru. I used some of the tiny wooden beads for this.


Keyring upcycle with beads and Sugru

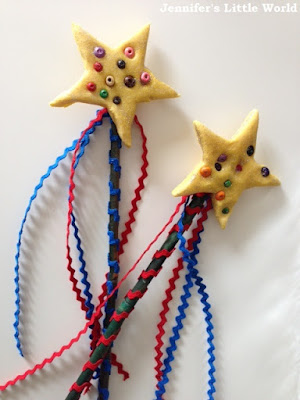
Then I worked with the children to make some salt dough fairy wands. Again we used the wooden beads, but this time I was brave enough to put the beads in the oven while the salt dough cooked. Fortunately they came out fine!


Beaded fairy wand craft

To decorate the stick and make streamers I used some ric rac, a crafting essential that has been missing from my craft box. I chose a roll each in red and blue. Again, there is plenty there to keep me going for a long time and it's lovely, really bold and bright in colour. I still have a packet of heart buttons to use, which I think I'm going to use to customise plain hair clips. I also chose a simple pom pom maker, as I've been after one for a while and I think that the children will enjoy making some pom pom creatures! 

You can also see some more fab ideas using products from The Bead and Button Company over at Baby Budgeting. 


I was given the opportunity to select these lovely items from The Bead and Button Company for review.