I watched the video through a few times before I began, and I worked out exactly how many beads I would need of each colour. Then I gathered all my supplies together ready to work on.
This is the first time that I've tried a beading craft with wire, and I will say that I did not find it as easy as I expected. It took me several attempts and a long time, to produce my beaded fish, and I had to undo my work many times. I changed the sequin that I used for the eyes to a larger one, and because my beads aren't all uniform sizes he has come out a little wonky.
Once I had got the hang of it I progressed quickly, and I think that I could probably make another one very easily. But this craft didn't really appeal to me, so I don't think I'll be making any more. I'll be looking for some other crafting options next time when it comes to de-stashing my beads!
I used slightly larger beads than the ones used in this tutorial so I cut myself a longer piece of wire which was a good move because I very nearly ran out.
Here are the exact quantities of beads that are needed for one beaded fish using this tutorial:
Tail - 10 (orange)
Mouth - 4 (red)
Colour 1 - 44 (green)
Colour 2 - 28 (gold)
Colour 3 - 19 (silver)
Eyes - 2 (black)
You also need:
2 round sequins for the eyes
1 jump ring (and pliers to open and close it)
1 keychain attachment
A length of wire, I used a 1m, which is thin enough to pass twice through the centre of each bead
This is a fun and meditative craft project, and if you have beads in lots of different colours you could easily and quickly bead up a whole aquarium. But for now I'm just going to enjoy my one beaded fish!
A little while ago I shared a video that had caught my attention about batch prepping craft projects like you do meals. I loved the idea of planning out a craft in advance and getting everything that you need ready so that you can get started when you have the chance.
I set myself a challenge to batch prep five craft projects, using supplies that I already own from my craft stash, and to complete them by the end of the year. September always feels like a good time to start new things, and so here are the five craft projects that I've put together. There are a couple of Christmas ones, so that will help with my self-imposed deadline!
Autumnal beaded bracelets
I have had the supplies for this for so long, it's been about two years since I picked up a string of beads on holiday and thought they would be perfect for some bracelets in Autumn colours. I've sorted them by colour and also hunted through my bead stash for other beads which fit the theme.
Beaded fish key rings
A second beading craft, because I definitely need to make a dent in my beading supply stash. I came across this craft in an article I was reading about alternatives to doom scrolling - the author had made a huge pile of them! I've watched a video tutorial online to make sure that it's something I can attempt, and luckily I already have some wire and the clasp. When I was watching the video I counted up how many beads are needed of each colour and gathered them all together.
This is the video tutorial that I'll be using:
The gorgeous tiny cat plate was a souvenir from Kappabashi Street in Tokyo, isn't it lovely!
Christmas fabric gift bags
I have had some Christmas fabric lying around for far to long, and I've had no clue what to do with it. It's nice but it's not really my favourite, and I don't even remember buying it. So I've decided to make some drawstring gift bags to hold groups of smaller gifts under the Christmas tree. I love making drawstring bags, they are so easy, and very forgiving if your seams aren't quite straight, I don't even line them. I also have a pile of Christmas ribbon and cotton in various colours to use up from my stash.
So in my tub I have five pieces of Christmas fabric, a co-ordinating ribbon for each, and some coloured cotton which I will use in my sewing machine.
Christmas mug rugs or coasters
I saved some of the Christmas fabric, along with a few other co-ordinating pieces from my fabric stash, to make some Christmas themed mug rugs.
This is the pattern that I'm intending to use - Super Simple Mug Rug Tutorial for Beginners. To make each 5" by 5" mug rug you need four strips of different fabrics each measuring 2 1/2" by 6" which you then cut in half. So when I was preparing the fabric for my Christmas gift bags I chose my two favourite fabrics and cut a strip from each to use, along with other matching fabrics from my stash. I intend to make four mug rugs.
I really hate measuring and cutting fabric, so having it all ready to go will definitely make me more likely to start the project! Both fabric projects are now stored next to my ironing board, so next time I am ironing I will iron the fabric pieces too.
Felt pumpkins for Halloween
For my final project I had my eye on my felt stash. I wanted to make something that used up quite a bit of felt (I have a whole drawer full!) and that was also something seasonal. I decided to have a go at some felt pumpkins and I found this tutorial to use which comes with a free pattern - DIY Felt Pumpkins with free printable pattern.
My only problem is that I don't have much orange felt in my stash! So I pulled out some pieces in other seasonal colours which I'm hoping will work. I'm also using green felt for the leaf instead of fabric and I'll be using gold twine - I'm making sure that all my materials for these projects come from my extensive craft supply stash.
I have gone ahead and cut out the felt pieces - which is always the most off-putting part of any fiddly felt project - and I have the stuffing stored close by. So it's all ready to go!
Those are my five batch prepped crafts, I'll share updates as I complete them!
Recently this video ended up in my feed and I really enjoyed it, so I thought that I would share it:
It's all about batch prepping crafts in advance, so that when you have some time for a crafty project you have everything that you need all in one place to get started. The video shares a few examples of simple craft kits that the creator has put together, including a cross stitch embroidered journal and a paper garland kit.
I remember a similar idea from back when I used to lurk on scrapbooking forums - people would discuss preparing their pages in advance by gathering together photographs and co-ordinating supplies in a plastic sleeve, ready to put a page together when they had some spare time.
I thought this was such a great idea! But for me, it's not so much about preparing some new crafts that I want to try, but rather using this technique as a way to use up some of the craft supplies that I have lying around.
I have my craft supplies stored in various locations around the house - fabric in drawers in my wardrobe, beads in little wooden drawers in my study, patterned papers in the toy cupboard and so on. As well as various unfinished craft projects, mainly cross stitch kits, that are waiting to be continued. When I want to do something I often need to gather things from all over the house, and then return the leftovers once I'm done.
Photo credit Eric Prouzet via Unsplash
I've been having a think about the craft supplies that I have in my stash, and brainstorming some projects that I can work on to use them up. Some ideas that I have so far - bracelet making using my enormous bead stash, some kind of project that will use up tiny scrap pieces of fabric, finding a use for my patterned paper and collage supplies.
I'm going to challenge myself to bag up five craft projects, as far as possible using only supplies that I already own, and then complete them by the end of the year. I'll include all the materials that I'll need, as well as any printed instructions or templates. As we head towards Christmas I'll try for some seasonal theming, and I'll attempt to choose projects that will leave a noticeable dent in my crafting stash.
I've been a bit quiet with the crafty posts recently, but I've still been crafting away busily in the background! I am making a determined effort this year to work through some of my fabric and felt stash, and as we have a Disney cruise coming up I've been thinking of ways that I can use my stash to create some Disney cruise themed crafts.
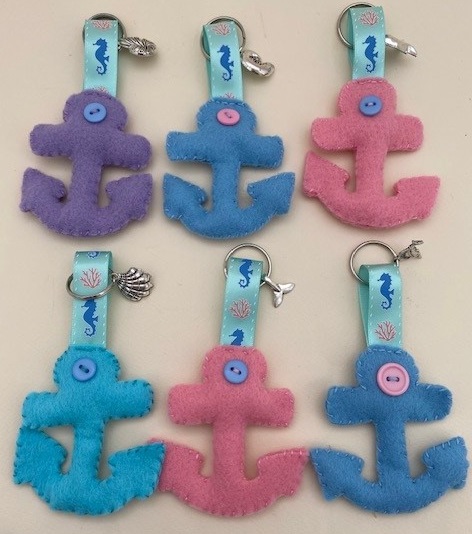
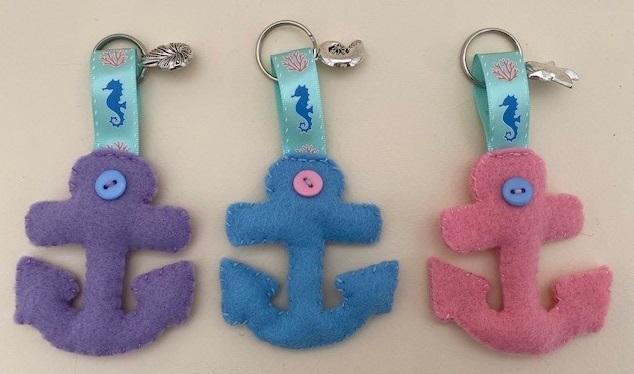
I decided to make a dent in my felt stash and make some simple anchor themed felt keyrings. I already had the keyring rings and some sea themed charms leftover from previous projects, and I picked up the gorgeous marine themed ribbon on my holiday craft shopping spree last year. It works perfectly for this project because the designs are vertical!
The keyrings were very simple to make. I created an anchor paper pattern using Google image search for a simple anchor design and modifying it to fit what I wanted. I made sure that the top of the anchor was wide enough to fit the ribbon, then I cut out two anchor shapes for each keyring. I chose pastel shades because I have plenty in my stash and they co-ordinated well with the ribbon.
I sewed the two halves together, adding stuffing into the bottom as I went along as it was quite fiddly to do it afterwards. The ribbon is sewed in firmly along the top, with the keyring and charm already in place. As a final touch I added a contrasting button to the front.
I'm planning on using these along with some drawstring bags to present the gifts for my Fish Extender exchange.
I recently decided that I wanted to make a big effort to work my way through my fabric stash. It's not a huge stash compared to many fabric crafters, but it was starting to overflow the drawer space that I had available, and I was feeling bad about all the pretty fabric that I had stashed away.
I've shared a few of my recent fabric stash projects here on the blog:
My latest project was another travel related project - I wanted to make myself a simple eye mask to wear for sleeping on a plane. There are lots of tutorials online but I settled on this one from Tilly and the Buttons as it has a free pattern, a video, and also written instructions if you need to slow down a bit!
The tutorial was fairly easy to follow, and I think that I managed to make myself a reasonable eye mask!
It's definitely far from perfect - the process was very fiddly and I ended up having to take it all apart and start again which meant that it all ended up a little smaller than it should be! I was particularly pleased with the fabric elastic covering which took me ages to work out, it's easy to sew up a narrow tube but not so easy to turn it the right way round!
I'll be trying it out on our next holiday but I think that I may need to revisit this project and have another go to improve it a little! I know that I'm supposed to be working through my stash, but I'm tempted to see if I can buy some cheap fleece material (or perhaps recycle an old blanket) to make a fluffy eye mask.
One of my resolutions this year was to try and make a bit of a dent in my craft stash. In particular I have lots of felt and fabric, as well as drawers full of crafty bits and pieces like ribbon and buttons. I love crafting for the different seasons and celebrations, so I decided to make some felt Easter bunting to hang over the fireplace, inspired by my Halloween felt bunting.
I used the same cardboard template to cut out six flags in a variety of different pastel colours. I decided that three of the flags would have decorated Easter eggs and the other three would have a sheep, a chicken and a bunny.
For the different pictures I just searched online for line drawings of the shapes that I wanted, altering them a little to suit how I wanted them to look. I traced the designs from my computer screen onto some plain paper which I used to make templates for cutting out the felt pieces.
Once I had my six different designs planned out I went through my stash for embellishments that would fit. I used a lot of buttons for this bunting, and also various scraps of ribbon in shorter lengths which I had been hoarding. To sew the various parts together I turned to my collection of embroidery threads and cottons.
The bunting is strung together with a length of coloured thread - it was in a Christmas themed pack but I think it fits the bunting flags well! I used a needle to thread it through the flags so they can be easily positioned in case I hang the bunting in a different place in the future. I keep a small command hook on either side of the mantlepiece that I use to attach any decorations.
I'm really pleased with my seasonal bunting! I know that Easter isn't for a little while yet but it has inspired me to get out our small collection of Easter decorations too,and my fireplace makes me smile every time I see it.
One of my goals this year is to make a decent dent in my fabric stash. I have a huge drawer filled with fabric of all sizes and patterns, some given to me and some that I've bought. I have a number of larger pieces which I've been trying to work through, and my latest project was some fabric shoe bags for travel.
We are lucky enough to travel quite a bit, and I've got the packing down to a fine art. I always pack a spare pair of shoes for each member of the family, and I usually pack them in a plastic carrier bag. But these days I don't have such a stash of plastic bags, and it feels so wasteful to use them, especially as I don't like to reuse them after putting dirty shoes inside.
So the obvious thing to do was to make some fabric shoe bags. They hardly take up any extra room in the suitcase, and they are made in different colours and patterns so that they can be used to identify shoes belonging to various family members. They can be put in the washing machine after a trip ready to use next time, and when we are away at our destination they can be used to store the spare shoes neatly in the wardrobe or on a hook.
There are lots of tutorials for simple drawstring bags available but I just made mine up as I went along! I used a piece of fabric that measured 15" by 34" which makes for a roomy shoe bag. I sewed a seam for the ribbon along the long side, then folded it in half and sewed up the sides. The drawstring is a piece of long ribbon from my stash, threaded through and tied in a knot. They were so easy to make and I'm really looking forward to using them on our next trip!
Over the years I've accumulated quite a stash of crafting supplies. I do love having lots of materials that I can pick and choose from, and it's true that I usually have the right button or length of ribbon on hand to finish a project perfectly. But I also have some supplies building up that I really need to do something with. In particular I have lots of fabric and felt, and also a sizeable quantity of Hama beads and normal beads.
So I have decided that this is the year when I will really make an effort to craft from my stash. I made a start this summer when I started to work through my fabric stash and I made some projects that I was really pleased with. In particular I learned how to make zipped pouches, and I've found them really useful for all sorts of purposes. I also made some really handy laundry bags which we have taken away on holiday with us.
I've spent some time brainstorming by listing the supplies that I have and thinking about the projects that I want to make. I've also been browsing on Pinterest and I've created boards - one for my fabric stash and one for my felt stash - filled with ideas of projects that I could realistically attempt. This helped me to make an initial list in my new Bullet Journal of things that I could start to work on.
In September I challenged myself to complete ten craft projects by the end of the year and I found having a list written out really motivated me to get things completed. So to start myself off I have made myself a list of stash projects that I want to complete by the end of March. Here they are:
* Scrunchies - these are intended for an upcoming cruise. I want to make six in total, two for me and four for Mia, in anchor and pirate themed fabrics.
* A set of stretch beaded bracelets in red/brown/gold - similar to the ocean themed stretch bracelets that I made last year.
* Four adult trainer sized drawstring bags to hold spare shoes in the suitcase for holiday.
* A sleep mask to wear on planes
* A small fabric case for my sunglasses
* Some felt Easter hanging decorations
I think that this gives me enough to be getting on with for now!
I love making seasonal bunting to string from our mantelpiece and decorate for the season. A few years back I made some embroidered felt Christmas bunting, and as I'm currently trying to work through my felt stash I decided to make some similar Halloween felt bunting using felt, buttons and scraps of ribbon.
I made a simple cardboard triangle template for the flags which I used to cut out the felt. Because I was working from my stash I was a little limited when it came to my colour choices, so I chose to alternative black felt with a dark orange mustard shade. I first used my sewing machine to go around the edges of each flag and to sew them each to a length of thin black ribbon. The patterned ribbon and ric rac along the top of each flag covers up the stitches.
I love working with felt, it's so forgiving and so satisfying to sew on by hand.
Each flag is different, with a different felt cut out picture as you can see in the pictures above. I either made up my own templates or adapted designs that I found online. The basic shapes are cut from felt and sewn into place, then the flags are embellished with scraps of ribbon, ric rac and buttons. I used co-ordinating embroidery threads for the sewing. The spider is sitting on some gorgeous spiderweb fabric and the cauldron is spouting tiny star shaped buttons.
The scariest thing about this bunting is that I was able to make it entirely from my craft stash! Between past blog collaborations, supplies that I've treated myself to over the years and leftovers from past projects I have a sizeable stash of crafty bits and pieces. Although I'm not sure that I've made much of a dent, it was nice to be able to use up some things that I've had around for a while!
I'm really pleased with my spooky Halloween bunting!
I have recently come to realise that my craft stash is starting to get a bit out of control. I don't feel that I buy very many crafty things (apart from trips to the US that is!) There's a Hobbycraft within walking distance but I usually only visit when I have a voucher - last weekend they had a £5 voucher promotion and I walked out with £5 of products for free, I didn't spend an extra penny! I think I'm just very lucky to have lots of generous family and friends that think of me when they are having a crafting clear out!
But I'm starting to realise that my craft supplies are adding up. Earlier in the year I wrote about working through my fabric stash, and I have been doing pretty well at this. Last week was all about the tote bags - I made my own sea themed tote bag and then went on to make a few more which I am intending as gifts for smaller family members.
I also sorted through all my smaller scraps of fabric which I couldn't bear to part with. I tried some crazy patchwork but I couldn't get the hang of it so I made myself a template 7cm square and cut out as many squares as I could from leftover fabric in shades of pink, before being ruthless and throwing away the leftover pieces. I used the squares to make a little patchwork drawstring bag to hold my sewing machine pedal and cables. It's not perfect, and I really need to get better at lining up the squares before I sew them, but it does the job and it made a dent in my fabric drawer!
I don't have masses of stuff to be fair. But my stocks of fabric, felt, buttons and ribbons are now bulging out of their storage containers. I've collected quite a few Hama beads in both the mini and the midi sizes, and I also have plenty of paints, brushes and sketchbooks. So I really need to do something about it!
A few weeks ago I found it really helpful to put together a list of ten craft projects to complete by the end of the year. I've already ticked off six and have another one nearly finished! So I'm going to challenge myself to come up with a nice long list of craft projects that I want to make, based on the supplies that I already have in my various stashes. Then my intention will be to have a 2023 filled with crafting but not craft shopping, buying only the very basic supplies that I need for a project like glue or cotton.
I've made a start already with a couple of inspirational Pinterest boards for my fabric and felt stashes, and next I want to turn that into a written list of specific projects. Then I'll aim to gather the supplies for the first projects together so that I can get going. I'll be sharing my list towards the end of the year, so stay tuned!
Whenever we visit the US I always make a beeline for a craft shop. It's not quite as exciting as it used to be - thanks to online shopping we now have access to a much wider range of products, and on this trip in particular we found that prices over there have really shot up. But I always enjoy having a good look around and there are always plenty of things that I can't resist bringing home to add to my crafting stash.
I made trips to three large craft stores - Michaels, JOANN and Hobby Lobby. I also browsed the craft aisles in Target and Walmart and picked up a few bits at Dollar Tree (although thanks to inflation products are now priced at $1.25!) If you are planning a US shopping trip it's well worth downloading the app or looking on the website for each store and looking for coupons, as they are almost always available. I found coupons for 20% off the whole shop, or 40% off the highest priced item. Many of the shops also had rotating offers on specific product categories, with further discounts of 40% or 50%. If you are downloading the app from a non US phone then you might need to change your location settings to download the US version of the apps.
Here are some of the bits that I picked up, and I think that I was very restrained! Firstly fabric. I know I know, I've been writing about working through my fabric stash and trying to use some of it up. But the fabric that I have is all quite similar, mainly pink and flowery, and I wanted some more blues and greens. I found some lovely sea themed fabrics and all of these fat quarters were so cheap, some of them were just $1 each.
I also found some lovely rolls of ribbon, including some more sea themed patterns and a couple of Christmas ones.
I love a bargain, and lots of this ribbon came from two discount trolleys which were filled with rolls of ribbon for less than $1 each! I had a good rummage through and I love this photo that Mia snapped of me digging away - I was so engrossed that I didn't even notice her taking it!
I was recently given some beading supplies and that has given me a hankering to try some simple jewellery making. I want to make a simple stretch beaded bracelet with several different strands of coloured beads, mainly blue and green. On the right you can also see some lovely glass beads which look a little bit like sea glass which I'm planning to mix in. I just need to do a bit of research to find the best way to do it!
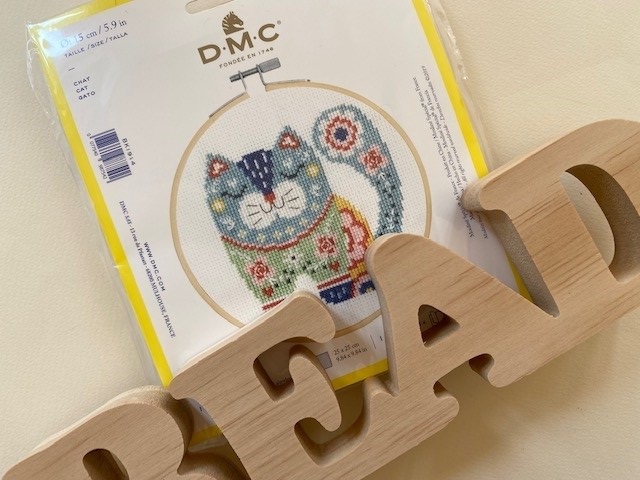
Finally two projects which I can start on right away. A little cross stitch kit of a colourful cat and a wooden letter shape to decorate - it says 'READ' and I think it would look good on my bookshelf. I've not planned what to do with it yet, I'll definitely paint it and then see if I think it needs something else added.
I'm really pleased with all my purchases and I didn't really spend that much. I'm looking forward to crafting away!
Over the last few weeks I've been making a real effort to craft only using items from my stash. Like most crafters I have a rather large stash. Over the years I've collected lots of things, some from my own shopping but also many things that have been passed on to me or that I've received as part of blog collaborations.
These are the things that I have most of:
Felt - I have a massive plastic drawer full of felt in a huge range of colours. My felt projects are small so I don't get through it very quickly. But I love working with felt and I have lots of ideas for things to make!
Fabric - I have another massive plastic drawer packed with fabric. I've been writing recently about some of the things that I've made with my fabric stash. It doesn't feel like I've made much of a dent though! I have a few larger pieces but mainly smaller cuts which would be great for patchwork.
Buttons - Many of these came from a collaboration that I did with a button company a few years ago, although I also save buttons that come as spares with clothes. Most of them are in lovely bright colours and I have some really pretty ones. They are sorted in plastic pots by colour and in a gorgeous button tin that I bought years ago (which also came full of buttons).
Beads - I've always collected beads and I've had a few happy shopping trips to the bead shop in Brighton. I was recently lucky enough to be given a box of beads along with a book on beading and I'm definitely inspired to get on and make something. I love wearing bracelets but I always forget to put one on, so I quite fancy having a go at making a few, I definitely have everything that I need.
Ribbon - I save any ribbon that I encounter, from hanging loops in clothes to ribbon from fancy boxes of chocolate. I also have some from ribbon blog collaborations and a few reels that I've bought for various projects.
Embroidery thread - I have masses of embroidery thread in every colour that you can think of. I have very rarely bought it, most of it I have been given or it is leftover from various embroidery and cross stitch kits. This part of my stash is brilliant because I can always find exactly the colour of thread that I need for any project!
Hama beads - I have so many Hama beads and pegboards, both the mini and the midi sizes. I need to work on some more mini Hama bead projects because I really love how they look.
In addition I also have lots of crafty bits and pieces that I don't consider to be part of my stash. I have paints, pens, pencils, coloured paper and card. I also have my in progress cross stitch projects - two large and a few smaller ones. Finally there are the craft books - but not too many and I love browsing through them for inspiration.
In many ways it is great having such a large and varied stash, because it means that I usually have something on hand when I'm looking. It also inspires me when I hunt through my stash. But I definitely need to challenge myself to complete some projects by working through what I have.
Recently I wrote about my fabric stash, and I've also shared some of the projects that I have been working on. I thought I'd do a little round up of some of the things that I've made so far!
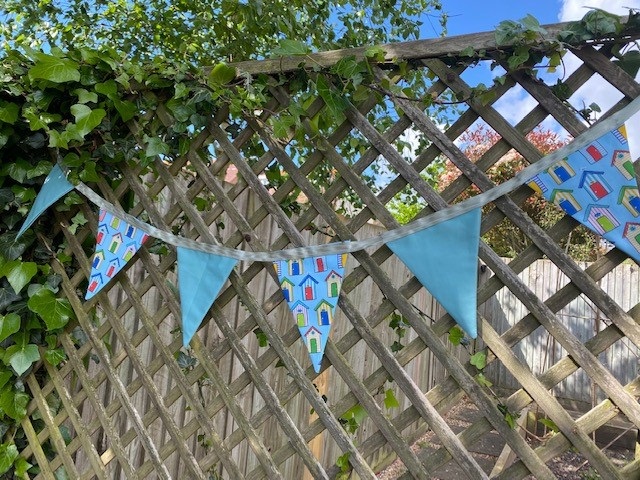
The garden bunting was my first project. It hangs at the entrance to my vegetable patch and I love seeing it when I go in to do the watering. I know that it won't last forever but I'm hoping it will make it through a few seasons.
These were my first large zipped pouches and I'm very pleased with them. They make great project bags, and use up scraps of fabric which I really like to look at. The flowery one is for Mia, she uses it to take her iPad and notebooks round with her if we are going visiting. I am using the other one for my current long term cross stitch project.
I've already shared these next projects - the first is a small fabric storage bin. I'd like to make more of these although I will need to buy some more interfacing. Interfacing isn't too expensive, but I want to work with what I have already first! These are a pretty way to store things, and I might also use some of my less loved fabric to make storage bins for inside drawers.
Secondly, these laundry bags were a great way to use some of my larger pieces of fabric. They look a bit mismatched but they are very practical, I've been using the smaller one to store the dirty clothes for my weekly white wash instead of having a heap inside the wardrobe. They are very sturdy and will be great for travelling as they can be washed when we get home.
Then I made a third patchwork zipped pouch which you can see in the picture below. I'm using to store my current craft project. It's made using smaller strips of fabric, I sewed a selection of long strips together to make each side, then cut each piece in half and swapped them over (I think it's called strip piecing if that description doesn't make sense!). It makes it look more complicated than it really is!
I really love my beach hut fabric and I wanted to use it for something for the home, so I decided to attempt a fabric bowl. I used this tutorial Charmed Fabric Bowl and it's very simple, basically you just cut out a circle of outer fabric, interfacing and lining fabric, sew them together then gather the edges to pull it up into a bowl shape. You finish the bowl by sewing around a long strip of fabric to hide the gathers at the top. I didn't manage to get the neatest finish on this bowl, but it looks fine from most angles!
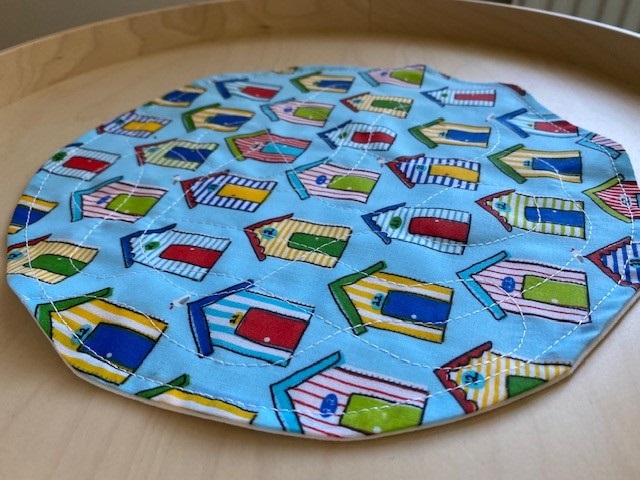
While making the bowl I really liked how the fabric looked when it was sewn together in a circle before it was gathered up. So I decided to make a small circular mat for my round table. There's no interfacing in this one, it's just two circles of fabric sewn together. But then I decided to try stitching some random loops across the top to practice using the sewing machine for curves. I was really pleased with how well it worked!
I'm rather impressed with how well I've managed with these projects. I've learned some new techniques - how to use a zipper foot, sewing curves, simple patchworking. I've also become a lot more confident with using my sewing machine, for example how to thread the machine and how to wind bobbins.
I still have an unopened Christmas print fat quarter bundle which I bought with a voucher last year. I have a few ideas but I'm a bit nervous because I really like the fabric! I'm wondering about a patchwork table runner or place mats, or perhaps some way of incorporating a display for the gorgeous Christmas cross stitch kits that I need to get on and finish.
I also now have a bag of fabric scraps which need using up, so I can see some more patchwork projects in my future!