Showing posts with label sugru. Show all posts

Tuesday, 2 December 2014

Festive Sugru colours and a funky Sugru coaster

One of the many things that I love about my blog is the opportunity to try out new crafting products. You may remember that I recently shared some crafty projects that I've made using Sugru. Well this Christmas Sugru have launched some new festive colours, presented in limited edition tins. Sugru has loads of uses around the home, and it also makes a great, more unusual gift!

How to make a Sugru spiral upcycled coaster

For Christmas 2014, Sugru released two limited edition tins, each containing five 5g packs of Sugru. One contained five different colours - Awesome Orange, Silver Grey, Woody Brown, Mossy Green and Panther Pink. The other tin contained five 5g packs of the Silver Grey, which is a great colour if you are repairing or improving gadgets around the home. I received a tin of the new coloured Sugru to try out.

So here is what I made with this lovely colourful Sugru - a cheerful Sugru upcycled coaster!

How to make a Sugru spiral upcycled coaster


I really love the little tin that the Sugru arrived in, and the colours inside are gorgeous, lovely pastel shades and a bit of a change from the more vibrant colours that I've used before. I decided that I'd use some of the colours to make a cheerful coaster for my morning hot chocolate. Sugru is heatproof, and because unlike similar modelling materials it cures at room temperature you can use it to upcycle items that can't be placed in an oven. A little goes a long way and it's really easy to mould. However it does start to cure as soon as you open the packet so you need to work fairly quickly, you have about half an hour or so before it becomes too firm to work with easily.

I had some old coasters that we bought a long time ago and they are pretty disgusting. I'm normally quite ruthless so I'm not sure why I kept them really apart from the thought that I'd do something with them one day! I decided to do a swirly pattern, so I drew a quick spiral in pencil as a base then I started with the first colour, Silver Grey. I rolled out a small sausage, stuck it onto the coaster and then pressed it down a bit. I continued with each colour in turn, filling in all the gaps. From time to time I pressed the coaster downwards onto a sheet of baking paper to try and keep it fairly flat. The coaster used three and a half packets of Sugru in total.

How to make a Sugru spiral upcycled coaster

The Sugru needs to be left for about 24 hours to cure completely, and it sets with a soft, rubbery finish which remains fairly flexible.


When I'd finished I had about half a packet of the orange Sugru left over, so I used it to mend my stick blender which kept coming loose from the handle. Because Sugru doesn't keep once you have opened the packet I find it useful to have a running list of little fixes in case I have some left over!

Although these Festive tins are no longer available to purchase, you can find Sugru in the colours that I've used on the Sugru website, along with lots of other colours and themed packs. Sugru is also available to buy from many retailers.

If you are feeling inspired I have rounded up all my Sugru crafts along with a few others, in this post - Crafting with Sugru. 

I received a tin of festive Sugru to review.

Sunday, 14 September 2014

Crafting with Sugru - a round up of ideas

A round up of different crafts using Sugru

A few months back I was sent some Sugru to review- a fantastic substance that that can be moulded by hand, bonds to almost anything, and sets overnight to form a flexible, silicone rubber. As well as using Sugru for a multitude of fixes around the house, I also came up with some crafty ideas which I have rounded up in this post.

My first Sugru crafting project was a Sugru beaded holder for my washi tapes. I knew what I wanted to make, but I was finding it difficult to keep the pencil upright, and held firmly in position. A blob of Sugru holds the pencil to the base lid perfectly, and then I used another strip around the base of the lid as a decorative feature, with some pretty beads pressed in to it.

Sugru beaded washi tape holder

Sugru comes in a range of bright cheerful colours, and you can also mix the colours to make different shades - you can find a Sugru mixing colour chart on their website. I love the original colours, and I used the bright blue for this Sugru beaded keyring upcycle. I took an old keyring and used Sugru to cover the original design, then decorated it with coloured wooden beads.

Using Sugru to upcycle a keyring craft

I made this funky Sugru coaster using some of the new festive Sugru colours.

Sugru coaster craft

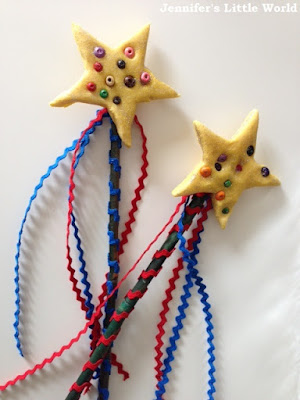
Sugru is also great if you want to glue things together that are tricky to stick with other types of adhesive. These salt dough fairy wands are very top heavy, and it would have been difficult to stick the star onto the stick using glue. A little ball of Sugru has kept them firmly in place and able to stand up to being waved around while spells are cast.

Using Sugru to make fairy wands

Leyla from This day I love...has made a fab tutorial video showing how to make an iPad case using Sugru and an old book. You can also see written instructions here.


Leyla also used Sugru to make a snowman to go inside a Frozen snow globe.

You can also find loads more Sugru craft ideas on the Sugru website.

I'll be updating this post with any future Sugru projects that I come up with. If you've made something crafty with Sugru then please do feel free to leave a link in the comments below to make this a helpful resource for other crafters!

Friday, 18 July 2014

Salt dough beaded fairy wands

I've been meaning to make fairy wands for a while. Mia loves dressing up in her princess and fairy costumes, and by calling it a magic wand I was able to interest Harry in the craft too! They are great for imaginative play, and with the streamers they look fab when they are being waved around.

Sugru beaded fairy wands craft for children

These pretty salt dough wands with their ric rac streamers are perfect for waving and twirling about. They take a few days to make as you need to wait for the different parts to dry, so you need to work on them in stages.

You need:

A length of bamboo garden cane or similar stick
Tape
Ric rac or ribbon
Strong glue or Sugru
Small wooden beads
Glitter/sequins/other decorations

To make the salt dough:

Two measures plain flour
One measure salt
A few drops food colouring
Water to mix to a dough

Each wand is made with a stick of bamboo from the garden, cut to about 30cm and with the ends sanded smooth. I decorated the entire length of each one with coloured ric rac. The easiest way that I found to do this was to secure one end of the ric rac to the end of stick with tape, and then paint a line of fabric glue along the side of stick. Twirl the stick on one end while you feed out the ric rac so that it covers round, then secure at the other end with tape. Leave to dry.

The toppers for the wands are made with salt dough. I used a very basic recipe - two parts of plain flour to one part salt, with a few drops of yellow food colouring and enough water to mix it to a dough. I used a heaped tablespoon as my part measure and it made enough for about eight toppers.

Sugru beaded fairy wands craft for children

I sorted out some small wooden beads for the children to use to decorate the salt dough. I've seen enough crafts on Pinterest using melted plastic beads to be wary of using plastic beads in the oven! Then we made up the salt dough and cut out shapes, placed them on a baking tray and pressed in the beads. This amount of salt dough made enough for about eight shapes, so the children could choose their favourite when they were dry.

Sugru beaded fairy wands craft for children

When it came to baking the salt dough, I kept a very close eye on the oven and checked them at ten minute intervals, as I was a bit wary about burning the beads. In the end I baked it at a low heat (100C) for just over an hour, turning the salt dough half way through, and it was absolutely fine. Then I kept the salt dough pieces in the warm airing cupboard for a few days to make sure that they were thoroughly dried out and also placed them on a sunny windowsill. When they were dry I painted them with some silver glitter paint which makes them really shiny and sparkly.

Sugru beaded fairy wands craft for children

I cut some long lengths of ric rac to make streamers for the wand. The salt dough pieces are quite heavy, and so I chose to use Sugru to attach them to the top of sticks. I reviewed Sugru recently and was very impressed at how well it stuck different materials together. I used one 5g pack of yellow Sugru which was enough to stick both the salt dough and the long pieces of ric rac firmly to the stick. If you don't have any Sugru then you'd need to use some very strong glue, and perhaps tape the pieces of ric rac to the stick first.

Sugru beaded fairy wands craft for children

When the Sugru or glue has dried, the wands are ready to be played with! Children can invent all sorts of role play games, and these wands should be sturdy enough to last for a good amount of time.

The beads and ric rac that I used for this project were part of a review bundle from The Bead and Button Company.

Monday, 14 July 2014

Keyring upcycle with Sugru and beads

Since I received some Sugru to review in my crafting I've been thinking of more and more ways that I can use it. Although it's similar in many ways to other polymer clay type products, a big advantage is that Sugru cures at room temperature, so you can use it for things that you don't want to put in the oven, for example if you are using it to customise objects.

Keyring beaded upcycle using Sugru craft

I wanted a more individual keyring for my keys, so I used some Sugru and some small wooden beads to upcycle this old metal keyring.

Keyring beaded upcycle using Sugru craft

 It was very easy to do. First I came up with a few designs, and chose the one that I liked best. I planned it out with the beads on my desk first, and took a photograph on my phone that I could refer to as I went along. Then I rolled out the Sugru and flattened it down to cover the keyring. One 5g pack was sufficient for this project. You can get the Sugru pretty smooth with your fingers, but I quite liked leaving it a little bit bumpy and uneven.


Keyring beaded upcycle using Sugru craft

Then I pressed the beads into the Sugru in my chosen pattern. I found it easiest to use tweezers to place the beads where I wanted them, and then pressed down with fingers. I left the keyring resting on a piece of cling film while it cured, as it's one of the only things that Sugru doesn't stick to and I didn't want it permanently attached to the desk! Sugru remains pliable for about half an hour after you open the packet, and then you need to leave it to cure for 24 hours.

Keyring beaded upcycle using Sugru craft

I'm loving my new keyring! If you are looking for more crafty ways to use Sugru you might like this post - Crafting with Sugru, a round-up of ideas.


I received both the beads and the Sugru that I used for this project as review products.

Tuesday, 1 July 2014

Sugru beaded washi tape storage

Recently I was sent some Sugru to review and to see how I could use it in my crafting. I've found it a really versatile material, and as well as in crafts I've also been putting it to good use fixing and improving things around the house! Today I'm sharing something pretty and very easy that I've made - a simple storage solution for my rolls of washi tape.

Sugru beaded washi tape storage craft


My washi tape collection is not huge at the moment, but this solution is so simple that you could make several of them, perhaps to organise tapes by colour or design. It's so nice to have them on display rather than left in a drawer, and it will remind me to get them out and use them!

You need:

A small (5g) pack of Sugru in your favourite colour
An old pencil
Some kind of small lid, similar to those from lip balm or make up containers
Some tiny beads

Sugru beaded washi tape storage craft


Directions:

Take a piece of Sugru about the size of a small marble and place into the centre of your lid. Press the pencil down into the Sugru so that it is held firmly.

Take the rest of your Sugru and roll out into a snake with the same circumference as your lid. Mould it around the sides of your lid and rub to smooth it out.

Sugru beaded washi tape storage craft


Press small beads into the Sugru to decorate, or you could create different textures by imprinting with different objects.

Sugru beaded washi tape storage craft

One the Sugru has cured for 24 hours, you can arrange your washi tape and display! Sugru is ideal for this craft because it sticks the surfaces together firmly. Sugru is a self-setting rubber, with a consistency much like plasticine. Once removed from the packaging you have about half an hour to mould it, then you need to leave it for 24 hours to cure. Once cured, it remains flexible, as well as being waterproof, electrically insulating and stable in temperatures from -50°C to +180°C.

If you are looking for more ways to use Sugru in your crafting you might like this post - Crafting with Sugru, a round-up of ideas.

I received some packets of Sugru to review