Showing posts with label food. Show all posts

Monday, 9 September 2024

Review - Sakuraco monthly Japanese snack subscription box

I received this snack box in exchange for a review

Recently I was given the opportunity to try out a Sakuraco monthly Japanese subscription box. The boxes support local Japanese snack makers, and each box contains twenty traditional, authentic and artisan Japanese snacks and teas. The box also includes a lovely piece of special Japanese tableware which you can use to display and serve the snacks. 

Japanese snack box subscription review

I received the September 2024 box, which is themed around the Autumn Moon Festival. The box celebrates the Japanese tradition of viewing and embracing the serene beauty of the autumn moon, when people will often gather with friends and family to celebrate the changing seasons and connect with nature's rhythm. Several items in the box depict rabbits under the moonlight that represent the Moon Rabbit, a popular Japanese legend.

Sakuraco subscription box review contents

I love Japanese culture but I'm not very familiar with the food, so I was eager to try some different treats! All of the packaging is in Japanese, but the box comes with a booklet which contains detailed descriptions of the snacks alongside information about the makers and some cultural insights. There is also allergy information.

Japanese treats for September moon festival

I had a lovely time trying out all the different treats and serving them to myself on the gorgeous rabbit plate! The portions were just the right size - small enough to be able to try several in one sitting, and large enough to give you a good impression of the treat. I particularly loved the Lemon Baked Chocolate in the paper case in the photograph above, it had a really crumbly texture and a sweet lemon flavour.

Japanese snack box subsciption

I also really enjoyed the Tsukimi Mikan Cream Cookie with a printed rabbit design, and the Custard Taiyaki sweet fish-shaped pastry which is sold on street stalls at this time of year. They were the ideal size to leave you satisfied and they paired perfectly with the Tsukimi Ryokucha green tea.

Japanese artisan sweet treats

The box contained a great selection of savoury treats too, like these Black Sesame Miso Arare. They were satisfyingly crunchy and had an interesting mix of umami and sweet flavour. 

Japanese Black Sesame Miso Arare snack

I really enjoyed the opportunity to try out this range of Japanese snacks and treats. I also loved the theming, and the snippets of information about Japanese culture that accompanied the various items. It was a really fun way to sample some Japanese flavours. The selection of snacks was varied and interesting and it felt as though there was plenty included.

You can find out more about the boxes here - Sakuraco Japanese snacks subscription boxes.

Sakuraco Japanese monthly snack subscription box

Friday, 27 January 2023

Food and drink at Champneys Forest Mere - what is included, menus, photos and timings

UPDATED JANUARY 2025

Following a recent stay at Champneys Forest Mere, I found that I needed to update the below post, as some things have changed quite a bit. Here's what is different:

The breakfast buffet was very similar to before, but I didn't see a smoothie and there was no hot porridge on offer. Any hot food was chargeable from a separate menu.

Lunch is now just served as a buffet. There was a soup with bread, a few salads and some warm food including pasta and some meat and vegetables. There was a reasonable selection but it could get a little crowded at busy times. It was also mostly the same food every day.

We stayed for three nights so we had dinner included on three evenings. Previously there were two menus in rotation, but on this occasion there was only one menu so we had the same choices every evening. On our last evening we were upgraded to eat in the Mere Restaurant which is a little more formal and I think usually for people staying in the suites. Our dinner here included a very small glass of Prosecco and a tiny smoked salmon amuse bouche. Although a nicer setting, the service here was very slow and we spent a long time waiting around for our food. It took us over two hours to get through our dinner. 

It was a shame that the menu was the same every evening, as although there was a range of choices, based on our previous experience we were expecting a different menu on at least one evening. 

Champneys Forest Mere dinner menu January 2025

Overall I did feel that the selection of food wasn't as good as on our previous visit, and there has definitely been some cost cutting going on. Also the food portions are not huge - we appreciated the extra biscuits and snacks we had brought along!

One afternoon my Mum treated the four of us to a hot drink and a cake in the cafe one afternoon, and while this was very tasty it came to over £35 which seems excessive. 

ORIGINAL POST

Before my recent spa break at Champneys Forest Mere I was really interested to find out more about the food that would be on offer. The Champneys website wasn't very helpful, and so I thought I'd share some of my experiences with the food - what was included, timings, photographs of the food that we tried and also some photos of the menus. I hope that it is helpful if you are planning a stay at Champneys Forest Mere! Scroll to the bottom to see a few menus.

We stayed at Champneys for three nights and so our stay included three breakfasts, two lunches and three dinners. There is additional food and drink available to purchase in the café during the day and there is also a kettle along with tea and coffee in the hotel rooms, as well as plenty of drinking water stations.

For breakfast and lunch dining you are welcome to wear casual clothes, including your robes and flip flops, but for dinner the dress code is smart casual. When we visited all our meals were served in the same restaurant.

Meal times do need to be booked in advance. You can book your first meal when you arrive, then you can book a meal or two ahead each time you arrive to eat. We had no problems booking the slots that we wanted. We were given the following timings - Breakfast 7.30am - 10am, Lunch 12pm - 2pm and Dinner 6.30pm - 8.30 pm however the restaurant did in fact open at 6pm for dinner. We usually ate early so it wasn't very crowded, but later slots seemed to be busier. It's worth arriving a few minutes early to avoid a queue when you arrive to check in for a meal.

Champneys flavoured water station

The only included drinks with meals were still or sparkling water, apart from at breakfast when there was juice available. If you want something more interesting to drink (including alcohol at both lunch and dinner) then that will cost extra at bar prices that I would say are on the expensive side. 

Breakfast

Breakfast was served as a buffet with lots of cold choices, if you want a cooked meal then that is at an extra cost. There was a selection of healthy cereals, fruit and yoghurt, a bread station with different breads, spreads and a toaster, along with juice, tea and coffee. One morning there was a smoothie available, and you could also request a generous portion of hot porridge as an included choice. 

Lunch

Lunch was served as a sit down meal with starter and a main, with a dessert station with three or four small desserts to help yourself to. Sometimes there was a bit of a wait for the desserts as they disappeared quickly - they were admittedly quite small and so lots of people were enjoying more than one! We found the lunch menu was definitely as filling as a main meal. The only dessert that wasn't a hit was the vegan chocolate mousse (bottom right) which didn't taste of chocolate at all! The other desserts were much nicer, and don't let me put you off the vegan chocolate torte on the dinner menu which was delicious! The soup of the day for a starter was always a vegetarian soup of some kind and was very good.

Champneys Forest Mere Lunch menu - mains, starters and desserts

Dinner

Dinner was a slightly more formal meal, with larger portions than lunch. Some of the meat, the more indulgent dessert and the cheese board cost extra. It seemed that they alternated menus, so we had the same menu for the first and last night of our stay. There were also a few dishes that were repeated on both menus.

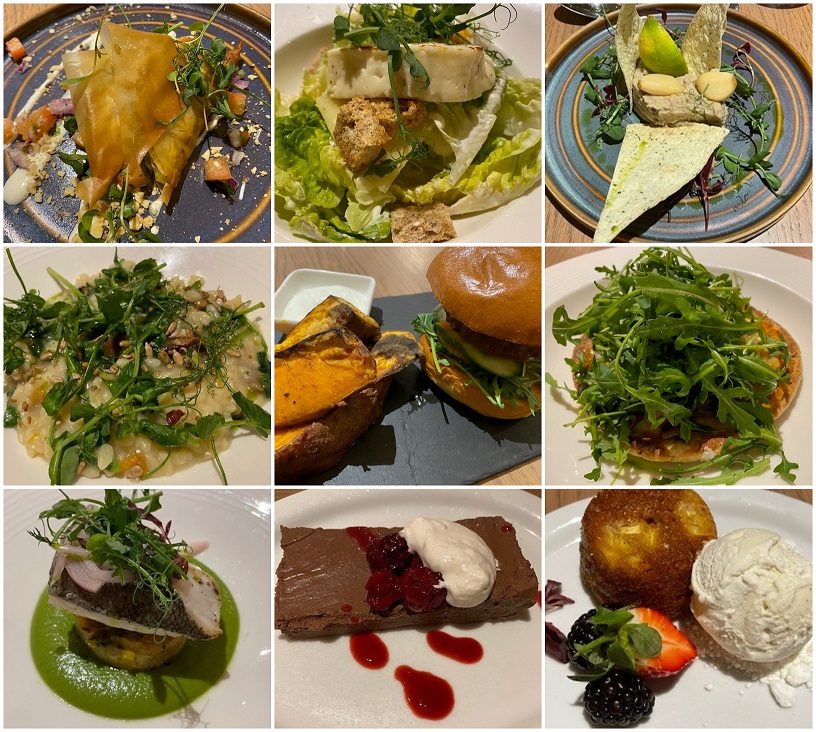
I enjoyed all of these meals. The samosas (top left) and the halloumi Caesar salad (top middle) were particularly good. The only one that I wasn't keen on was the vegan plant burger (centre) as it was too 'meaty' for my liking, I'm not keen on meat replacements that taste like meat. But everything else was delicious! All the meals had plenty of garnish and were well presented. They were large portions but not too big, and it was a good opportunity to try out some different foods that I wouldn't prepare or eat at home. I've never eaten so many pumpkin seeds in my life!

Champneys Forest Mere Dinner menu - starters, mains and desserts

I tried to take some photos of the menus so that you can see the different choices and what is included with the cost of a stay.

Champneys Forest Mere Lunch Menu One:

Champneys Forest Mere Lunch Menu one

Champneys Forest Mere Lunch Menu Two:

Champneys Forest Mere Lunch Menu two

Champneys Forest Mere Dinner Menu Two:

Champneys Forest Mere Dinner Menu two

Champneys Forest Mere Dinner Menu Three:

Champneys Forest Mere Dinner Menu three

We were all very pleased with the range of food on offer. Admittedly we are mainly vegetarian and not big eaters. I could imagine that if you are used to eating more meat and larger portions then you might not find it as satisfying. But as part of a health conscious break then I found that it was perfect (and of course there is nothing to stop you bringing your own extra food and drink to enjoy in your room!)

We enjoyed trying out some new things and found plenty of interesting choices. Additionally the service in the restaurant was very good with plenty of helpful staff, and plates were cleared promptly. All in all we had an excellent dining experience on our spa break at Champneys Forest Mere!

Thanks to my family members for help with the photos!

Monday, 21 October 2019

Simple iced Halloween gingerbread biscuits and cookies

Simple Halloween gingerbread cookies and biscuits

I love gingerbread biscuits, and this Halloween I decided that I'd have a go at some Halloween themed iced gingerbread cookies. I must admit that I'm not very well practised when it comes to icing, so I was quite pleased with the results!

Below is the recipe that I used, it's the best one that I've tried so far. The dry and wet ingredients are in the correct proportions, and the biscuits keep their shape well while cooking.

Ingredients:

450g plain flour
2 tsp ground ginger
1 tsp bicarbonate of soda
115g unsalted butter
5 tbsp golden syrup
150g soft light brown sugar
1 large egg

Royal Icing sugar and water to decorate

Method:

Preheat the oven to 180C and grease baking sheets.

Sift the flour, ginger and bicarbonate of soda into a large mixing bowl.

Put the butter, golden syrup and brown sugar into a saucepan and heat until the butter has melted.

Stir the wet ingredients in to the dry ingredients, add the egg, then mix to a firm dough.

Roll out the dough and cut out your shapes. For these biscuits, I used a circular cutter (for the spider webs), a gingerbread man (for the skeletons and mummies), and and Easter Egg (for the skulls). Place onto the baking trays.

Bake for 10-15 minutes until golden brown. 

Gingerbread shapes recipe

When the biscuits are cool they can be iced. I used powdered Royal Icing and added enough water to make a thick icing, then I used a piping bag to ice. I came up with four different designs - the mummy and the skeleton use the gingerbread man base, and the spiders web is drawn on a circular biscuit. The sugar skull uses the Easter Egg cutter turned upside down, which I think works really well!

Iced Halloween themed gingerbread biscuits

As I'm a bit of a novice when it comes to icing, I kept the designs very simple. The mummies were definitely the easiest, and once I'd got the hang of the spiders webs they weren't too tricky either. The sugar skulls took a bit more practice but I was pleased with them once they were done - I'd like to have another go at them using some different colours of icing!

Halloween themed iced biscuits recipe

These would be great to share at a Halloween party or as party favours for guests. 

Iced biscuits for Halloween

A whole heap of Halloween themed iced biscuits!

 Halloween iced biscuits and cookies

Wednesday, 4 September 2019

The stages of eating on an all inclusive holiday

We've just returned from a lovely all-inclusive break in Lanzarote. I do like an all-inclusive holiday, it's nice not having to worry about all the stress of firstly deciding what to eat, preparing it, and finally having to clean it all up, repeated three times a day. Now that the children are older they can be responsible for choosing and fetching their own food, so we can actually sit down to eat ours, and they will sit still happily for long enough that we can finish what is on our plates.

I don't know about you, but I definitely go through several distinct phases when it comes to the all-inclusive holiday buffet experience.

Stage 1 - Arrival

There's so much food! At home we don't eat a huge variety of different foods, and I often eat pretty much the same thing for breakfast and lunch at least. So it's very exciting to see different food stations on offer at each meal, and to select my favourites from each one. I always find it necessary to make several trips back to the buffet over the course of the meal - I want to try the things that other people have returned with, and I don't want to miss out on anything.

Stage 2 - In full flow

Much of the food has re-appeared, albeit possibly in a slightly different format, but there is still plenty to be eaten. I can slow down a bit and take a bit more time choosing what I want to eat, and I have also found some favourite items that I can concentrate on loading my plate up with.

Child with treats from a breakfast buffet in a hotel

Stage 3 - Overstuffed

The novelty of eating three different types of cake for breakfast has worn off and I'm starting to think that my skimpy holiday clothes are feeling a bit tight. I begin to wonder if it's time to slow down a bit, although a trip to the dessert station usually reveals my lack of will power.

Stage 4 - Diet day

For me this often occurs around day 5. I'll eschew the cake at breakfast and stick with juice and muesli, followed by a small sandwich for lunch. At dinner time I may eat a little more as a main course, but I'll limit myself to just the one dessert.

Stage 5 - No point stopping now

The holiday is nearly over, and since I'll definitely be starting a new diet and exercise regime the minute that I arrive home, there's no point in missing out. It's back to the cake for breakfast, along with trying out a few new types of cheese and rolls, and enjoying my vegetables coated with cheese along with a plate of nachos on the side. Diet tomorrow!

Friday, 28 June 2019

Tips for going on holiday with a fussy eater

We have been blessed with a child that is a fussy eater. At home he eats a reasonable amount across the food groups, so I'm happy with his diet in general, but the trouble is that not only will he not try new food when out and about, he also won't eat food which isn't exactly like the food he eats at home. So he'll quite happily eat a bagel and cream cheese for breakfast at home, but is suspicious of a different brand of bagel or spread if he sees it in a breakfast buffet.

Family tips for travelling with a fussy eater

This can be frustrating at times, because we travel and stay away from home a fair bit, and we definitely don't want to limit ourselves to self-catering holidays in this country every time.

To a certain extent we don't stress too much about it. I do feel that it's not the end of the world if he only eats bread, butter and ice cream for a week while we're away, as I know that I can feed him up again when we get home. But sometimes we go away for a bit longer and it can be annoying when we are out and about and can't find anything that he will eat, and of course it can feel like quite a waste of money when he returns from an extensive buffet with a few slices of cucumber and a bit of bread on his plate.

So here are a few tips that we've picked up over the years, to make things easier for all of us when travelling with a fussy eater:

When booking


Think about what you will eat while away. An accommodation option with a buffet is usually a good choice, or you may want to stick with self-catering and the option of eating out from time to time.

Some types of holiday, for example a cruise, will allow you to take food back to your room, so you can take extra from a buffet and always have a snack or drink in the room to rely on. Check if your room will have a fridge for storing a wider variety of food.

Suss out shopping and restaurant options near where you'll be staying to make sure that there is somewhere you can get something to eat when you need to. For example a cafe where you can pick up a simple breakfast that you know will be eaten, or a supermarket for buying snacks.

When packing


Take some favourite food with you from home. You'll need to check carefully the restrictions for countries that you are travelling to, but generally if food is factory sealed in its original packaging then it will be fine to take in your luggage. We often pack biscuits, plain fajita wraps, breakfast cereals, cereal bars, bread sticks and so on.

Pack sandwich bags, plastic snack boxes and a knife (in your checked luggage). This way you can buy food at the supermarket to make sandwiches for lunch, cut up fruit, and prepare other snacks that your child will eat. This also saves money on buying food that won't be eaten while you are out! Depending on your holiday arrangements you might even want to take more cutlery and plastic plates or bowls with you so that you can eat your own food comfortably in a hotel room.

If you are travelling by plane, prepare your own food and snacks for the journey, or eat at the airport before you leave. This goes for adults too - I'm less fussy than I used to be but I've quite often been served a meal on the plane that doesn't take my fancy at all and been grateful for the pizza that I ate before boarding.

While you are away


When you arrive, stock up on snacks that you can keep in the room or the fridge if you have one. Look for portable options that you can take around with you.

Always carry snacks and a drink in your day bag. That way if you are stopping for a meal and your child can't find anything that they like you'll be able to keep them going until you can find something.

If you will need to find somewhere to eat out, make a plan in advance and line up some suitable options. This might be the same chain restaurant that you eat at when you're at home - maybe not that exciting but worth it if it reduces the tension!

And finally don't get too stressed about it. We relax the rules a little bit and we aren't too strict about, for example, demanding that a meal is finished before dessert, as long as something filling has been eaten. We also heap on the praise for trying something new, even if they only have a tiny bit, and we reinforce how important it is to fill themselves up so that they'll be able to enjoy themselves. Then when we get home I'll cook favourite meals for a few days to fill them back up!

Child eating at open air terrace on holiday

Sunday, 20 March 2016

Having fun with the Chocolate Picture Maker

In the run up to Easter, we've been having fun making our own chocolate bars with Chocolate Picture Maker kits (affiliate link). Aimed at children aged from 4 and up, the kit allows you to make and personalise your own chocolate bars using 100% Belgian chocolate.

Review - Chocolate Picture Maker set for children

Each kit contains everything that you need to make one chocolate bar - a tray, a selection of templates, full instructions and chocolate in three colours - dark, white and milk. The chocolate melts at a low enough temperature that all you need to do is submerge the sachets in hot water for a few minutes and it will have melted enough to work with. Much easier than trying to melt it in the microwave, which is what I've done in the past!

I decided to attempt an Easter egg template. Harry wanted to come up with his own design, and Mia preferred to make hers up as she went along. As promised, the chocolate melted easily when we placed it into our bowl of hot water.

Review - Chocolate Picture Maker set for children

As per the instructions, we started with the dark chocolate to create our outlines. You place your template underneath the transparent plastic tray, then use the chocolate to colour in your design, cutting a corner off the sachet to pipe out the chocolate.

Review - Chocolate Picture Maker set for children

There is a bit of a knack to it, but Harry managed to follow his template really well and Mia had fun splodging hers out. I think if you don't set any expectations about perfect designs then even younger children that lack the dexterity to trace a pattern would still have fun playing with the chocolate (and of course licking their fingers afterwards!). Harry was constantly worrying throughout that he was messing up his design, but when it came to pop it out it was pretty much perfect underneath.

Review - Chocolate Picture Maker set for children

After you have traced the design in the dark chocolate you can add extra detail with the white chocolate, then use the milk chocolate (which is in a larger packet) to coat the design and fill in the back of the chocolate bar. We found that there was only just enough milk chocolate to fill the tray, so you do need to work carefully. I used a cocktail stick to spread the chocolate out and make sure that it went all the way to the edges.

Although the individual kit only contains the chocolate to make one bar, you could easily re-use the trays and designs if you buy some more chocolate.

Then you leave the bars in the fridge to cool. Half an hour is long enough for the bars to set, but they still melt quite easily after that time. I found it less messy to eat them after they'd been in the fridge overnight when they had set firmly, and you need to keep the leftovers (if there are any!) in the fridge until you eat them.

Review - Chocolate Picture Maker set for children

The chocolate was delicious, and it disappeared very quickly! Both children really enjoyed both the process of making their own chocolate bars, and the consumption afterwards. These kits would be brilliant for playdates with a group of children as it wasn't particularly messy and it's a really fun, creative activity. It would also be great for small parties, as the children could then take their bars home with them as party favours.

Review - Chocolate Picture Maker set for children

We received some Chocolate Picture Maker kits in exchange for a review. Amazon link is affiliate.

Wednesday, 23 December 2015

Our Gingerbread Houses - Christmas 2015

I started our Gingerbread House tradition back in 2012. I was inspired by ones that I'd seen on blogs and Pinterest, and so I added it to my Day Zero Project list. I spent ages fretting about my first Gingerbread House, but in the end it wasn't nearly as difficult as I expected it to be! I always use the same recipe from Tesco which includes an easy template and also a video to follow - you can find the Gingerbread House recipe here. The first house I made pretty much by myself, with Harry adding a few decorations under careful supervision.

Over the years I have adapted the recipe slightly, I decrease the amount of the wet ingredients by about 20% and by reducing the size at which I print the template to 75% it makes just enough dough for two slightly smaller gingerbread houses.

In 2013 we had two houses, and while I pretty much decorated Mia's house, Harry did it by himself. Then last year they were both very much involved in the decoration and loved making them.

So continuing tradition, here are the 2015 Jain Family Gingerbread Houses!

Making gingerbread houses with children

I made the gingerbread and assembled the houses but I had no role in the decoration apart from piping the icing where directed. Mia went with a pretty house, with jelly heart sweets on the roof and neat lines of chocolate buttons. Harry came up with an imaginative house which has sweets formed into the shape of a moose with antlers and a butterfly, and he embellished with a paper cut out snowman.

Making gingerbread houses with children

Now to see how long we can keep them around for before they are broken up and eaten!

Here are our previous Gingerbread Houses:


And here was our 2016 Gingerbread House which was also captured on video as part of Vlogmas 2016

Sunday, 8 June 2014

Recipe - Baked chocolate brownie cheesecake

For Mia's birthday I baked a dessert that I've been meaning to try for a long time - chocolate brownie cheesecake! The recipe comes from my brother who has impressed me with it in the past. It does take quite a few ingredients, but I found it pretty easy to make (and I had never made a cheesecake before).

Baked chocolate brownie cheesecake recipe

The cheesecake works best if you make it the day before and refrigerate overnight, so it's great if you are making it for an occasion where you want to prep as much as you can in advance. The brownie base can also be used to make standalone brownies, in fact I used this brownie recipe for my delicious cookie and brownie petit fours.

Ingredients:

Brownie base

130g dark chocolate, roughly chopped
130g unsalted butter
170g icing sugar
2 eggs
75g plain flour

Cheesecake topping

400g cream cheese (I used full fat Philadelphia)
150g icing sugar
1/2 teaspoon vanilla extract
2 eggs

Method

Start by making the brownie base. Melt the chocolate in a bowl. In a separate bowl, cream the butter and sugar together then beat in the eggs. Mix in the flour and the melted chocolate until you have a smooth mixture, then pour into a circular baking tray (mine measures 26cm in diameter which is about the minimum size I'd recommend using, but you could easily use one a few centimetres larger).

As I had the oven on anyway, I placed the brownie base into the oven (180C) for about five minutes just to make it a little firmer before putting on the topping.

Then make the cheesecake topping. Cream together the cream cheese and icing sugar then mix in the eggs. Spoon the mixture on top of the brownie base, making sure that it is spread evenly across. Smooth over with a knife. Bake in a pre-heated oven at 180C until the top has browned slightly and it is golden around the edges. I found that it took about 45 minutes. Leave to cool completely, then refrigerate overnight.

Baked chocolate brownie cheesecake recipe

Monday, 5 May 2014

Bank Holiday shopping as a #MorrisonsMum

Although we have a new Morrisons close to us in Littlehampton, we don't tend to shop there regularly. Ram is very good at comparing prices between the supermarkets, and he has always found Morrisons to be on the more expensive side. This week however, Morrisons have cut the prices on over a thousand of their products - not as promotional prices but as new everyday prices. We were given some Morrisons vouchers so that we could see how the prices compare on some of the things that we usually buy.

It was easy to spot the products that had been reduced in price, as they were very clearly marked in the aisles with bright yellow stickers. Not all of the shelves were as packed with labels as the one below, but there were plenty throughout the store.

Review - Saving money by shopping at Morrisons

Morrisons really stands out from the other supermarkets in the presentation of fruit and vegetables. I'm sure that I won't be the only blogger posting a photograph of the salad misters, seen here keeping the fresh herbs moist. I also liked that a lot of the produce was displayed in wicker baskets, really attractive to browse through.

Review - Saving money by shopping at Morrisons

With it being the Bank Holiday weekend, we went shopping for the food that we'd need for a family barbecue in the sunshine.

Review - Saving money by shopping at Morrisons

We bought:

Charcoal briquettes - £5
Pack of four veggie burgers - £1.50
Pack of six Linda McCartney veggie sausages - £2
Six white rolls - £1
Sweetcorn cobs - £2
Cucumber - 49p
Pack of tomatoes - 52p
Cheese slices - £1.75
Potato salad - 65p
Heinz Ketchup - £1.99
2 litre bottle of diet Coke - £1.85 (two for £2.50)
1 litre bottle of Robinsons squash - £1.49
Cadbury Mini Egg cakes (reduced after Easter!) - £1.19

Total - £21.43

This is our usual barbecue meal. Being a vegetarian meal I'm guessing that it probably comes to less than a proper meaty barbecue would be, but it satisfies us. I reckon that each full meal (a veggie burger, a veggie sausage, two bread rolls, two cheese slices, a dollop of ketchup, a little bit of cucumber and tomato, half a tub of potato salad and a drink) came to a little over £2 per head not including the charcoal, not bad!

Ram is quite particular about his veggie burgers. Fortunately the Morrisons own brand burgers that we'd not tried before were delicious! Our usual branded veggie sausages were cheaper, and I was very impressed with the taste of the Morrisons brand potato salad, which was nice and creamy. The fresh produce that we bought was in great condition too.

It was a lovely sunny day, and although it wasn't quite warm enough to sit outside while we enjoyed our food, we did have a lovely walk along the seafront afterwards!

Review - Saving money by shopping at Morrisons

As a sweet treat, I've also been trying out a few new baking recipes this weekend, and so in the afternoon I made some delicious chocolate orange biscuits. The ingredients that I needed to buy were:

Unsalted butter - £1.70 (two for £3)
Caster sugar - 99p
6 free range eggs - £1.75
Plain flour - 40p
Icing sugar - 99p
Orange juice - £1
Plain chocolate - £1.02

Total - £7.85 (of course as I only used a fraction of some of these products this isn't a cost per batch, and I've got plenty of ingredients left over for next time!)

Chocolate orange biscuits

We also shopped for our weekly staples. I was pleased to find that our usual branded sliced bread was the same price that we are used to paying, as were many of our other regular items.

We definitely noticed a difference on this visit to Morrisons with the new prices. Although the prices weren't necessarily cheaper than the supermarket where we do our regular weekly shop, they were more likely to be the same price, and several things that we bought were on special offer. It's very good to know that the prices are now more in line with those seen elsewhere.

You can read about the experiences that others have had while shopping at Morrisons this Bank Holiday weekend by following the #MorrisonsMum hastag on Twitter or Instagram, or pop over and read the posts at the #MorrisonsMum linky over at Britmums.

I received £80 of Morrisons vouchers in exchange for sharing my experiences and opinions in this post

Friday, 18 April 2014

Review - Hans Sloane Drinking Chocolate

I've never been a tea or coffee drinker, but sometimes I still want to sit down and relax with a nice hot drink. On these occasions I always turn to a hot chocolate, and so I was delighted when I was asked if I'd like to try a sample of Hans Sloane Drinking Chocolate. Sir Hans Sloane launched his first drinking chocolate in London over 325 years ago, and today the range includes three main variants - Smooth Milk Drinking Chocolate, Rich Dark Drinking Chocolate and Natural Honey Drinking Chocolate.

Hans Sloane Drinking Chocolate doesn't look anything like the powder that I'm used to adding to water. Instead it's a box of pure chocolate beads, which are melted together with hot milk or water to produce a hot chocolate drink which really is chocolate actually made for drinking.

I made my first mug using milk. The recommended quantity is three heaped tablespoons of the chocolate beads melted into 200ml of water or milk. I couldn't resist trying one of the beads on its own and it was delicious, you could easily just eat them by themself! The hot chocolate drink itself was equally yummy, it really was just like drinking actual chocolate. The texture was beautifully smooth, and the only slight remnants left in the bottom of the mug were pure chocolate, a pleasure to finish with!

My Dad happened to be visiting, so he tried a  mug of the Rich Dark Drinking Chocolate. He's a fan of dark chocolate anyway, and he pronounced it delicious!

Hans Sloane drinking chocolate review

The recommended retail price for the packet is £4.99, and each packet will make approximately six servings. It's not cheap, although having said that that, my usual hot chocolate brand doesn't work out particularly cheap either, and the quality is nowhere near as good as this. And of course it's nothing compared to what you would pay for a hot chocolate when you're out and about. But the fact that it's 351 calories per serving (when mixed with semi-skimmed milk) also means that it's a drink for indulging rather than every day drinking! A packet would make a lovely, luxurious gift for someone like me that doesn't drink tea or coffee.

I would imagine that the chocolate beads are pretty versatile too. As well as simply snacking on them, you could easily use them in baking - perhaps in cookies, or to flavour icing. You could even just sprinkle them across the top of a chocolate cake, or melt to make fridge cake or rice crispy cakes.

I'm certainly not going to have any problems getting through my boxes!

I received two boxes of Hans Sloane Drinking Chocolate for the purpose of this review. 

Tuesday, 1 April 2014

Mini Hama bead Easter Egg cake toppers


Since I received a big bag of mini Hama beads for Christmas I've been busy making all sorts of things. I blogged about some of them here - mini Hama bead projects - and one of the designs that I really enjoyed making was some mini Hama bead Easter Eggs.

Mini Hama bead Easter decorations for cupcakes toppers

The bag of mini beads had all sorts of different colours in, perfect for making the little multi-coloured eggs.

Mini Hama bead Easter Egg cake toppers


Each egg is about 3cm in height, and I thought that they would make lovely cupcake toppers. You could either glue a cocktail stick to the back to stick them firmly into the cake, or else just place them on top of the icing. Our favourite Easter treat is chocolate nest cakes, so I made up a batch and used the mini Easter Eggs as a little decoration.

Mini Hama bead Easter Egg cake toppers


My Easter nest cakes are made with four Shredded Wheat biscuits mixed with 100g melted chocolate (although a little more chocolate wouldn't have hurt) then placed into cupcake cases to look like nests. A lovely Easter treat!

The designs for these mini Hama bead Easter Eggs are taken from the Hama Mini Beads Inspiration 13 idea book.

Mini Hama bead Easter Egg cake toppers

If you are looking for other Easter crafts using Hama beads, you might like some of the ideas in my full round up of Easter crafts using Hama beads!

Easter crafts using Hama beads ideas

Mini Hama bead Easter Egg cake toppers

Monday, 31 March 2014

Making chocolate Easter Eggs

I've long been fascinated by the idea of making my own Easter Eggs. When I was little we had some Easter Egg moulds, but I just couldn't imagine how you used them to make the chocolate eggs. So when I was offered an Easter Egg making kit it seemed like the perfect opportunity to give it a go.

The kit that I was sent is the Make Your Own Chocolate Egg kit from Choconchoc which contains everything that you need. I must admit that I was a little daunted by the process, but we gave it a good go!

It was Harry that suggested that we use some white chocolate as well, and as we had some white chocolate buttons in the house we melted some of those down first and put a few splodges into each mould. Then we moved onto the milk chocolate and melted down a good batch to fill the moulds. You need to put the chocolate into the mould and then swirl it around to coat it. Then place into the fridge to set. You need to put in several layers of chocolate, we ended up with three thick layers in the end. You also need to make sure to place the mould face down in the fridge so that the chocolate runs right to the edges of the mould.

Making our own chocolate Easter Eggs

Because you need to wait for each layer to harden before you add the next there is a little bit of hanging around, fortunately you still have a bowl of melted chocolate to keep you busy! The photograph of Mia above was taken at the beginning of the session, by the end there wasn't much Peppa visible on her top!

Making our own chocolate Easter Eggs

The chocolate eggs popped out of the moulds quite easily after they'd been in the fridge for a little while. The edges were a bit rough though as I hadn't smoothed them off properly, so I evened them up a bit with a knife. Then I pressed them against baking paper on a hot baking tray to smooth them off even more, and then pressed the two halves together. It was a lot simpler than I was expecting! We used more melted chocolate to add the face decorations.

Making our own chocolate Easter Eggs

You may notice that one of the Easter Eggs has an improvised mouth. This is because my husband got to the jelly sweets before we did! We also had enough chocolate to make another couple of eggs. It was a lot easier the second time round, perhaps this is a thriftier way to celebrate Easter in the future!

I was sent an Easter Egg kit by Stay In to make my own chocolate Easter Eggs, although with no obligation to blog about it, I just wanted to share the fun that we had!