Showing posts with label patchwork. Show all posts

Sunday, 19 April 2026

Not letting comparison be the thief of joy

Recently I wrote about how I had been inspired to craft after spending some time on Instagram. I have my Instagram feed pretty well curated, and I'm regularly greeted with gorgeous finished craft projects and some great mini tutorial videos. 

I've always loved doing patchwork, and I found that I had been presented with a number of videos featuring a patchworking trick that is new to me. The reel below explains it much better than I can - basically you cut out your squares and lay them out on some fusible interfacing, meaning that you can iron them into place before you sew your seams. The edges of the patches should line up perfectly, and it's a really easy way to make beautiful patchwork fabric.

I have lots of odd bits of fabric lying around, and so I decided to try this method out. I didn't really have a finished project in mind, but I thought I'd quite like to have a mat to put on my table for when I have a project on the go, or some drinks and snacks out. I used mainly 2" squares, with a few 2" by 4" rectangles. Here are my squares after they've been ironed to the interfacing.

Patchwork squares on fusible interfacing ready for sewing

And here is my finished mat, once the patchwork squares are sewn together and a fabric backing has been added.

Finished simple patchwork mat

It's not that good! I hear you politely protest, but it really is very wonky - some of the squares look more like rectangles, and you can see the white backing around some of the border.

But do you know what, I am really proud of it. I've seen reams of finished projects on Instagram that are absolutely perfect, and mine isn't anywhere near that quality. But I have learned to remind myself that what I'm seeing there are the very best pieces that the maker can produce. They are often made by people that are selling their work, and an Instagram feed is their shop front. They need to show the very best that they can do - and what's more they are showing the final results after many hours of practice.

I expect their first pieces looked a lot like mine!

I'll keep practising here and there, and in the meantime I'll just enjoy what I'm doing.

Friday, 31 March 2023

Trying out crumb (crazy) patchwork quilting

I had been wanting to try crazy or crumb patchwork for a while now. It's a way of using up odd little bits and pieces of fabric to do a piece of patchwork that doesn't need to be as neat as patchwork quilts generally are. This appeals to me because I'm very bad at cutting and sewing fabric into regular shapes! 

As I understand it, crumb patchwork stitches together odd shaped pieces of fabric, and crazy patchwork is the same thing but using a mixture of different fabric types and embellished with extra stitching and so on to add more interest. 

I've been working on a few fabric projects recently and had collected together a pile of different fabric pieces so I decided to give it a go. There are lots of video tutorials on crumb patchwork with different methods and techniques. I watched a few and the one that made the most sense to me was this one, as it uses some more irregularly shaped pieces rather than just squares or rectangles.


I set myself to it, and it turned out that it wasn't quite as easy as I thought it would be! I had a few false starts and pieces that I had to unpick because I'd left myself with a hole. I found it quite difficult to work out what the pieces would look like when they were sewn together. It's also quite an active craft as you are constantly having to get up and iron flat the little pieces of fabric that you have sewn together! I had a reasonably large pile of scrap pieces but it took a lot more fabric than I expected to make my crumb patchwork piece. But I was delighted with the result! It measures about 24cm square. 

Crumb patchwork quilt piece square

I've been making a few drawstring bags recently and they are very forgiving for a beginner sewer so I decided to make a small drawstring bag to hold my phone. The idea is to tuck my phone away at night so I'm not tempted to pick it up first thing. I was originally going to line the bag but I wasn't sure if the piece of fabric would be large enough so I didn't worry about it and it worked out fine!

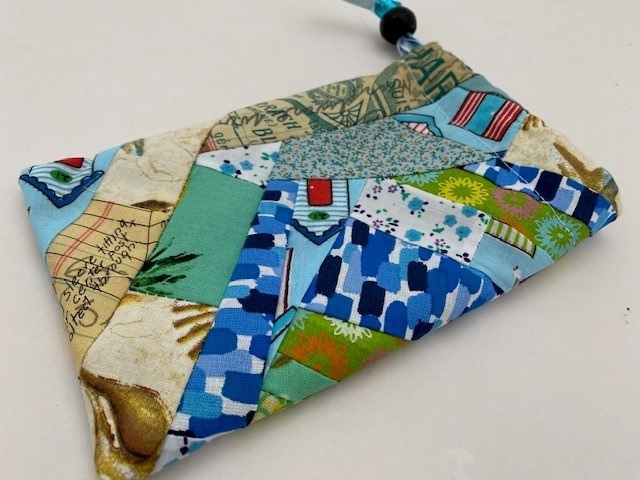
Crumb patchwork drawstring bag for phone

I used some gorgeous shiny mermaid inspired ribbon for the drawstring. I recently bought some  drawstring toggle things which are really good for holding the bag closed - I don't know why but I only just realised that these are a thing that can be bought, they are going to come in very useful for lots of other projects like my drawstring shoe bags!

Drawstring bag made with a crumb crazy patchwork square

I really enjoyed working on this once I'd figured out the technique, I'm definitely going to continue saving all my scraps so that I can have another go in the future!

Friday, 10 July 2015

My patchwork mobile phone case

I blogged recently about how I'd been inspired by BritMums Live to try my hand at patchwork again, and I'm so proud of myself now for finishing my patchwork mobile phone case!

Hexagon patchwork mobile phone case

I'm afraid that I can't really offer a tutorial for the phone case as I made it up as I went along. I started by creating my piece of patchwork, made using the English paper piecing technique where you tack the fabric around paper hexagons before sewing them together along the edges, then remove the paper pieces. You can find a good introduction and tutorial for the technique here.

Each of my hexagons measures one inch across, and I made a long strip four hexagons across which was long enough to go around the length of the phone twice with some left over for a flap at the end. It was pure luck that the pattern worked out allowing me to match the hexagons over the flap!

Hexagon patchwork mobile phone case

I backed the patchwork piece with some lining fabric (actually a cheap pillowcase) and sewed up the sides using my sewing machine. I was recently very kindly given the sewing machine by my friend's Mum and I'm still learning how to use it so it was a great opportunity to have some practice and become more familiar with it. The flap is closed with a piece of velcro. I toyed with the idea of adding some padding inside but I'm glad that I didn't as I think it would have made the case far too bulky, it's quite soft enough as it is.

The case isn't finished to a particularly high standard, the stitches are probably way too visible and the inside of the flap is a little bit of a mess (not to mention the wonky sewing machine seams), but I made it all by myself and I'm very proud of it!

The dark green flowered fabric is Nel Whatmore Sketch Book and was in my BritMums Live goody bag from Lady Sew and Sew.