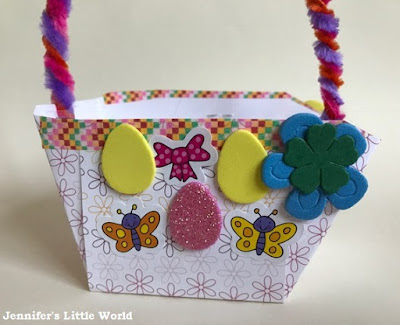
For the baskets you need:
A square of patterned paper for each basket (mine measure 20 cm x 20 cm)
Pencil, ruler and stapler
Tape (optional)
Brightly coloured pipe cleaners
Decorations - I used foam stickers, cut out shapes
Bostik Fine and Wide Glu Pen
Shredded paper or felt to fill (optional)
To make the basket:
There are lots of different ways of making Easter baskets from paper. I found a tutorial here - Paper Easter Basket Instructions - which is very simple, and then adapted it slightly by trimming the tops of the basket to make it even. Here's how I made mine:
First turn over the square of patterned paper and mark it out into a grid measuring three by three squares. Cut along the lines which are marked with the grey pen, and fold along all the other lines. Then fold up the sides and use a stapler to secure them together to form a basket. You can adjust the angle to create a deeper or a shallower basket, just make sure that you have left enough room for a staple.
If you want to trim the basket across the top like I have then you need to make sure to position the staple quite low down. You might want to add some clear or washi tape to keep the sides together and give a smooth outline.
Then you can decorate the baskets. We used stickers and cardboard flower cut outs, glued firmly into place with the Bostik Fine and Wide Glu pen. I love this glue pen because it has two nozzles - one for fine detailed gluing and the other for covering a larger area. The tube is nice and easy to squeeze meaning that little ones can manage it with ease.
For the eggs you need:
Small polystyrene eggs
Paint (acrylic or poster)
Bostik Fine and Wide Glu Pen
Coloured glitter and/or sequins
To make the eggs:
I find it best to paint the polystyrene eggs first so that they have a nice base. They are quite an awkward shape, and the easiest way that I've found to paint them is to insert a cocktail stick into the base and use a cardboard box or similar to hold them in position for both painting and drying. I used acrylic paint, but poster paint would also work well.
When the eggs are dry, keep them on the cocktail stick and cover them with glue from the Bostik Fine and Wide Glu Pen. I found it easiest to squeeze some out onto a margarine tub lid and apply using a brush to ensure even coverage. Then coat the egg in glitter. I found it was best to hold the egg over a tray and sprinkle the glitter over the top. Excess glitter can be retrieved from the tray and sprinkled over again. Return the egg on the cocktail stick to the box to dry.
When the glitter is dry you can embellish further with sequins or other smaller decorations, this time applying the glue directly from the pen and sticking the embellishment into place.
The glittered eggs were placed inside the basket along with a few smaller ones, they make a lovely Easter decoration!
The box of craft materials was provided to me free of charge by Bostik as part of the Tots100/Bostik Craft Bloggers Club.


No comments:
Post a Comment
I love reading your comments!