Friday 30 November 2018

Embracing the season

I know that I'm not the only one to struggle at this time of the year. I don't enjoy the cold weather or dark and gloomy days, and I just want to stay at home under a blanket or with my back pressed against a radiator. But this year I'm determined to do a better job of embracing the winter season, and although it's early days yet I think that I've already made a good start.

Making Winter: A Creative Guide for Surviving the Winter Months (affiliate link) by Emma Mitchell was recommended to me by my sister last year, and she very kindly bought it for my birthday a couple of months ago. It's a gorgeous big hardback book packed with winter inspiration from an author that has discovered many ways to encourage herself to enjoy winter more. There are recipes, craft projects and crochet patterns, along with plenty of tips and inspiration to help you make the most of winter. I've kept the book beside the bed and I've been leafing through before I go to sleep and it's given me many ideas. 

One that particularly struck me was the suggestion of holding a regular craft session with friends. I have a couple of friends that I think I could interest in the idea, if we can find a time when we are all free! So this week I made a brief foray into a crafting evening with a friend, and we had a lovely time attempting to make woven paper hearts, a craft that I remember from school. They aren't as difficult to make as they look, I began with a simple woven heart template from Twinkl and then used the template to try out some variations on the theme. I was so pleased with them that I ended up making more with the children after school the next day! I think I'll make one of my New Year's resolutions the promise to try and set up a few more crafty and cake evenings with friends.

Making woven paper hearts and hygge books

My inspiration for making the hearts came from a second book which has inspired me to think a little more positively about winter. I'm very late to the Hygge bandwagon, but I bought The Little Book of Hygge (affiliate link) by Meik Wiking about a year ago, and it's another lovely book to dip in and out of. I have a couple of favourite sections that I enjoy referring back to - in particular how to put together a hygge emergency kit, and a selection of ideas for embracing hygge throughout the year. I love the idea of stocking up on blankets, warm socks and nice chocolate while I do some crafting, look through old photos, write letters or watch television.

I've also upped my game a bit with my Christmas decorations this year. My home decor does tend towards the minimalistic, but it's nice to have a cosier look at Christmas. Inspired by a display at the local garden centre I went a bit mad buying fake greenery, poinsettias and fairy lights, and now I just want to invite everyone over to show them off. We even have a wreath for the door for the first time, although I'm waiting until a few neighbours are displaying theirs before I put mine up!

Christmas garland with baubles and poinsettias

Finally I've been enjoying my Christmas jigsaw puzzles. I have quite a collection now, and this year for the first time I want to try and finish them all by Christmas. I've managed to do three already and I have another three to go - I've started early and I'm confident that I can do it! I find jigsaws so relaxing, and once I've got past the initial sorting of the pieces it's so satisfying to watch them come together.

Doing a Christmas jigsaw by the tree

If you struggle with winter like I do, I'd love to hear your tips for embracing the season before we can start to look forward to some warmer weather!

This post contains Amazon affiliate links.

Tuesday 27 November 2018

Setting exercise challenges

I recently found out about various companies that sell exercise challenges. One of the best known is probably Virtual Runner, which also has a charity element, but there are lots more. You enter by paying a small fee, and when you have proven that you've completed the challenge (usually by submitting a screenshot from an exercise tracking app) you are sent a medal. The medals are themed and can be very fancy - sometimes seasonal or based around a TV show or film. They are a great alternative to an organised race, which aren't always easy to manage logistically.

I love the idea of these challenges, but I must admit that I'm too mean to consider paying to sign up for one. I'm also not fussed about the medal - I wouldn't know what to do with it and it would just be clutter. So I decided to come up with my own challenge.

While waiting in a queue at Disneyland last month and feeling that I had indulged a little too much on cookies and sweets, I decided that I would challenge myself to run a total of 50 km in November. My usual running distance is 5 km, so I thought that if I could get out for three runs a week then I could easily manage it. Until that point I'd been averaging about one run a fortnight, and running 5 km was doable, but it would involve making quite a bit of extra effort!

It wasn't easy, especially coming back to the cold after a warm holiday, but I was determined to complete the challenge. I aimed for two outside runs per week and one run on the treadmill at the gym. For the outdoor runs I ran at a fairly easy pace, and for the treadmill workout I pushed myself a bit more, as I find it easier to pace myself on a treadmill where I can set my speed. After just a week of running I could already feel the difference, and as the end of the month approached I noticed a big difference in how easy I found it to run the distance.

I tracked all my runs in the Runkeeper app. When I finished a run it told me how close I was to reaching my goal which was very motivating, and it also shows how far you have run that week and month. I was really pleased to complete the challenge almost a week early! Now I have to decide whether to up my game for next month, or stick to the same challenge for December, bearing in mind that things will start to get busy more over the next few weeks!

Monday 19 November 2018

Knott's Berry Farm, California

A family day out at Knott's Berry Farm, California

On our recent family holiday to Los Angeles, we had a great day out at Knott's Berry Farm, one of the most visited theme parks in North America. There are plenty of rides - including impressive roller coasters, family rides and water rides - spread across several different themed areas.

Knott's Berry Farm, California

We visited the park just before Halloween, when it has been re-themed as the Knott's Scary Farm attraction. Even without staying late for the full Scary Farm experience (which is aimed at older children and adults, and looks pretty terrifying) when you visit during the day you can still enjoy the spectacular decorations throughout the park, and many of the rides have been decorated for Halloween. Lots of brilliant photo opportunities too!

Knott's Berry Farm for Halloween

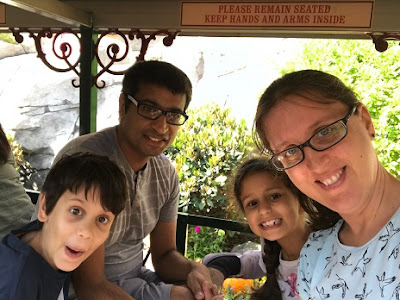
The beginning of the present day theme park was a replica Ghost Town, and it's still very much in evidence with lots of Wild West themed rides and attractions. Harry is a little nervous of rollercoasters so we decided to start off with something gentle - the Calico Mine Ride. This attraction was Knott's first major ride, and it takes you on a little train through the dimly lit tunnels of a working mine. It's very realistic, with a ride past underground lakes and caverns populated by over 120 characters, many of them animatronics, as you twist and turn your way along the route. We loved this one!

We also loved the Western Trails Museum which is packed with all sorts of interesting things, including leaflets and maps showing how the theme park developed over time, and we enjoyed the show Mystery Lodge which has some excellent special effects as you encounter the Old Storyteller and hear his stories. Voyage to the Iron Reef was also a spectacular 3D ride with an interactive 'freeze ray' gun to shoot menacing under the sea creatures.

Knott's Berry Farm mining ride

I really loved seeing all the history in the park. It felt much more authentic knowing that the park actually once was an actual berry farm, rather than being a purpose built theme park.

Knott's Berry Farm historical sign

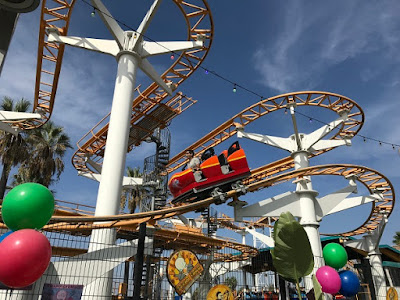
In the Boardwalk area you can find some of the most exciting and fastest rides in the park. We all enjoyed the tamer Sky Cabin, ascending over 180 feet for a panoramic view over Orange County and Los Angeles, before trying out some of the coasters.

Knott's Berry Farm roller coaster

There are also lots of classic fairground rides here, like the Wheeler Dealer Bumper Cars and the Pacific Scrambler, as well as plenty of funfair stalls where you can win prizes and buy snacks.

Knott's Berry Farm coasters

Camp Snoopy was where we spent most of our time. This area is filled with rides that are perfect for younger children and those that aren't keen on the more adventurous rides. Children can ride by themselves on most of these rides, giving them a bit more independence while you watch from the sidelines. Because we visited on a quiet day we very rarely had to wait and could ride over and over again.

Knott's Berry Farm Camp Snoopy for Halloween

The most popular ride here with my children was Linus Launcher, where you ride around suspended face down. Harry went on it three times in a row. We also enjoyed the Grand Sierra Railroad ride which had been given a Halloween themed makeover, and the Huff and Puff ride where the children had to propel themselves around a track by pumping and pushing on their levers, lots of fun to watch!

Knott's Berry Farm Camp Snoopy rides

We had a really lovely day out at Knott's Berry Farm. I must admit that I was a little worried that the rides there would be too adventurous for my more timid child, but for the few rides that the rest of us wanted to ride he was easily able to wait for us at the exit, and we found plenty to do that we could all enjoy as a family. I'd definitely recommend a visit if you are in the area!

Knott's Berry Farm train ride for Halloween

We were provided with complimentary entry to Knott's Berry Farm in exchange for sharing our day on my blog and social media.

Thursday 15 November 2018

Trying out diamond painting

A couple of weeks ago I was lucky enough to visit the US on holiday, and as well as enjoying the tourist attractions we also made the time to visit some craft stores. I love craft stores in the US, they are so much bigger than the ones that we have here and have all sorts of different things that I've never seen before. The prices are also very reasonable, and there are plenty of reductions as well as coupons that make the prices even better.

We visited over Halloween and so there was lots of seasonal stock reduced. I bought a few craft kits for the children and also lots of bits which I'm planning to use as little gifts for our planned Halloween Disney cruise next year. The only trouble was making sure not to go overboard and stay within our baggage allowance!

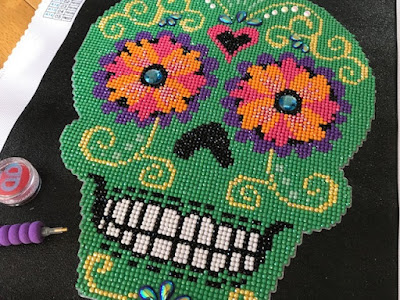
Something that caught my eye in the clearance section at Michaels was a Halloween themed diamond painting. I've heard of diamond painting before, in fact I've been offered kits to review here which I've turned down as I've never been very taken with any of the designs. But it was still a craft that I really wanted to try, and when I saw this Halloween sugar skull in the sale I couldn't resist.

Diamond painting sugar skull for Halloween

Despite the name, diamond painting doesn't involve any diamonds. You start with a canvas which has the design printed on in colour, and a selection of tiny plastic 'diamonds'. The canvas is very sticky, and you uncover a small area at a time to work on. Using a special tool, you dip it into a pot of wax, then pick up the diamond and place it in the correct position. When it's finished you place the piece underneath something heavy to make sure that all the plastic pieces are stuck firmly, then you can frame it, preferably without the glass so that the 'diamonds' can catch the light.

Diamond painting in progress

I very much enjoyed working on this kit, it's a lot like cross stitch or mini Hama beads, but way quicker and very satisfying to put together. The finished picture really catches the light and sparkles. I'm going to pop it in a frame and keep it with the Halloween decorations to put out on display next year!

Diamond painting kits seem to be mainly mass produced in China and can be bought online very cheaply from places like Amazon and eBay. The designs tend to be brightly coloured with a hint of fantasy - unicorns and fairies are popular - and not really my sort of thing. I've not seen any other designs that really appeal to me, but I had such fun doing it that I'd love to pick up another kit that is more my style!

Monday 12 November 2018

The Natural History Museum of Los Angeles

Los Angeles Natural History Museum review

On our recent family holiday to Los Angeles, we spent a great morning at the Natural History Museum. We began our visit with a showing at the 3D Theater - Oceans 3D: Our Blue Planet. Narrated by Kate Winslet, this 3D oceanic adventure explores stories of under the sea creatures and it was truly fascinating and beautiful. 

Oceans 3D Our Blue Planet

Then we explored the rest of the museum. We began with the mammal halls - African Mammals and North American Mammals. Each massive hall contains dozens of dioramas that recreate the natural environments of these creatures over a range of habitats. You can study the animals in detail close up, and I wasn't surprised to find out that these habitat dioramas are amongst the finest in the world - I've certainly not seen anything as magnificent in other museums that we have visited.

Like many children, both of mine are fascinated by dinosaurs, so we spent most of our time in the Dinosaur Hall. The center piece is a growth series display featuring a baby, juvenile and sub-adult Tyrannosaurus Rex, which is the only one of its kind in the world and includes the youngest known T-Rex fossil in the world. There is also a Triceratops, and my favourite dinosaur, a Stegosaurus.

Dinosaur Hall at Los Angeles Natural History Museum

We all spent a lot of time playing with this interactive digital table where you could take part in a fossil dig and act as different characters digging for bones and wrapping fossils - a really fun way to learn about how a fossil dig runs.

Los Angeles Museum of Natural History digital table game

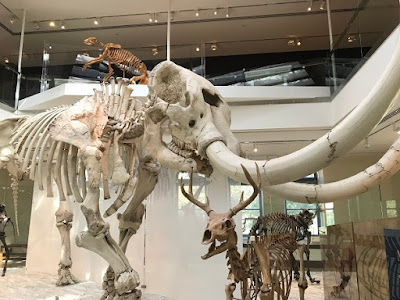
In the Age of Mammals exhibit we admired this mastodon, a species which once lived in this area alongside the giant jaguar and sabre-toothed cat. Both children have studied the Stone Age recently at school, and this exhibit was the perfect accompaniment to their learning.

Mastodon at Los Angeles Natural History Museum

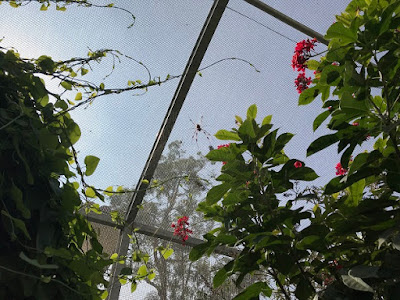
We also enjoyed a visit to the Spider Pavilion which is a temporary exhibition available until the 25th November, 2018. You can walk through inside a safe pavilion and observe spiders up close in their webs without any barriers - not one for the arachnophobics! I was a bit nervous but luckily the spiders don't move, and are large enough that you can keep a close eye on them!

Spider Pavilion, Natural History Museum

We finished our day spending some time in the Discovery Center. This area is fully aimed at children and there are plenty of hands on exhibits to entertain them, for example reassembling skeletons and  touching items like minerals, furs and fossils. The favourite area was the dinosaur dig pit, I think that the children would have spent hours here if we'd had time!

Los Angeles Natural History Museum Discovery Centre

I also made a little video of our day which you can see below:


We really enjoyed our visit to the Natural History Musuem, and I'd definitely recommend a visit if you are in the area. It's also ideally located to combine a visit with the California Science Center which is on the same site.

We were provided with complimentary entry to the museum in exchange for sharing our visit on my blog and social media.

Friday 9 November 2018

How to make some mini Christmas gift bags

Have you started Christmas shopping yet? I must admit that I've barely thought about it! But I'm definitely starting to feel Christmassy, and so today I'm sharing my latest craft, how to make some simple mini Christmas gift bags. These little bags are ideal for gifting small items like jewellery or sweets and you can customise them to make any size that you want.

Mini gift bags for Christmas tutorial

You need:

Christmas paper or wrapping paper
Bostik Fast Tak Spray Glue
Tape
A small box to use as a template
Sequins or other embellishments
Bostik Glu Dots
Ribbon
A hole punch

How to make a simple gift bag tutorial

Instructions:

First prepare your paper. My Christmas paper is not double sided, so I used Bostik Fast Tak Spray Glue to glue two pieces together back to back. This glue is very sticky and will stick almost any surface. It's easy to use, although do make sure that all nearby surfaces are covered! You just need to spray both sides of the paper to coat with glue from a distance of about 15 to 20 cm, leave to dry slightly for a couple of minutes until it is tacky, then press both pieces together firmly and leave to dry.

Decide which side of your paper is going to be on the outside of the bag, and fold over the top so that a strip of the inside paper will show on the outside.

Gluing Christmas paper together to make a gift bag

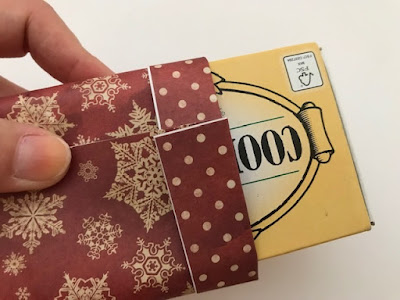
Next find a small box that you can use as your template. I used a matchbox, but something like a pack of cards would also work well. This helps you to make the shape for your bag. Wrap the paper around the outside of your template box and tape firmly in place. If your paper is quite thick you can remove from the box and press down the sides to make sure that you have a crisp fold line.

Using match box as a form for a gift bag

Fold the paper around the bottom of the box in the same way that you would if you were wrapping a parcel, starting about 1 cm from the bottom of the box. Secure in place with tape. You can also push in the paper down the sides of the bag.

Making a Christmas mini gift bag

Use a hole punch to make two holes in the top on each side of the bag. Cut two lengths of ribbon and tie a knot in one end of each. Thread them through the holes on each side from the inside of the bag so that the ribbon is held in place by the knot, then thread them back through the bag and tie another knot so that the ribbon forms handles for the bags with the knots hidden inside the bag.

Making ribbon handles for a gift bag

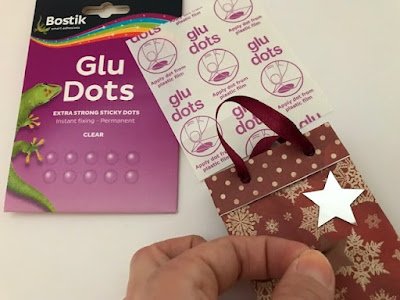
Finally decorate the bag using sequins or other embellishments. I used Bostik Glu Dots to hold my large star sequins firmly in place. The Glu Dots are easy to apply and very sticky, and you can use them for all sorts of decorations. You just peel off one side of the plastic covering, apply the glue dot to one of the surfaces, peel off the second side of plastic and press the surfaces together firmly.

Bostik Glu Dots for Christmas crafting

Your gift bags are ready to use!

Mini Christmas gift bags made using Bostik glue products

These simple gift bags would also make lovely decorations for the Christmas tree, filled with sweets or small presents.

Mini Christmas themed gift bags with Bostik

This is a collaborative post in association with Bostik. 

Wednesday 7 November 2018

La Brea Tar Pits and Museum, Los Angeles

La Brea Tar Pits and Museum review

The La Brea Tar Pits in Los Angeles, California, are a collection of tar pits which have preserved the bones of trapped animals over tens of thousands of years. They are one of the world's most famous fossil localities, and the Ice Age fossils found there include saber-toothed cats, dire wolves and mammoths. The accompanying museum is dedicated to both researching the finds from the pits and displaying the specimens for visitors. You can visit the pits, watch scientists and volunteers excavating and cleaning the fossils, and we spent a fantastic morning here as a family

La Brea Tar Pits and Museum, Los Angeles

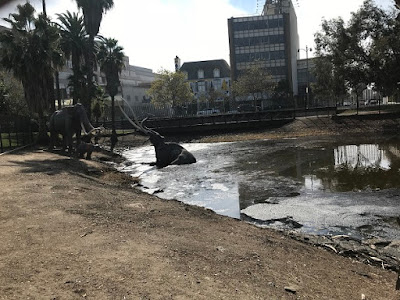
The Museum entrance is located opposite the Lake Pit - a large lake which bubbles as gas is released to the surface and is home to iconic sculptures depicting a mammoth trapped in the tar. It's a dramatic way to start your visit! An animal trapped in the pits would have remained there until it died of exhaustion, and a large trapped herbivore might have attracted the attention of other predators which would in turn become trapped and die alongside it. With the amount of fossils recovered it would seem as if this was a regular occurrence, but in fact an entrapment event probably only occurred every ten years or so over a very long period of time.

La Brea Tar Pits with elephant

Inside the museum we began our tour by watching Titans of the Ice Age, a 3D journey back in time which helped to set the scene by introducing the main creatures discovered at the site, and showing how they became trapped in the tar. We also enjoyed the Ice Age Encounters show, which featured a life sized Sabre-Toothed Cat puppet and was incredible to watch.

La Brea Tar Pits skeleton in museum

There is plenty to see inside the museum. The Tar Pull exhibit lets you try and see if you could escape from sticky tar, and at the end of our day having learned more about the tar pits the children both wanted to go back and try again to see if they could have escaped (unfortunately the answer was no!) There are huge assembled skeletons and several animated models like this Columbian Mammoth that is really very realistic.

La Brea Tar Pits animated mammoth

Since 1906, more than three million items have been recovered from the pits, which represent over 231 species of vertebrates as well as 159 species of plants and 234 species of invertebrates. It's an impressive number which will continue to increase as excavations continue. It's difficult to get a sense for just how many specimens this is, although displays like the one below help a little - this case contains many many different examples of just one bone. There is also an entire wall composed of just dire wolf skulls - it's amazing to spot the similarities and differences.

La Brea Tar Pits display case with bird bone

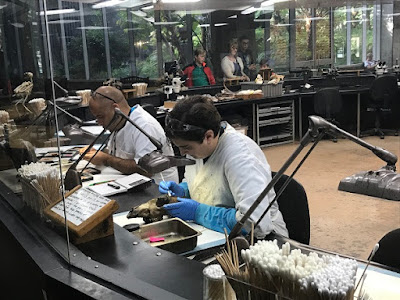
In the Fossil Lab you can watch a group of scientists as they work on cleaning the new fossils, with some of the work magnified on screens for a clearer view. It's not just the large fossils that are important, there are also many micro fossils like tiny insects and plants which are excavated and studied with just as much care and interest.

La Brea Tar Pits scientists working

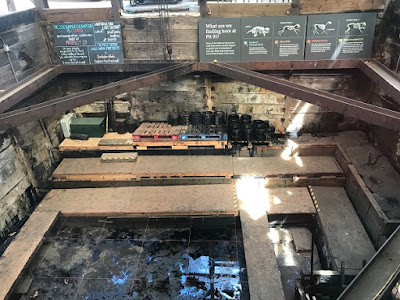
There is lots more to see outside the museum too. You can visit Pit 91 which is an active dig site in the summer. Even when not in use it's still fascinating to look down on, and there is plenty of interpretive signage and photographs to help you imagine how the work progresses. We also joined a free museum tour to Project 23 - a collection of 23 large wooden boxes containing fossils which were removed during the construction of an underground car park for the adjacent Los Angeles County Museum of Art. There is years and years worth of work still to go here and it was fascinating to learn all about it and watch the fossil specimens being cleaned.

La Brea Tar Pits Pit 91 active dig

We had a brilliant morning at the museum. It was truly fascinating, and we all felt like we learned a lot. I'd definitely recommend a visit! You can see some of our highlights in the short video below, including the very realistic life sized Sabre-Toothed Cat!


We received complimentary admission to the museum in exchange for sharing our visit on my blog and social media.

Monday 5 November 2018

How to make a nature postcard

This guest post is from Becky Goddard-Hill, co-author of Create Your Own Happy (affiliate link) - a happiness boosting activity book for 7-12 year olds and their families. All the activities are based on scientific findings that explain why doing them will create happiness.

  How to make a nature postcard

Making a ‘nature photograph’ is a great way to tell the story of an outdoor adventure, and bring nature inside your home. This is a really simple activity and suits kids (or grown-ups of any age) It can be done by yourself or in a group and combines a little nature hunt with a beautiful craft.

 What you need: 


A postcard sized piece of coloured card

Double sided sticky tape

A forest, wood, park, garden or anywhere nature is growing.

How you make it: 


Put a strip of double-sided sticky tape across the middle of one side of your piece of card and take it out with you for a nature walk.

Pick things up as you go and stick them on your card. Try looking for different colours, textures, shapes and sizes, from tiny seeds to bits of bark, leaves and small flowers.

Only pick up fallen things as we don’t want to disturb growing things.

You can arrange them on the card to make an interesting picture or pattern.

You should now have a beautiful ‘nature photograph’ that you can hang in your home or seal with sticky back plastic and send to a friend.

How to make a nature postcard with children

Why nature makes you happy 


Here are 2 amazing bits of research that show us how being out in nature can make us happier and healthier

When a group of scientists at the University of Chicago tracked people’s happiness for 17 years, they found the people were happiest when they were living near trees. Pennsylvania hospital patients with a window with a tree view went home on average a day earlier than people with no view.

Japanese researchers found that a one-day trip to a park can boost our ‘natural killer’ white blood cells and proteins that help to fight off illness for at least seven days afterwards

You really create your own happy by getting out in nature. This will make you healthy AND happy and you will have a beautiful nature photograph too!

Create Your Own Happy book for children

This post contains an Amazon affiliate link.