Wednesday 30 March 2016

Things I do on holiday that I don't do at home

This blog post is inspired by a page in my Travel Listography journal (affiliate link). I received the book as a birthday present last year and it's a brilliant way to keep track of places that you've visited and things that you've done, as well as coming up with future travel plans.

So just for fun I thought I'd share my list so far, and I'd love to hear what you'd add to your own list of things that you do on holiday but not at home!

  • Wear short skirts and shorts out in public
  • Eat cake for breakfast
  • Drink orange juice
  • Shave my legs regularly (assuming a holiday in a hot country!)
  • Enjoy getting up early
  • Keep a detailed diary
  • Collect tickets and mementos
  • Lock valuables in a safe when I go out
  • Wash out clothes in the sink and hang them up to dry
  • Wear ear plugs at night
  • Use miniature sized toiletries
  • Drink bottled water
  • Eat different types of cheese
  • Eat out for dinner every night

Travel Listography book - things I do on holiday but not at home

So what would be on your list? I'd love to know!

Monday 28 March 2016

Trying to teach the children to swim

Both my children are quite different, which took me by surprise a little bit when Mia came along as I've had to change my parenting to cater to both their needs. Another difference between them has been to do with them learning to swim.

I took Harry swimming as a tiny baby, I remember splashing him about in the water and even dunking him underneath and he was perfectly happy with it. Then Mia appeared, the gym fees increased, and the swimming tailed off. They were both quite confident splashing about with arm bands on, but no more than that.

Then Harry did a whole year of swimming lessons with his school last year, and then an intensive swimming course over the summer. Unfortunately, despite all these lessons he's not really progressed. He's happy enough kicking about with a float, but his big issue is that he will not put his face in the water and it's holding him back. He will lean back and put his ears under, which was a huge step, but he won't even contemplate putting his face forwards.

Collection of swimming bits for children

We started them both with swimming lessons at our gym back in September, both in the beginner class. Mia got off to a rocky start, she was splashed in the face a few minutes into her first lesson and screamed for the next half hour, and did the same at her next two lessons, before she settled down. Harry happily pootles about, but without really getting anywhere.

But a couple of weeks ago Mia had a massive breakthrough. Something clicked, and she put her entire head underwater. Since then, we can't keep her out of the water! What's really funny is that she can swim beautifully underwater for as long as she can hold her breath, but with her little face above the water she can't swim at all yet!

Harry watches with interest (and puts up with her patronising him - 'don't worry Harry, you'll put your face in the water soon') but it doesn't seem to have spurred him on to try himself. I'm starting to worry that Mia is going to end up in the more advanced class, and I'm not sure how Harry will feel about that. It might give him a push to try and keep up with her, it might upset him, or he might just accept it and carry on as he is.

I really hope that Harry clicks with the swimming soon. Obviously it's important to be confident in the water from a safety perspective, but it's also great exercise and makes trips to a water park or swimming pool with slides and chutes much more fun.

I'd love any tips for dealing with a child that is reluctant at learning to swim!

Saturday 26 March 2016

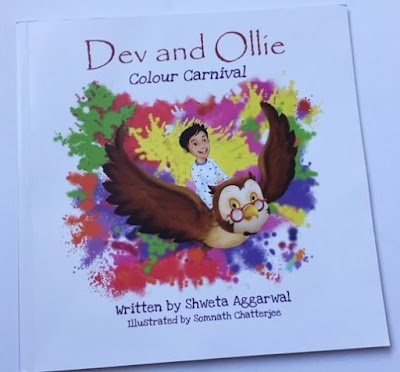
Book review - Dev and Ollie Colour Carnival

Dev and Ollie - Colour Carnival (affiliate link) is a new picture book by Shweta Aggarwal that aims to teach children a little more about the diverse global society that we live in. It's part of a series which covers festivals celebrated by different cultures around the world, and this, the second book in the series, teaches children about the famous Hindu festival of colour - Holi.

Book review - Dev and Ollie Colour Carnival

Raising mixed-race children, I'm obviously keen for them to learn about their heritage, and at their age the obvious place to start is with festivals and celebrations. Holi is a fun festival which marks the triumph of good over evil, and the start of the spring season. All over India and across the globe, Hindus mark the holy day with bonfires on the festival's eve and by throwing brightly coloured powder paints and coloured water at each other during the day.


The story follows Dev, who isn't a fan of messy play and hates getting dirty. After his Mum tucks him up in bed one night, his magical bedtime owl Ollie takes him to Agra, where a group of children are dancing, singing, and throwing water balloons filled with paint. At first Dev is angry, but he can't stop himself joining in and soon he's having a great time before he has to return home, having forgotten all his worries about getting paint on him.

It's a lovely story, and although aimed at little ones there are still plenty of references to the important parts of the festival which were new to me and which I'll certainly be learning more about to pass on to the children. There are more books for the series planned which will introduce children to more festivals around the globe, and I'll definitely be keeping an eye out for them!

I was sent a copy of this book to review, Amazon link is affiliate.

Friday 25 March 2016

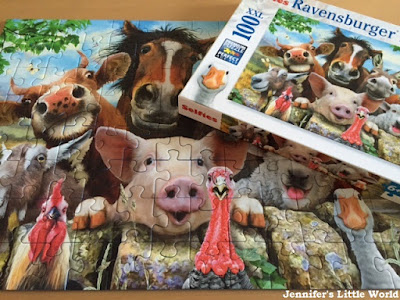
Review - Farmyard Selfies jigsaw puzzle from Ravensburger

We love doing jigsaws in this family, and so we always enjoy the chance to try out a new puzzle from Ravensburger. Farmyard Selfies is a 100 piece jigsaw with extra large pieces depicting some farmyard friends taking a selfie. Aimed at children aged 6 and up, I knew that my children would love the cheeky animal picture.

Farmyard Selfies jigsaw puzzle from Ravensburger

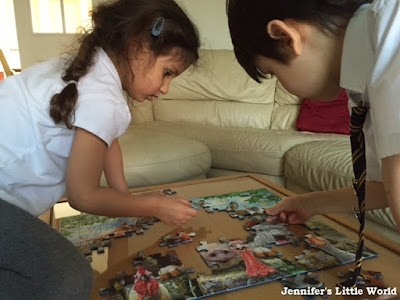
I decided as a challenge I'd let them have a go at it themselves to see how they got on. Harry organised them both into making sure that all the pieces were turned the right way up.

Farmyard Selfies jigsaw puzzle from Ravensburger

My first step with a jigsaw is always to sort out the edge pieces, but with Harry in charge he picked out the leafy pieces from along the top to pass over to Mia to have a go with.

Farmyard Selfies jigsaw puzzle from Ravensburger

Harry decided to start with piecing together each animal in turn. He did have a little direction from me as I helped him to find the dominant colours in the puzzle and look for them first, and I'm afraid I couldn't help myself from joining in the puzzle making with them!

Farmyard Selfies jigsaw puzzle from Ravensburger

They both took it all very seriously and we all had a lot of fun completing the puzzle together. Although 100 pieces seems quite a lot, because they are larger in size it seems less daunting and it's quick to watch the picture build up. They were so proud of themselves when it was finished!

Farmyard Selfies jigsaw puzzle from Ravensburger

This is a lovely jigsaw to add to our collection and at just the right difficulty level for the two of them to complete either individually or together with a little bit of help from me.

We received this puzzle in exchange for a review.

Thursday 24 March 2016

Printing with the old printing set

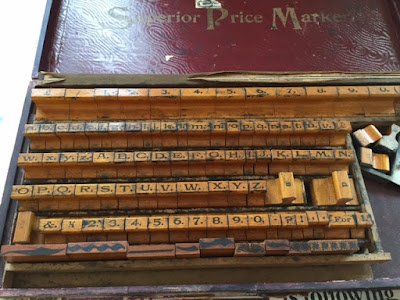
I have very fond childhood memories of having fun stamping with my Dad's old printing set. It's a lovely wooden set of blocks with uppercase and lowercase letters, numbers, and lots of symbols and other decorations. A few years ago I rather cheekily asked him if I could have it (sorry siblings!), and I've been keeping it safely ever since until I felt that the children were old enough to use it and respect it.

Child stamping with vintage printing set

The time came the other week! I sorted out some of my coloured ink pads, a big stack of paper, did a quick demo, and then let the children loose to see what they would come up with.

Child stamping with vintage printing set

Harry took it all very seriously. He was quite fascinated as I explained to him how this was the way that books were once printed, and showed him that although it was quite time consuming to print each letter individually, at a printers you could set up a rack with all the letters in place and then print multiple copies one after the other. He tried it himself by holding a few stamps together and pressing them down at the same time!

Child stamping with vintage printing set

He was very interested in using the letters for writing. He also drew pictures of things and used the £ sign stamp and numbers to put down prices for them. Mia was a bit more haphazard in her approach, she liked the symbols and patterns and stamped them over and over in a range of different colours.

Child stamping with vintage printing set

We had a lot of fun playing with these old stamps and I know they'll be coming out regularly now that the children know they exist!

Tuesday 22 March 2016

Creating an ornament from the outdoors

Making a simple stick mobile with buttons and pom poms

I was challenged by Tiger Sheds to create an Easter themed craft challenge - creating an ornament using something found in the garden. I decided that we would use sticks to make a simple cheerful mobile using Spring coloured pastel pom poms and buttons.

Making a simple stick mobile with buttons and pom poms

To make this mobile you need:

Making a simple stick mobile with buttons and pom poms

Sticks
Coloured pom poms and buttons
Decorative flowers
Thin twine and a needle
Thicker twine for hanging

Instructions:

First collect some suitable sticks. We don't have any trees in our garden so we looked for some on the school run, and even though it's through a residential area I was surprised at just how many we found! Wash them and make sure that they are thoroughly dry.

Collect together a selection of pom poms and buttons. Allowing four strands for each mobile, lay them out to create a pattern and cut four lengths of twine for each mobile.

Tie a knot at the bottom of the twine then thread on your first accessory. Older children can do this by themselves but younger children will need help. Make sure to thread right through the centre of the pom pom so that it doesn't fall off. Tie a knot underneath each item to hold it in place.

Making a simple stick mobile with buttons and pom poms

Tie each length of twine to the stick at regular intervals, then use a sturdier piece of thread tied at each end of the stick to make a loop for hanging. Decorate with artificial flowers if you have any.

Making a simple stick mobile with buttons and pom poms

Then hang up your mobiles and enjoy!

Making a simple stick mobile with buttons and pom poms

Tiger Sheds sent me a box of crafty items in exchange for this post.

Monday 21 March 2016

My crochet granny square blanket

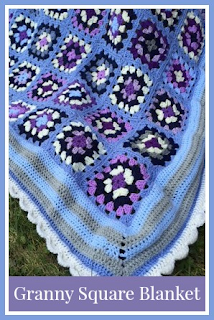
Blue and purple granny square crochet blanket

This week I finally finished my crochet granny square blanket! It was my very first crochet project, which I started as part of my learning to crochet process. It's not perfect, but I like to think that I've come a long way since my very early crocheting, and of course in the meantime I have also completed another crochet afghan and made a good start on my sky blanket

Blue and purple granny square crochet blanket

The blanket involved an awful lot of work, sewing together the squares seemed to go on forever, not to mention going around and around the border! But I got there in the end, and I'm so proud of it.

Blue and purple granny square crochet blanket

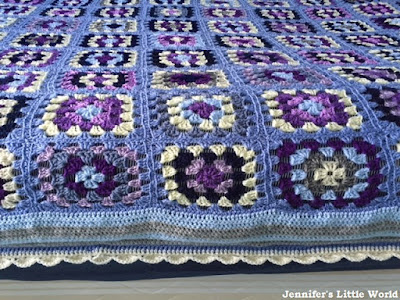
I made up the pattern as I went along, but it's really very simple. The blanket is made of 117 granny squares, arranged in a rectangle which is 9 squares across and 13 squares in length. Each square has five rounds, with colours chosen at random from a blue/purple/grey/cream palette, with the final round always in the same blue. The blanket has a border with one row of half trebles in the main blue, then ten rows of trebles (two rows per stripe), finished with a scalloped border.

Blue and purple granny square crochet blanket

In terms of yarn, the main blue that forms the outer round of each square is a Hobbycraft value yarn which I bought a few years ago, and most of the other yarn was given to me by my Mum from her stash. Some of the border rows are Red Heart yarn from the extra that I was kindly given by Make it Coats for my Sky Blanket. The cream scalloped edge is crocheted using Patons yarn that was left over from my previous crochet afghan. So it's all a bit of a mixture!

Blue and purple granny square crochet blanket

The border took a bit of fiddling with to get it right and it still doesn't lie entirely flat, but it's not too bad. The first row was a row of half trebles in the blue border colour, to smooth it all out a bit. Then I did rounds of trebles. It was starting to curve out a little around the squares, so for the first four rows I decreased stitches as I went around, first from the stitch in the middle of the square and then at the point at which the rows joined.

It was curling up quite a lot, and I eventually realised that this was because I was going around the edge of the blanket in circles, so from row seven I started alternating directions and this sorted out the curling, next time I'll remember to do this from the beginning!

The border took up a lot more yarn than I had anticipated - I estimated that a 100g ball did about 2 1/2 rounds. I turned to the Red Heart yarn set aside for my Sky Blanket as I have more than I'm expecting to use for that project (I really hope that I'm right!) which meant that the border was made with paler colours than I would perhaps have chosen, but I couldn't really justify buying more yarn when I had so much around.

Blue and purple granny square crochet blanket

The corners I made up as I went along. For a while I chained four stitches across the corner, but this was making quite large holes so I changed to doing a couple of trebles into the corner hole, chaining two, and then another couple of trebles into the hole, which filled it up nicely.

I didn't plan it that way, but it has ended up exactly the right size for a single bed! We probably won't use it for a bed though (unless one of the children particularly wants to!) instead I'll add it to our collection of blankets that we snuggle under while we are watching television. It's nice to have a selection!

Blue and purple granny square crochet blanket

This granny square blanket was a lot more work than I had anticipated - a huge amount of squares, all that sewing up and then the seemingly never ending border! It hasn't put me off trying another one though, but with my Sky Blanket keeping me busy every day I think I'll be concentrating on some smaller projects for the time being!

Sunday 20 March 2016

Having fun with the Chocolate Picture Maker

In the run up to Easter, we've been having fun making our own chocolate bars with Chocolate Picture Maker kits (affiliate link). Aimed at children aged from 4 and up, the kit allows you to make and personalise your own chocolate bars using 100% Belgian chocolate.

Review - Chocolate Picture Maker set for children

Each kit contains everything that you need to make one chocolate bar - a tray, a selection of templates, full instructions and chocolate in three colours - dark, white and milk. The chocolate melts at a low enough temperature that all you need to do is submerge the sachets in hot water for a few minutes and it will have melted enough to work with. Much easier than trying to melt it in the microwave, which is what I've done in the past!

I decided to attempt an Easter egg template. Harry wanted to come up with his own design, and Mia preferred to make hers up as she went along. As promised, the chocolate melted easily when we placed it into our bowl of hot water.

Review - Chocolate Picture Maker set for children

As per the instructions, we started with the dark chocolate to create our outlines. You place your template underneath the transparent plastic tray, then use the chocolate to colour in your design, cutting a corner off the sachet to pipe out the chocolate.

Review - Chocolate Picture Maker set for children

There is a bit of a knack to it, but Harry managed to follow his template really well and Mia had fun splodging hers out. I think if you don't set any expectations about perfect designs then even younger children that lack the dexterity to trace a pattern would still have fun playing with the chocolate (and of course licking their fingers afterwards!). Harry was constantly worrying throughout that he was messing up his design, but when it came to pop it out it was pretty much perfect underneath.

Review - Chocolate Picture Maker set for children

After you have traced the design in the dark chocolate you can add extra detail with the white chocolate, then use the milk chocolate (which is in a larger packet) to coat the design and fill in the back of the chocolate bar. We found that there was only just enough milk chocolate to fill the tray, so you do need to work carefully. I used a cocktail stick to spread the chocolate out and make sure that it went all the way to the edges.

Although the individual kit only contains the chocolate to make one bar, you could easily re-use the trays and designs if you buy some more chocolate.

Then you leave the bars in the fridge to cool. Half an hour is long enough for the bars to set, but they still melt quite easily after that time. I found it less messy to eat them after they'd been in the fridge overnight when they had set firmly, and you need to keep the leftovers (if there are any!) in the fridge until you eat them.

Review - Chocolate Picture Maker set for children

The chocolate was delicious, and it disappeared very quickly! Both children really enjoyed both the process of making their own chocolate bars, and the consumption afterwards. These kits would be brilliant for playdates with a group of children as it wasn't particularly messy and it's a really fun, creative activity. It would also be great for small parties, as the children could then take their bars home with them as party favours.

Review - Chocolate Picture Maker set for children

We received some Chocolate Picture Maker kits in exchange for a review. Amazon link is affiliate.

Friday 18 March 2016

How to make a simple floppy stuffed bunny toy for Easter

How to make a simple stuffed bunny for a child for Easter

I've been asked to partner with Brother Sewing to take part in the Brother Crafts Challenge. I will be completing a series of sewing challenges at home and documenting them on my blog. For my first post I'm sharing an Easter sewing craft - how to make your very own floppy, stuffed Easter bunny! Now I'm quite new to using a sewing machine, and so when I say it's simple it really is! So if you fancy making your very own cuddly Easter bunny, you can find full instructions below.

How to make a simple stuffed bunny for a child for Easter

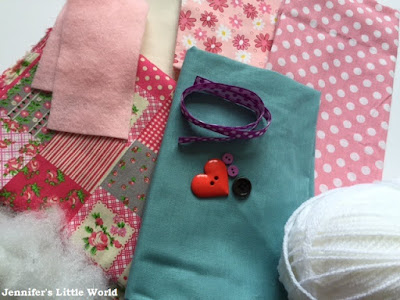
You need:

Scraps of fabric in different colours and patterns
Matching cotton
Pink felt for the ears
Embroidery threads (pink for around the ears and black for the mouth)
Stuffing
Buttons for the face and any other embellishments you'd like to use
Ribbon
White yarn for the pom pom tail

How to make a simple stuffed bunny for a child for Easter

Instructions:

Begin by gathering your different fabrics and making a rough sketch of how you want your finished bunny to look to help with planning which fabrics to use and for what parts.

Then come up with a simple pattern for your bunny. You will need a head, two ears, a body, two arms and two legs, I chose to use two different fabrics for the tummy. If you are making your own pattern, remember to make the pieces larger than you want them to be to allow for the seams, and to make a tab for the head piece to fit into the body of the bunny.

If you would like to use my pattern you can find it here:

Stuffed Bunny Pattern

Making the Ears:

1 - Cut out four ear pieces using your template

2 - Cut out two felt inner pieces and stitch them into position in the centre of the ears. I chose to hand sew with thick embroidery thread, as I like the look of the stitches. Remember to allow plenty of space around the felt for the seam allowance.

3 - Place each pair of ears with right sides facing in and sew around the edges, leaving a gap for turning.

4 - Turn the ears the right way around and press flat.

How to make a simple stuffed bunny for a child for Easter

Making the Head: 

Cut out two head templates. Sew the buttons into position for the eyes and nose one one side and embroider the mouth and whiskers (mark lightly with a pencil first to guide you). Remember that you have included a seam allowance so don't sew them too close to the edges, I placed my nose button in the centre of my circular head and worked from there.

How to make a simple stuffed bunny for a child for Easter

Then it's time to attach the ears to the head.

1 - Place the back head piece with the right side on top and lay the ears as shown.

2 - Fold the ears over and pin into place (to keep them out the way when you are sewing around it).

3 - Lay the front head piece over the top with the right side facing down.

4 - Sew all the way around the outside of the head, leaving a gap at the neck. Then turn the head the right way around. Reach in through the hole and carefully remove the pins first, then find the ears and pull them out first so that the rest will easily follow.

How to make a simple stuffed bunny for a child for Easter

Stuff the head firmly, using a knitting needle or similar to push the stuffing all the way to the edges. Sew up the bottom about 2cm from the base of the neck to keep all the stuffing in place.

How to make a simple stuffed bunny for a child for Easter

Body

The front body piece of my bunny is made from two pieces of fabric.

How to make a simple stuffed bunny for a child for Easter

1 - Cut out your fabric pieces

2 - For the front that is made from two different fabrics, place them together with right sides facing, sew them together along the top and then press flat.

3 - Add any embellishments that you'd like to use. My daughter chose a heart shaped button. You could also add extra embroidery, perhaps the name of the child that the bunny is intended for, or a Happy Easter message.

Arms and legs

Cut out two arm pieces and two leg pieces. Place each pair together with right sides facing and sew around, leaving the bottom open for turning. Press flat. I chose not to stuff them, but you could add a small amount of stuffing if you wanted to.

How to make a simple stuffed bunny for a child for Easter

Sewing it all together

Now you have all the pieces it's time to sew them together, it's important to do this step carefully so that everything ends up in the right place!

How to make a simple stuffed bunny for a child for Easter

1 - Lay the back body piece down with the right side facing upwards. Position the arms and legs as shown in the picture, or at whatever angle you want them to come out.

2 - Lay the front body piece on top with the right side facing down and pin in to place. Secure the arms and legs in place with the pins as you do so.

3 - Sew all the way around the edge of the body, leaving a gap at the top neck for turning. Turn the body the right way around, grabbing the arms and legs to pull through first to make it easier.

4 - Stuff the body quite firmly.

Then you can attach the head to the body. I pinned the neck piece of the head inside the hole at the top of the body then stitched it round by hand.


Finishing touches

Make a small pom pom for the bunny's tail using white or coloured yarn. When you tie the pom pom together, leave a long length that you can use to sew it to the bunny's behind.

How to make a simple stuffed bunny for a child for Easter

Add a ribbon or scarf around the bunny's neck.

How to make a simple stuffed bunny for a child for Easter

My bunny might be a bit wonky but Mia is thrilled with him, and that's the main thing!

How to make a simple stuffed bunny for a child for Easter

Please note that this bunny is not intended as a toy for young children as it has small parts that could be a choking hazard. Make sure that all parts are sewn together firmly before giving it to a child.

This post was written in collaboration with Brother Sewing.

Wednesday 16 March 2016

The new online learning journal, and photographs of Mia in front of things

Mia began in Reception back in September, and since Harry started school there was something new. We've been used to seeing the children's Learning Journals back from when they started at Nursery, but now the school has introduced an Online Learning Journal for the early years pupils - Tapestry.

I have to say that it's brilliant, and I hope that it has made things easier for the teachers too. There is both a website and a mobile phone app which we can login to and see what Mia has been up to. Something new is added several times a week, usually a photograph and sometimes a video. It's linked to the curriculum so it's organised by category - Expressive arts and design, Understanding the World and so on, with a note from the teacher underneath.

We can also add in our own photographs and videos of things that Mia has been doing at home, for example at parents evening it was mentioned that she wasn't holding her pen correctly, so when she finally worked it out I snapped a photo and added it to Tapestry.

I can't share any of her school photos here, but it has caused something funny to happen at home. Every time that Mia does something she's proud of - draws a nice picture, builds something with Duplo or sets up a little picnic with her dolls for example - she asks me to take a picture of it and sits in front of it with a big grin on her face. It's obviously what they do at school when they've done something good or interesting! So my camera roll is gradually filling up with photos of Mia sitting with things in various states of dress, and with the state of her hair marking the approximate time of day that the photo was taken.

Child sitting in front of her toys

It's really great to see what she's been up to at school, almost as it happens, and it's a lovely reassurance to know that she's having fun when I'm not with her. It's just a shame that it's only for the Early Years classes, I'd love to see what Harry gets up to as well!

Does your child's school or nursery use an online learning journal?

Tuesday 15 March 2016

Review - Toast at the Worthing Connaught Theatre

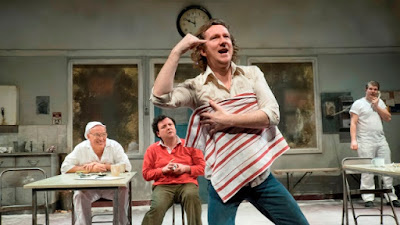
Last night I was invited to the press launch of Toast at the Connaught Theatre, Worthing and so I took my parents along for a night out. Written by Richard Bean and starring Matthew Kelly, Toast follows a group of men on a Sunday night shift in 1975 at the bread factory as they pop in and out of the break room for their lunch and smoking breaks.

The characters in the play are based upon Bean's own experiences of working in a bakery in Hull. The large clock on the back wall tracks the real-time progress through the shift, and there is a constant hum in the background as the bread making machinery rumbles away off stage.

The first half of the play was a bit slow, and with very strong language from the outset. We were introduced to the characters along with the relationships between them and their roles within the factory, along with plenty of banter. The second half moved along a lot more quickly, as a crisis hit the factory, leading to a few tense moments as the men face danger in order to keep the bread production going and to make sure that they can keep their jobs, for the time being at least.

Toast at Worthing Theatres

We enjoyed the play. It wasn't hilarious, but there were some funny moments and after a slow start the pace picked up as the play progressed. Matthew Kelly was brilliant in the role, he may not have had many lines but he conveyed so much of his character through his mannerisms, and all the other roles were characterised wonderfully.

I received press tickets for the performance in exchange for a review.