Showing posts with label sewing. Show all posts

Sunday, 19 April 2026

Not letting comparison be the thief of joy

Recently I wrote about how I had been inspired to craft after spending some time on Instagram. I have my Instagram feed pretty well curated, and I'm regularly greeted with gorgeous finished craft projects and some great mini tutorial videos. 

I've always loved doing patchwork, and I found that I had been presented with a number of videos featuring a patchworking trick that is new to me. The reel below explains it much better than I can - basically you cut out your squares and lay them out on some fusible interfacing, meaning that you can iron them into place before you sew your seams. The edges of the patches should line up perfectly, and it's a really easy way to make beautiful patchwork fabric.

I have lots of odd bits of fabric lying around, and so I decided to try this method out. I didn't really have a finished project in mind, but I thought I'd quite like to have a mat to put on my table for when I have a project on the go, or some drinks and snacks out. I used mainly 2" squares, with a few 2" by 4" rectangles. Here are my squares after they've been ironed to the interfacing.

Patchwork squares on fusible interfacing ready for sewing

And here is my finished mat, once the patchwork squares are sewn together and a fabric backing has been added.

Finished simple patchwork mat

It's not that good! I hear you politely protest, but it really is very wonky - some of the squares look more like rectangles, and you can see the white backing around some of the border.

But do you know what, I am really proud of it. I've seen reams of finished projects on Instagram that are absolutely perfect, and mine isn't anywhere near that quality. But I have learned to remind myself that what I'm seeing there are the very best pieces that the maker can produce. They are often made by people that are selling their work, and an Instagram feed is their shop front. They need to show the very best that they can do - and what's more they are showing the final results after many hours of practice.

I expect their first pieces looked a lot like mine!

I'll keep practising here and there, and in the meantime I'll just enjoy what I'm doing.

Wednesday, 4 December 2024

Different ways to display completed mini cross stitch designs

Most of my cross stitch projects are large designs that take several years to complete. But sometimes I just want a quick win, and that's when I turn to a mini cross stitch kit for some speedy crafting satisfaction. In particular I'm a sucker for the mini kits that are displayed at the till in Hobbycraft, especially as they are usually part of a tempting multi-buy promotion. 

But what to do with all the finished tiny cross stitched pieces? Here are some ideas!

Frame them in a small embroidery hoop

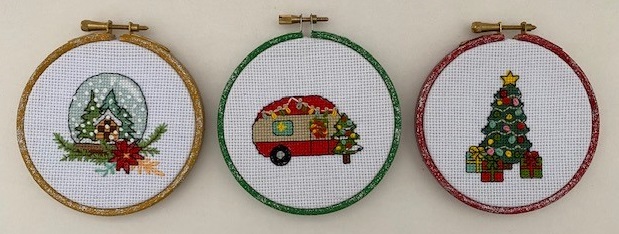
I bought these mini Christmas embroidery kits a few years ago. They were easy to stitch, and as well as cross stitch they also have some different embroidery stitches to add interest. I framed each one in a painted embroidery hoop with added glitter, and they form part of my Christmas mantlepiece display. 

Three Christmas mini framed cross stitch embroidery hoops

Use them to make a greetings card

This little cupcake design is really sweet! I used my Cricut to make a simple frame and mounted the cross stitch inside to make a card.

Cupcake cross stitch in greetings card

Use them as panels in a quilt

This would work best for a decorative quilt, or maybe one that is used as a wall hanging. Just use the cross stitched fabric to make a panel for the quilt, mixed in with different fabric panels or patchwork. You can find a tutorial for a gorgeous quilt here - Cross Stitch and Paper Piecing

Use for a cushion, pillow or lavender bag

You can either use a slightly larger piece or combine several smaller pieces to make a cushion or pillow. This is a great way to display your finished project! You can find a video tutorial here:


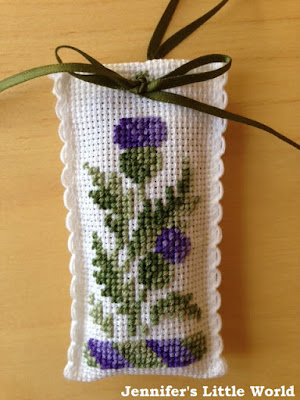
You can also use a smaller piece to make a simple lavender bag, either by folding over a larger piece of fabric or using contrasting fabric to back it.

Cross stitch lavender bag craft

Sew a bookmark


This project works best with very small designs, like my free mini cross stitch Christmas motifs. You can combine several together to form a wide strip, or you can even buy cross stitch fabric cut to bookmark size (affiliate link) which you can sew on directly.

Use for gift tags

It's really easy to make gift tags from tiny cross stitch motifs, and they add a lovely personal touch to a gift. If you put a pretty hanging tag then they could be re-purposed as Christmas tree ornaments!

Combine smaller designs for a larger project

I used some of my mini snowflake cross stitch patterns to make a larger framed embroidery hoop piece. It took a bit of fiddling to produce a design that I was happy with, but I was really pleased with the result which I stitched on dark fabric - you can find the free pattern here Snowflake embroidery hoop design.

Mini snowflake cross stitch designs in embroidery hoop

Sew together to use as bunting flags

You can use small finished pieces to make some lovely bunting, maybe combined with bunting flags in different fabrics. I love the woodland bunting which you can find in this article along with the free patterns - Children's cross stitch patterns

For really tiny pieces

I love these really small wooden frames (affiliate link) which can be used to frame those really miniature cross stitch projects. They can be used for hanging decorations and ornaments, pendants, brooches, keyrings and so on.

I hope that I've given you some ideas for ways to display those tiny cross stitch projects!

Friday, 31 March 2023

Trying out crumb (crazy) patchwork quilting

I had been wanting to try crazy or crumb patchwork for a while now. It's a way of using up odd little bits and pieces of fabric to do a piece of patchwork that doesn't need to be as neat as patchwork quilts generally are. This appeals to me because I'm very bad at cutting and sewing fabric into regular shapes! 

As I understand it, crumb patchwork stitches together odd shaped pieces of fabric, and crazy patchwork is the same thing but using a mixture of different fabric types and embellished with extra stitching and so on to add more interest. 

I've been working on a few fabric projects recently and had collected together a pile of different fabric pieces so I decided to give it a go. There are lots of video tutorials on crumb patchwork with different methods and techniques. I watched a few and the one that made the most sense to me was this one, as it uses some more irregularly shaped pieces rather than just squares or rectangles.


I set myself to it, and it turned out that it wasn't quite as easy as I thought it would be! I had a few false starts and pieces that I had to unpick because I'd left myself with a hole. I found it quite difficult to work out what the pieces would look like when they were sewn together. It's also quite an active craft as you are constantly having to get up and iron flat the little pieces of fabric that you have sewn together! I had a reasonably large pile of scrap pieces but it took a lot more fabric than I expected to make my crumb patchwork piece. But I was delighted with the result! It measures about 24cm square. 

Crumb patchwork quilt piece square

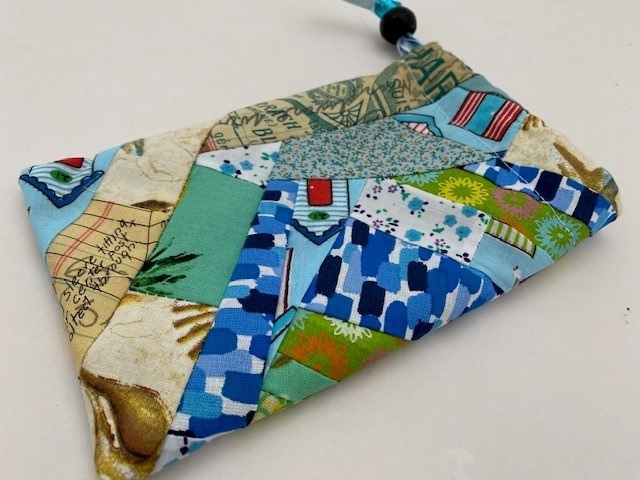
I've been making a few drawstring bags recently and they are very forgiving for a beginner sewer so I decided to make a small drawstring bag to hold my phone. The idea is to tuck my phone away at night so I'm not tempted to pick it up first thing. I was originally going to line the bag but I wasn't sure if the piece of fabric would be large enough so I didn't worry about it and it worked out fine!

Crumb patchwork drawstring bag for phone

I used some gorgeous shiny mermaid inspired ribbon for the drawstring. I recently bought some  drawstring toggle things which are really good for holding the bag closed - I don't know why but I only just realised that these are a thing that can be bought, they are going to come in very useful for lots of other projects like my drawstring shoe bags!

Drawstring bag made with a crumb crazy patchwork square

I really enjoyed working on this once I'd figured out the technique, I'm definitely going to continue saving all my scraps so that I can have another go in the future!

Monday, 6 March 2023

Sewing some simple scrunchies for our upcoming cruise

I almost always wear my hair in a pony tail, with just a plain band. But sometimes special occasions call for something a bit more standout, and recently I've been having lots of fun making some simple scrunchies!

My favourites are these two sets that I made for an upcoming cruise - a larger one for me and two smaller ones for Mia's plaits. The first set uses some anchor fabric that I received to review a few years ago. I used most of it for the lining of my beach themed tote bag and the leftovers were the perfect size for scrunchies. I found lots of tutorials for the scrunchies online but I ended up making my own version, it's basically just a long tube of fabric (14" in length and 4" or 5" in width for the smaller and larger scrunchies), a piece of elastic threaded through and the ends sewn together. It's not perfect but when it's tied in the hair you can't see the join.

Disney Cruise themed scrunchies

The pirate scrunchies are made using Disney pirate fabric. If you go on a Disney Caribbean cruise they usually include a pirate themed night and you each receive a pirate bandana to wear. I used the fabric from some previous cruises to make the scrunchies so they will match our new bandanas and those of the other passengers. It's a little difficult to see the fabric, but everyone else on the cruise will recognise it!

I have lots of fabric in my stash which I'm slowly working through, and this is a great way to use up odd scraps of fabric. Scrunchies might not be a desperately cool fashion accessory these days but that  doesn't bother me!

Friday, 30 September 2022

My sea themed simple tote bag

It's definitely getting cooler now here as we head towards the end of the year, and I'm busy working my way through my list of ten craft projects to complete by Christmas.

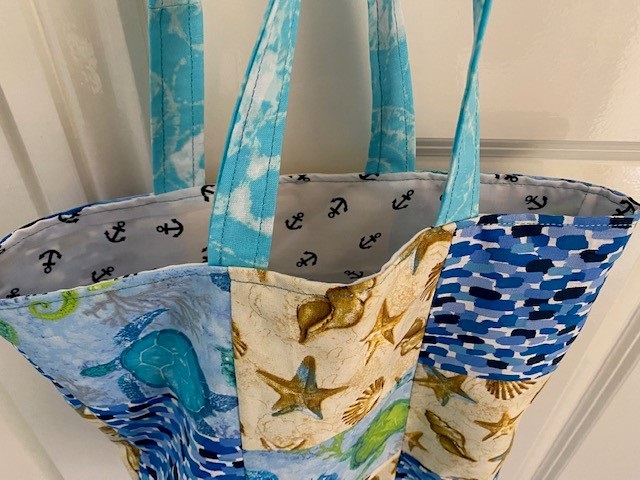
Next up on my list was a sea themed fabric project. I bought some lovely fabric while I was in the US this summer, and I intentionally chose some that had a beach or ocean theme or was blue and green in colour. Most of the fabric in my stash was pink and flowery and so I wanted something a bit different. I wasn't sure what to make, but after searching for inspiration online I decided to try a simple tote bag.

Simple beach themed fabric lined tote bag

From my new fabric I chose the blue camouflage, seahorses and turtles and different shells. I already had some fabric with anchors on which I knew would be perfect for the lining.

Making my first simple tote bag with my sewing machine

I searched for simple tutorials and found this one from Skip to my Lou - How to make a tote bag. It's an excellent tutorial for a simple lined and reversible tote bag and I found it pretty easy to follow. The only place I got a bit caught out was with the straps, I'm not very good at visualising how a pattern will come together, and it took me a while to work out how I needed to place them! Next time I would manage the placement a bit better with an extra twist.

A simple lined tote bag craft

And there will definitely be a next time because I was so pleased with how this turned out! I already have an order lined up for Mia, and I'm thinking about making a few smaller ones for some younger family members. It's gong to be a great way to work through some of my fabric stash!

Friday, 27 May 2022

Making plans for my fabric stash

Over the years I seem to have accumulated quite a bit of lovely fabric, even though I'm only at a very basic level when it comes to using a sewing machine. Some of it has come from past blog collaborations and some has just caught my eye when I've seen it on special offer. I now have a large plastic drawer filled with fabric, and I really want to use it for some cool projects.

Pile of different fabrics

There are so many tutorials online and on YouTube that there is really no excuse for not crafting with it. I have a sewing machine which I was given by friend's Mum, I have a huge collection of embroidery silks, I have interfacing and stuffing as well as ribbons and buttons galore. I'm thinking that there are lots of things that I could make without even needing to buy anything extra.

I like the idea of using the red, white and blue London themed fabric for a travel bag, as I'm always looking for storage to help with my packing when we go away. I would love to learn how to make some zippered or drawstring pouches, or perhaps a padded case for electricals.

The anchor fabric would be great to make some things for a cruise gift exchange if we are lucky enough to cruise again, as would the London Underground fabric and the beach huts. I bought some Christmas fabric last year which I want to get crafting with for this year, maybe making some Christmas bunting or tableware. 

I recently made fabric bunting for our garden and there is lots of space to hang some more. I also have many smaller pieces of fabric which would be perfect for some patchwork. I'm thinking about simple patchwork coasters or a case for my phone. I also want to make a cover for the monitor in my study, both to keep it dust free and to keep it out of sight when I'm not using it. 

So I have lots of ideas, I just need to start hunting down some simple tutorials and get started!

Friday, 20 May 2022

Making some new fabric bunting for the garden

A few years ago I made some fabric bunting to hang across the entrance to our vegetable patch area. It was never intended to last forever, and as spring approached it was looking decidedly scruffy so I knew that it was time for an upgrade.

I had some gorgeous beach hut fabric in my fabric stash, and as I'm intending to make it into a seaside themed area I knew that it would be the perfect choice. I alternated the patterned flags with some plain green so as not to be too overwhelming, and it is all sewn to a length of green ribbon for hanging.

Garden fabric bunting with beach huts

This is the third set of bunting that I've now made for the garden, and although my method is a bit rough and ready I'm really pleased with how it looks! I have a cardboard triangle template which I've used before, and I cut out a front and back piece for each flag. Then I turn the good sides together, sew around the long edges and turn them the right way around. I trim across the tops so they are all even and then I just sew them to a length of ribbon.

This time I sewed the flags to the top and bottom of the ribbon to hopefully keep them lying nice and flat and stop them twisting too much. I leave a long length of ribbon at each end for tying to the trellis, and sometimes I secure with a drawing pin or two if they are blowing about too much. They look so bright and colourful, and will hopefully keep looking good for a few more years at least!

Simple fabric bunting for the garden with beach huts

Friday, 1 February 2019

Pencil and treat holder for a Disney cruise stateroom door

Last week I shared the fabric Disney pin trading board that I made for our upcoming Disney cruise. This is just one of several crafts that I have in mind to add a little more fun to our Disney cruise, and this week I finished off another - a pencil and treat holder for our stateroom door!

We are sailing on a Halloween themed cruise, and while we were in the US last year I stocked up on some Halloween treats that I intended to use as Pixie Dust - little gifts to hand out to other travellers. But then I spotted some treat holders online and decided that I'd like to make my own to share some of the treats via our door for passers by to grab!

Disney cruise homemade treat holder

The treat holder was very simple to make. I made a backing strip from black fabric which had a layer of interfacing inside to make it a little stiffer. Then I used a second strip of fabric (or you could use thick ribbon) and sewed it to the black background using a series of rows of stitches, each one about 1.5cm apart. This makes loops of narrow pockets (mine has 17) which you can use to hold all sorts of things. It's attached to the door with a ribbon loop over a strong magnetic hook (I really hope that mine is strong enough!), as all door decorations need to be magnetic.

Treat holder to use on Disney cruise

Many people use these holders to hold lollipops, but they can also be used for pencils, glow stickers, candy canes, reusable straws or long thin candy. Because we are flying in for our cruise I wanted to use something small and light so I'm mainly going to use pencils, but if we are able to stop at a supermarket before we board I may buy a big bag of lollies too. I also have lots of little plastic spiders which I can hang from a strip of lace at the bottom or from the pencils themselves.

Pencil and lollipop fabric treat holder

I've not done this before so I've no idea how popular it will be! I hope that everything doesn't disappear within the first day - if it starts to go quickly I might bring it inside for a day or two to restock. If I'm left with anything I'll pop it into the Fish Extender pockets on people's doors on the last sea day of the cruise, as I don't want to be bringing them home with me.

Fabric treat holder for using on a Disney cruise

Like the pin trading board my hanger has a Halloween theme as we are taking a Halloween on the High Seas cruise. But it can easily be changed to suit any season by adding some different stickers and ribbon so I can use it again on any future cruises that I'm lucky enough to take!

You can read about more ways to add some magical extras to a Disney cruise here!

Wednesday, 8 February 2017

A mini heart cushion for Valentine's Day

This month I have partnered with Brother Sewing to create a Valentine's Day themed sewing craft. I decided that I would use some of the pieces of pink patterned fabric in my stash to make a mini patchwork cushion with a heart theme.

How to sew a simple patchwork heart cushion for Valentine's Day

You need:

* Pieces of fabric in a variety of complementary colours and patterns. Each square on my cushion measures 10cm x 10cm and you will need a larger piece in one fabric 30cm x 30cm to make the back of the cushion (or you may choose to make the back of the cushion as a patchwork piece too). I used a selection of pieces of patterned fabric from my stash.

* Heart themed embellishments - I used two heart shaped buttons and scraps of felt, you could also use ribbon, lace or beads

* Stuffing for the cushion

Simple heart themed patchwork cushion sewing project

Instructions:

First prepare all your pieces of fabric. For one side of the cushion you will need nine squares of fabric, each measuring 10cm x 10cm. Cut the patchwork pieces to size and then experiment with different arrangements until you find one that you are happy with.

Simple heart themed patchwork cushion sewing project

It's a good idea to take a photograph or do a rough sketch so that you don't forget your layout!

Simple heart themed patchwork cushion sewing project

Begin the patchwork side by sewing the squares together in three strips of three. Take two squares that will be next to each other, place them so that the right sides are facing inwards, and sew down one side.

Simple heart themed patchwork cushion sewing project

Then turn right side up and press flat. Repeat with the third square in the strip. Make sure to follow your pattern closely so that you keep the arrangement correct, it requires a bit of concentration to make sure that you get all the pieces in the correct place!

Simple heart themed patchwork cushion sewing project

When you have made three strips you can sew the three strips together. Again, place the two right sides facing inwards and sew along the side. Take care to align the seams as closely as you can so that the squares will line up.

Simple heart themed patchwork cushion sewing project

Press flat when finished. My finished piece of patchwork measured about 27cm x 27cm square.

Simple heart themed patchwork cushion sewing project

Next think about which embellishments you'd like to use on your cushion. I decided to use a large felt heart and some heart shaped buttons, both of which were stitched on by hand. When planning the position of embellishments, make sure that you don't place them too close to the edges as you need to allow room for the outer seam. Then cut the piece of fabric that you are going to use for your backing to the correct size.

Simple heart themed patchwork cushion sewing project

Place the patchwork piece and the backing piece together with the right sides facing inwards. Sew around the outer edge, leaving a gap of around 6cm at the bottom for turning and for stuffing the cushion.

Simple heart themed patchwork cushion sewing project

Turn the cushion the right way out, using a knitting needle or similar to push into the corners to make sure that they are square. Press flat, being careful to avoid the embellishments.

Simple heart themed patchwork cushion sewing project

Stuff the cushion firmly, making sure that the stuffing is distributed evenly throughout the cover.

Simple heart themed patchwork cushion sewing project

Finally, sew up the remaining gap by hand, and your cushion is finished!

Simple heart themed patchwork cushion sewing project

This mini cushion makes a lovely gift for Valentine's Day, or a pretty seasonal decoration for your sofa or bed.

Simple heart themed patchwork cushion sewing project

This post was written in collaboration with Brother Sewing.

Friday, 18 March 2016

How to make a simple floppy stuffed bunny toy for Easter

How to make a simple stuffed bunny for a child for Easter

I've been asked to partner with Brother Sewing to take part in the Brother Crafts Challenge. I will be completing a series of sewing challenges at home and documenting them on my blog. For my first post I'm sharing an Easter sewing craft - how to make your very own floppy, stuffed Easter bunny! Now I'm quite new to using a sewing machine, and so when I say it's simple it really is! So if you fancy making your very own cuddly Easter bunny, you can find full instructions below.

How to make a simple stuffed bunny for a child for Easter

You need:

Scraps of fabric in different colours and patterns
Matching cotton
Pink felt for the ears
Embroidery threads (pink for around the ears and black for the mouth)
Stuffing
Buttons for the face and any other embellishments you'd like to use
Ribbon
White yarn for the pom pom tail

How to make a simple stuffed bunny for a child for Easter

Instructions:

Begin by gathering your different fabrics and making a rough sketch of how you want your finished bunny to look to help with planning which fabrics to use and for what parts.

Then come up with a simple pattern for your bunny. You will need a head, two ears, a body, two arms and two legs, I chose to use two different fabrics for the tummy. If you are making your own pattern, remember to make the pieces larger than you want them to be to allow for the seams, and to make a tab for the head piece to fit into the body of the bunny.

If you would like to use my pattern you can find it here:

Stuffed Bunny Pattern

Making the Ears:

1 - Cut out four ear pieces using your template

2 - Cut out two felt inner pieces and stitch them into position in the centre of the ears. I chose to hand sew with thick embroidery thread, as I like the look of the stitches. Remember to allow plenty of space around the felt for the seam allowance.

3 - Place each pair of ears with right sides facing in and sew around the edges, leaving a gap for turning.

4 - Turn the ears the right way around and press flat.

How to make a simple stuffed bunny for a child for Easter

Making the Head: 

Cut out two head templates. Sew the buttons into position for the eyes and nose one one side and embroider the mouth and whiskers (mark lightly with a pencil first to guide you). Remember that you have included a seam allowance so don't sew them too close to the edges, I placed my nose button in the centre of my circular head and worked from there.

How to make a simple stuffed bunny for a child for Easter

Then it's time to attach the ears to the head.

1 - Place the back head piece with the right side on top and lay the ears as shown.

2 - Fold the ears over and pin into place (to keep them out the way when you are sewing around it).

3 - Lay the front head piece over the top with the right side facing down.

4 - Sew all the way around the outside of the head, leaving a gap at the neck. Then turn the head the right way around. Reach in through the hole and carefully remove the pins first, then find the ears and pull them out first so that the rest will easily follow.

How to make a simple stuffed bunny for a child for Easter

Stuff the head firmly, using a knitting needle or similar to push the stuffing all the way to the edges. Sew up the bottom about 2cm from the base of the neck to keep all the stuffing in place.

How to make a simple stuffed bunny for a child for Easter

Body

The front body piece of my bunny is made from two pieces of fabric.

How to make a simple stuffed bunny for a child for Easter

1 - Cut out your fabric pieces

2 - For the front that is made from two different fabrics, place them together with right sides facing, sew them together along the top and then press flat.

3 - Add any embellishments that you'd like to use. My daughter chose a heart shaped button. You could also add extra embroidery, perhaps the name of the child that the bunny is intended for, or a Happy Easter message.

Arms and legs

Cut out two arm pieces and two leg pieces. Place each pair together with right sides facing and sew around, leaving the bottom open for turning. Press flat. I chose not to stuff them, but you could add a small amount of stuffing if you wanted to.

How to make a simple stuffed bunny for a child for Easter

Sewing it all together

Now you have all the pieces it's time to sew them together, it's important to do this step carefully so that everything ends up in the right place!

How to make a simple stuffed bunny for a child for Easter

1 - Lay the back body piece down with the right side facing upwards. Position the arms and legs as shown in the picture, or at whatever angle you want them to come out.

2 - Lay the front body piece on top with the right side facing down and pin in to place. Secure the arms and legs in place with the pins as you do so.

3 - Sew all the way around the edge of the body, leaving a gap at the top neck for turning. Turn the body the right way around, grabbing the arms and legs to pull through first to make it easier.

4 - Stuff the body quite firmly.

Then you can attach the head to the body. I pinned the neck piece of the head inside the hole at the top of the body then stitched it round by hand.


Finishing touches

Make a small pom pom for the bunny's tail using white or coloured yarn. When you tie the pom pom together, leave a long length that you can use to sew it to the bunny's behind.

How to make a simple stuffed bunny for a child for Easter

Add a ribbon or scarf around the bunny's neck.

How to make a simple stuffed bunny for a child for Easter

My bunny might be a bit wonky but Mia is thrilled with him, and that's the main thing!

How to make a simple stuffed bunny for a child for Easter

Please note that this bunny is not intended as a toy for young children as it has small parts that could be a choking hazard. Make sure that all parts are sewn together firmly before giving it to a child.

This post was written in collaboration with Brother Sewing.

Tuesday, 3 November 2015

Making a padded fabric and ribbon pinboard

I'm very happy to be a part of the blog team at White Tree Fabrics, and for my latest project I decided to upcycle an old cork notice board with some of their gorgeous fabric and ribbon. It's a really simple project, and makes a big difference to the room!

How to make a padded fabric and ribbon pinboard tutorial

Supplies:

A cork noticeboard
Fabric to cover - I used some gorgeous Tilda cotton print fabric in China Blue
Plain fabric for backing (optional)
Ribbon - I used matching Tilda ribbon in blue grey (total of three packs to give 9m)
Polyester wadding to cover (2oz)
Pins - I used pearl headed pins in silver
Staple gun

How to make a padded fabric and ribbon pinboard tutorial

Instructions:

First iron the fabric, then cut fabric and wadding to size. Make sure that you cut your fabric correctly if it needs to be a certain way up like mine! You will need to leave a border of around 8 cm to allow for the depth of the board and to have enough to turn over.

How to make a padded fabric and ribbon pinboard tutorial

Lay the wadding and patterned fabric over the front of the corkboard and turn the board over. Secure both to the frame on one side of the corkboard using a staple gun, then pull tightly and secure to the frame on the opposite side. Repeat for the other two sides. Depending on the style of your noticeboard you may need to remove the fixings first and replace them once the fabric is in position.

How to make a padded fabric and ribbon pinboard tutorial

Finish with the corners and make them as neat as possible with plenty of staples to keep it all tightly together.

How to make a padded fabric and ribbon pinboard tutorial

Then it's time to do the ribbon. It's important to work out how much you'll need beforehand, as this project uses more than you might think! It might be a good idea to plan your work out first and make some markings where you want the ribbon to go.

How to make a padded fabric and ribbon pinboard tutorial

Starting with the longest diagonal pieces, secure each end in turn with a staple into the back of the board. You might want to add a pin as well, to make sure that it's completely secure, and also for decorative purposes.

How to make a padded fabric and ribbon pinboard tutorial

Then finish stapling the other lengths of ribbon across the noticeboard, securing to the back frame with the staple gun as before.

How to make a padded fabric and ribbon pinboard tutorial

Complete the pin board by adding in the pins where the lengths of ribbon cross. As well as keeping the ribbon securely in place they also look really pretty. You could also use plain or decorative buttons or any other small embellishment.

Then it's up to you if you want to make the pinboard look a little neater with a fabric backing. I just cut a piece of old cotton fabric to size, allowing an amount for a hem which I folded over before stapling to the back of the frame.

How to make a padded fabric and ribbon pinboard tutorial

Here's a close up before I'd finished adding all the pins, I love how well the fabric and the ribbon go together.

How to make a padded fabric and ribbon pinboard tutorial

And here's the complete before and after, what a difference, I'm so proud of it!

How to make a padded fabric and ribbon pinboard tutorial

I received the supplies to complete this project as part of the White Tree Fabrics blog team.