Showing posts with label holiday. Show all posts

Friday, 5 December 2025

Simple Hama bead snowflakes for Christmas

I know it's been ages since I shared a new Hama bead craft on my blog, so this week I've been working on some Hama bead snowflakes! They are a great way to add a bit of homemade craftiness to your Christmas decor.

Hama bead white snowflakes Christmas craft

The designs for these snowflakes are mainly based on the snowflake pattern that I came up with for my Hama bead snowflake bunting many years ago. I used designs which are created on the hexagon shaped pegboard. I also experimented with some smaller designs. The hexagon pegboard works really well as it easily divides into six sections, so you can just start by placing beads in the centre, head out towards the corners, and see what you end up with! 

Hama bead simple snowflake designs

When it comes to ironing the Hama beads, for this particular craft it is especially important to make sure that you iron the beads until they are well fused, and to iron them on both sides. Even though some areas are only one bead wide, as long as they have been well ironed then they will be sturdy enough to stand up to being used in your Christmas decor.

If you are new to crafting with Hama beads then you might find this post helpful - Ironing tips for Hama beads. 

This craft was a bit of a de-stashing exercise for me - I've been lucky enough to hoover up lots of Hama bead collections from friends and family which has left me with small numbers of beads across a huge range of colours. So I mixed in some of the pale blue, transparent and glitter blue beads to add some interest to my Hama bead snowflake collection!

Hama bead snowflakes in white and blue beads for Christmas

I don't have a final home for these snowflakes yet, but it would be easy to add some festive cord or ribbon so that they can be used as ornaments on the Christmas tree.

Hama bead snowflake Christmas ornaments

I can also imagine them hanging from lengths of cotton in a window or over an unused fireplace. They could be attached to gifts, or enclosed with Christmas cards.

Hama bead snowflakes displayed among Christmas decorations

These Hama bead snowflakes were so fun and simple to make, and I loved coming up with different ways to place the beads in order to create new designs.

If you are looking for more snowflake crafts then you might also enjoy these:

Mini Hama bead snowflake embellishments

Free simple cross stitch snowflake designs

Snowflake cross stitch embroidery frame design

Cross stitch felt snowflake bunting

Lollipop stick and button snowflakes

You can also see some of my favourite Hama bead Christmas crafts.

Friday, 7 November 2025

Some Autumn sunshine in the Dominican Republic

Over half term we were lucky enough to get away for some sunshine and warmth in the Dominican Republic. We booked our holiday as a package with Tui, staying at Dreams La Romana Resort & Spa. The hotel is located in Bayahibe, about an hour transfer from Punta Cana and the airport. We chose this resort because the beach is on the Caribbean Sea rather than the Atlantic, so we were hoping that the water would be a little warmer and calmer.

Unfortunately our holiday did coincide with Hurricane Melissa, and although we were well away from the direct path I do think that it made the sea conditions a little rougher, especially at the beginning of the week. The sea was also quite cloudy, fine for swimming but unfortunately no good for snorkelling. The water temperature was really warm, it was lovely to float out there bobbing up and down and it felt very safe.

We had two rooms which each had two double beds. The rooms were next door so we felt comfortable letting the teenagers share a room, and they loved the independence. 

My favourite part about the room was the balcony. I absolutely love a balcony, especially one that is high enough to be tucked away from the world and with plenty to look at. I spent hours out there every day reading on my Kindle, enjoying the warmth and watching the birds and the people going past. Even when it rained I sat out there until the wind picked up and turned horizontal!

Dreams La Romana Resort and Spa, Balahibe, balcony

There was a brilliant cafe in the lobby which was always open and served drinks and delicious cakes as part of the all inclusive. Every afternoon I went down to fetch a fruity tea and a couple of cakes to take back to my balcony to enjoy.

Tea and cakes on balcony with Kindle

The holiday did involve speaking a little more Spanish than I was expecting. Spanish isn't one of my languages although both children can do pretty well. I managed to learn the words to order cheese (there wasn't a huge selection of veggie food) and bottled water as well as a few bonus words like watermelon and butter!

The resort also has a water park which was excellent and not too busy. There was a lazy river with plenty of rubber rings, and although it featured several instances of unavoidable waterfalls they were spaced very well to let you get nice and hot before you were swept underneath to cool down!

Water park at Dreams La Romana, Balahibe, Dominical Republic

On our last morning we were floating happily along when my husband spotted what he thought was a dead crab in the water. A lady by the side of the pool came over and fished it out with her flip flop - it was actually a dead tarantula! I had no idea there were freely roaming tarantulas in the Dominican Republic, I'd been walking around every evening through grassy areas in my sandals!

We had a lovely holiday, and it was a great chance to relax and enjoy some last warmth before heading for cooler temperatures and dark evenings. 

The books that I read while on holiday:

American Sky by Carolin Dasher - an Amazon First Reads selection that was excellent, much better than many of them that I've struggled through, a historical novel that follows three generations of women and in particular their connections to aviation.

The Mystery Guest by Nita Prose - a sequel to the The Maid, I enjoyed this very much.

The Restoration Garden by Sara Blaydes - ticked a lot of my boxes - an overgrown garden, secrets to uncover, a time jump between WWII and present day narratives.

The Memory Library by Kate Storey - a simple plot but with the lovely idea of choosing and collecting books for others and explaining their special meanings.

Very, Very Lucky by Amanda Prowse - fairly predictable but a fun easy read.

The Women at Ocean's End by Faith Hogan - a group of women with compelling stories connected by life on a remote island.

Monday, 3 November 2025

How to pack light for a longer holiday

We have been lucky enough to enjoy some longer holidays over the years, but as the children have grown so has our need for suitcases! 

Before children we managed a two week trip around Europe with just hand luggage, we also survived nearly six weeks away with a suitcase and a holdall. I even lived in Germany for a year with mainly just the contents of a 22kg suitcase. So I like to think that I'm quite good at planning my packing to be as minimal as possible. 

Travelling light isn't just about saving on your weight allowance, it's also much easier when it comes to moving around airports and stations with a suitcase, and with less to keep track of it takes away some of the worries.

Here are some tips!

Try to wash clothes while you are away

If you can, book accommodation with laundry facilities. This is the reason that we usually book a villa stay when we travel to Florida - I'm able to keep up with washing as we go and we only need to pack clothes for a few days. It can be a pain taking time out of your holiday to faff with the washing, but it makes such a difference with the packing and it's so nice to come home with a suitcase of clean clothes! On our recent trip to Seoul we stayed in a hotel with a coin laundry which was fantastic, I would never pay for a hotel laundry service so it's definitely worth looking for self-service facilities.

If there aren't any washing facilities you can always wash by hand in the sink or bath, especially underwear that will dry quickly. You can either take some hand washing liquid with you, or in the past I've just used shower gel! Take clothes made from lightweight materials like sportswear and they will dry more quickly if you wash by hand.

Plan your clothes packing carefully

Unless you are an Instagram influencer then you really don't need a fresh outfit each day. Obviously underwear needs to be changed, but outer layers like trousers and jumpers can be worn a few times. 

Make sure that everything you pack goes well together, with neutral colours that can be mixed and matched.

Pack lightweight clothing that can be layered depending on the temperature or your activities.

Choose items that can be worn in different ways. For example I might wear a summer dress during the day, then add leggings and a cardigan for the evening. 

Bring the clothes that you enjoy wearing at home, don't bring clothes that you will avoid wearing and will turn out to be a waste of space.

Don't pack extra 'just in case' clothes - you will always be able to make do with what you have even if it means washing a few things out after unexpected accidents.

Pile of vintage suitcases
Photo credit Nick Fewings via Unsplash


Check what is included in your accommodation

Don't pack towels unless you are absolutely certain that you will need them. If you are going self-catered you can shop for essentials like toilet rolls, tissues, bin bags or dishwasher tablets when you arrive. 

Remember weight rather than size

If you are flying, it will usually be the weight that limits what you can take with you. I find that the heaviest things are usually shoes, so try to pack pairs that can go with all of your outfits. I try to limit myself to a pair of trainers for walking and some comfortable sandals if we are going somewhere hot. Depending on the type of holiday you might also want a pair of dressier shoes.

Books also add to the weight, so if you are an avid reader consider using an e-reader. When we went on our long holiday in the days before Kindles I chose one nice thick book - Anna Karenina - which kept me occupied for the entire trip!

Another way to save weight is to decant toiletries into smaller bottles, or do what I do and plan to use toiletries provided by your accommodation. If you arrive and there aren't any supplied then you can always just buy some when you arrive.

If you are packing heavy clothes like boots or winter coats then try and wear them for travel days.

A luggage scale is a great investment if you are worried about going over a weight limit - we have a simple strap one that you hang the suitcase from and it's very accurate. You can keep track while you are packing, and it helps you to think more carefully about what's going in.

Modern suitcases are much lighter than older ones, so it might be worth upgrading if you are wasting some of your weight allowance on bulky luggage.

Look for travel sized items

If you travel regularly it's definitely worth investing in some lightweight accessories. For example a small, light umbrella or a device charger with multiple USB ports. Thin, foldable ponchos are a great alternative to a bulky raincoat if you aren't sure whether you'll need one.

Remember that other places have shops too

Most of what you need can always be purchased while you are away. Even if you are staying in a remote resort there will always be a shop for essentials.

I always consider the things that absolutely couldn't be replaced, and anything other than that is a bonus. Apart from travel documents, for us that is our glasses as we are glasses wearers (and a spare pair is essential too!) and medication that would be difficult to replace or find an alternative.

Do you have any tips to add?

Friday, 3 October 2025

Using ChatGPT to plan a holiday - what's the best way to use it?

I'm currently in the process of planning a big holiday - a several week trip to Japan which will involve travelling around the country to visit many places of interest - and for the first time I'm experimenting with using ChatGPT to help me come up with places to visit and to plan an itinerary. 

I've been having a really positive experience, so I thought I'd share some of the pros and cons, as well as a few tips for anyone thinking of using AI to plan a holiday. 

Advantages of using AI to plan a holiday

ChatGPT is constantly evolving, and is constantly being updated. ChatGPT now has an excellent memory, so even in a separate query it will remember the ages and interests of family members or information like the fact that you are a vegetarian family. So you don't need to keep repeating yourself with each prompt.  

It's perfect for finding a small piece of information quickly, for example the opening times of a particular attraction, without having to trawl through Google search results. Just remember to ask it for for a link that you can use to check the information!

It's brilliant if you are searching for information online which may be in a different language, for example a small local attraction which may not have an English website. 

I found it very helpful for putting together an itinerary based on attractions which are close together geographically without having to hunt everything down on a map. It's also great for suggesting day trips or other places to visit nearby.

The AI can pick out some less well known information, for example more niche attractions, that wouldn't come up in the first few pages of search engine results. It finds even the most obscure information incredibly quickly.

Some negatives to using ChatGPT to plan a holiday

If you've asked for an itinerary make sure that all the days are included - I had an attempt that missed out an entire day. 

The AI may draw to your attention to the fact that an attraction is closed on a certain day, yet still plan for you to visit on the day when it's closed.

Opening hours or ticket prices may be incorrect, and it may suggest visiting places such as restaurants that have now closed down.

Restaurant suggestions in particular can be a bit random and it's difficult to see why a particular venue has been suggested over others that are just as good or more suitable.

Depending on how you phrase your initial prompt, the AI may pick out something small and run with it. For example, I mentioned shopping as a possible interest among several others and was presented with a three day itinerary which included only shops, rather than any famous sights.

Close up map of Japan
Photo credit Finn Mund via Unsplash


Some tips for using ChatGPT to plan your travels

In your initial prompt, enter as much detail as possible. For example - ages of travellers, interests (history, art, nature, transport...), the type of place that you want to visit (museums, shops, landmarks, places to take a good selfie, ways to experience local cuisine...), attractions that you definitely want to visit and the sights that you aren't bothered about, whether you will have a car or will be using public transport.

Make sure to add in your travel plans, for example flight or train details, and whether any of the dates in your itinerary are fixed, for example if you have booked tickets to an event. Ask the AI to suggest quieter days or times to visit large attractions, and ask whether there are any public holidays or local events to be aware of.

When the AI comes back with suggestions you can keep a thread going and all the information you've received so far will be stored in the chat. For example further prompts like 'do you have any other suggestions that are more suitable for teenagers', 'how about some places with historical significance' or 'what else could I do while I'm in this area'.

You can ask for summary reviews, like 'what do people think of this attraction' or 'is this a popular place to visit with teenagers'.

Finally, check every detail before you leave. In particular opening times, transport links, admission costs, process for purchasing tickets and so on. I've found ChatGPT to be generally accurate, but you can't rely on it entirely! You can also always ask the AI for a link to an official website where you can verify the information.

I hope that this article is helpful - next time you are planning a holiday see whether ChatGPT can help you out!

Thursday, 24 July 2025

Our fantastic summer holiday to Helsinki, Tallinn, Seoul and Shanghai!

We have just got back from our summer holiday, and it was a very exciting one for us! We travelled to Helsinki in Finland, took a day trip to Tallinn in Estonia, then spent a week in Seoul in South Korea followed by a week in Shanghai in China.

The itinerary came about for several reasons. Firstly, the trip was booked using Avios Air Miles. We wanted to visit Seoul, and because you can't fly directly from London to Seoul with British Airways we began the trip with a short stop in Helsinki. 

Secondly, we were able to easily travel to China without a visa by taking advantage of their 240 hour visa free transit policy. You just need to arrive from one country and depart to another within 10 days, with proof of your onward travel. So we took a short flight with Korean Air from Seoul to Shanghai, then used Avios points again for our return to the UK from Shanghai. 

Why did we choose those destinations? Seoul was inspired by our 14 year old daughter's love for everything K-pop and Shanghai was an opportunity to visit Shanghai Disneyland. I'll be sharing lots more about these places over the next few weeks!

We had to change our plans slightly at the very beginning after our outbound airline FinnAir announced strikes on the day we were due to leave. We decided not to take a chance and to fly to Helsinki a day early, giving us an extra day on the itinerary. We didn't have much planned for Helsinki, so we made the great decision to take a ferry over to Tallinn in Estonia for the day (an option we only knew about after investigating alternative options if our flight to Helsinki was cancelled!) It's not that we didn't like Helsinki, but it was a great opportunity to visit a city which we'd heard things about and were unlikely to visit separately.

Tallinn was lovely and I felt that it had much more of a heart to it than Helsinki. We visited on a weekend when there was a Song and Dance celebration taking place with a huge parade through the city centre and lots of people dressed in traditional costumes. Unfortunately it did rain quite heavily all day, but we stuck with it and carried out our sightseeing under umbrellas!

View from Tallinn viewpoint in the rain

After a second rainy day in Helsinki we were ready for some warmth and sunshine, and fortunately that's what the rest of the holiday delivered in abundance! We landed in Seoul and my daughter was in K-pop heaven - shops, billboards, posters, merchandise and music everywhere you looked. 

Gangnam Style golden hands statue in Seoul

We did a lot of shopping in Seoul. Everything was incredibly cheap, it was a friendly and pleasant city, easy to get around and we also took two excellent organised tours.

Seoul shopping street at dusk

The first tour was to watch a recording of 'The Show' - a weekly K-pop show featuring idols galore performing live on stage - an incredible experience for a K-pop fan. The second tour took us to the DMZ (demilitarized zone) border between South Korea and North Korea which was fantastic. We covered a number of stops including a visit to the observation deck where you can peek out across North Korea, a tunnel dug from North Korea that is now a tourist attraction, and a drive through the land mined area that separates the two countries. I'll be sharing more about this tour because it was truly excellent, but for now here is a picture of the toll gate to North Korea, now no longer in use.

Toll gate between North and South Korea

Then we travelled on to Shanghai which I must admit was quite a change after Seoul. It was even hotter, very busy, and although we knew in advance that most of the familiar apps wouldn't work on our phones it was a bit of a shock to actually encounter the Great Firewall of China! Fortunately we had purchased e-Sim cards which allowed us to access most things through our data, and a bit of pre-planning and downloading of Chinese apps meant that we were able to cope. 

We stayed in a hotel with an amazing view across the Huangpu river towards The Bund area. 

View of the Shanghai Bund at night

Shanghai Disneyland was definitely an experience. Although the tickets for entry were reasonably priced, we ended up paying extra for early entry and to get on two of the rides as it was just so busy and too hot to be waiting around for long. We enjoyed the rides that were different from the ones that we are used to and we had a couple of fun days there.

Shanghai Disneyland and castle

We also visited temples and gardens in Shanghai and spent some time in the shopping malls to escape the heat, although the prices on the high end goods weren't any better than at home. We struggled a bit for food as we aren't adventurous eaters, but towards the end we found a fantastic Italian restaurant opposite the the hotel that kept us filled up! 

Shanghai temple amongst skyscrapers

We had an amazing holiday and saw some many interesting and unique things, I think I'm still processing it all and I'm definitely still recovering from the jet lag!

Saturday, 13 April 2024

Some cool things I've seen over the last couple of weeks

This Easter we finally managed the trip to New York and Washington that was originally planned for March 2020. We spent 6 nights in New York, 5 nights in Washington D.C. and travelled by train between the two. It was a brilliant holiday, with lots of walking and sightseeing. I feel like my head is full of all the amazing things that we saw! 

Here are just some of them:

On our first evening in New York we all booked a trial for the Apple Vision Pro at the shop in Grand Central Station. I've written before about how I was interested to see the technology in action, and we weren't disappointed. We each had half an hour or so to run through a quick demo, learning how to use the headset and seeing what it is capable of. We all loved it and I think my husband was very tempted to bring one back home with us, but at $3500 it's a little out of our price range at the moment!

Apple Vision Pro headset demo in New York

We spent a lot of time in museums on this trip and saw so many things that it's difficult to pick out a few, but one thing I was excited to see was definitely this costume from Hamilton in the National Museum of American History. We spent a lot of time learning about different aspects of US history, we also did a tour of the Capitol building and saw the original Declaration of Independence along with other historical documents.

Hamilton costume in Washington DC museum

We were also lucky enough to see not one space shuttle but two! We first saw the Enterprise at the Intrepid Museum in New York. The Enterprise is the only shuttle that didn't actually fly in space, it was used for atmospheric test flights. Then we saw the Discovery at the Udvar-Hazy Center on the outskirts of Washington. It's parked in a huge hanger at the Udvar-Hazy museum, and it's almost close enough to touch which was amazing. This means that we've now seen all of the space shuttles in their various homes across the US!

Space Shuttle Discovery at Udvar-Hazy Center near Washington

We saw lots of other space related artefacts as well. At the Smithsonian National Air and Space Museum in Washington D.C. I was most impressed by Neil Armstrong's actual space suit which he wore when he first walked on the actual moon. I was also interested to see a replica of one of the Voyager probes which I remember learning a lot about as a child. 

Neil Armstrong's space suit

Also in Washington I loved spotting this Floral Library on the National Mall. At this time of year the 93 beds are filled with tulips planted with bulbs from Holland. 

Tulip library in Washington DC

On the final day of our holiday we were fortunate to still be in the US for the solar eclipse. Although Washington didn't fall into the path of totality, the sun was 87% covered by the moon and everyone was looking forward to it. We joined crowds of people sitting on the grass to watch from the moment that the shadow first appeared across the sun.

Children wearing solar eclipse glasses

It was all very exciting, and the sky remained mainly clear throughout. Apart from at the actual minute where the eclipse reached its peak and a cloud appeared in front of the sun! It was quite funny because it blocked out the sun completely and everyone cheered because it felt like a total eclipse! 

Solar eclipse 2024 in Washington

We had a fantastic trip and although we all came back exhausted from so much walking around we saw things that will stay with us for a long time to come.

Wednesday, 8 November 2023

The Old Seven Mile Bridge, Marathon Key, Florida

We recently spent a few days in Marathon, part of the Florida Keys. The Florida Keys are the string of small islands which stretch from the south eastern tip of mainland Florida to Key West. It takes about two hours to drive from Miami to Marathon Key, which is located in the Middle Keys. We stayed at the Isla Bella Beach Resort which is a fantastic resort in a beautiful location, and is situated just opposite the entrance to the Seven Mile Bridge.

The Seven Mile Bridge connects Knight's Key, part of Marathon, to Little Duck Key. There are two bridges here, the modern road bridge and an older bridge. The older bridge was originally a railway bridge and was then converted to a road bridge before the new bridge was completed in 1982.

Although most of the older bridge is still standing, it has fallen into disrepair and only the 2 mile section which connects Marathon to Pigeon Key has been restored. Reserved for pedestrians and cyclists, it can be used to access Pigeon Key and is also a lovely walk with great views and the opportunity to look for sea life in the water below.

Entrance to Old Seven Mile Bridge to Pigeon Key

There is a good sized car park at the entrance to the bridge. There were always spaces when we visited (late October) and I would imagine that turnover is pretty quick as many people just hop out for a quick look. There are also some informational boards so that you can find out more about the history of the bridge.

Old Seven Mile Bridge informational sign

The walk across the bridge to Pigeon Key is 2 miles, however entrance to Pigeon Key is only possible with paid admission (see details here - Pigeon Key. Paid admission to Pigeon Key also includes transport across the bridge via tram. If you just want to walk across the bridge like we did (or run, or cycle!) then be warned that it can be a hot walk with no shade (although there may be a breeze), and because it's just a bridge there are no toilets or other facilities along the way or in the car park.

Old Seven Mile Bridge, Marathon Key

There are distance markers painted along the bridge so you can see how far you have left to go if you are walking to Pigeon Key. Initially we set out to walk the entire distance, but we quickly realised that there was no benefit if you aren't planning to visit it! In fact you only really need to walk a few hundred metres across the bridge to really appreciate it.

If you want to look for sea life in the water below, a good tip that we were given is to stand at the part of the bridge which is over a pillar. You can identify this by looking for where two parts of the outer railing have a smaller gap in them, like in the photo below (there is an inner railing in front of this one):

Looking for sea life at Old Seven Mile Bridge

The water below here was often smoother and so it was easier to see underneath the surface. We were also told that this is where the larger sea creatures lie in wait for the smaller fish. 

We spent quite a lot of time looking for sea life over the bridge! It took several visits, but we saw jellyfish, lots of really large rays just under the surface, some creatures that looked like huge sharks with their fins above the water, and lots of things jumping and splashing before we could see clearly what they were! We also saw lots of birds. People on the bridge at the same time saw turtles, but we kept missing them!

The Seven Mile Bridge is also a lovely place to watch the sunset, either from on the bridge itself or from just to the side. In the photo below you can see the new road bridge in the foreground, and the restored old bridge is the blue one just behind to the right.

Sunset at Old Seven Mile Bridge, Marathon Key

If you are visiting the Keys then the Old Seven Mile Bridge is a must stop. It's a great way to break up the long journey from Miami down to Key West, it's easy to find, and if you are staying in Marathon then you have a great opportunity to pop back at different times of the day to see what you can spot!

Wednesday, 25 October 2023

Halloween crafts using Hama beads

This is a collaborative post

A few years ago I published this post - Hama bead crafts for Halloween. But that was a long time ago, and since then I've published many more Halloween crafts using Hama beads on my blog, both the usual midi size and also the much smaller mini sized beads. So I thought that I would publish an updated post containing all of the Halloween Hama bead crafts that I've shared to date! Make sure that you click the link to the original post for the full tutorial and patterns.

Small Halloween Hama bead designs

These pixel art Halloween designs would also work really well for cross stitch or other digital art. The small designs don't use too many beads and can be customised to use the colours that you have.

Mini Halloween Hama bead projects

Hama bead sugar skull bunting

This Halloween sugar skull bunting uses a very simple pattern that can be made in lots of different ways. It's a great craft for using up odds and ends of colours and looks fantastic hung up on a mantelpiece or across a window.

Simple sugar skull Halloween bunting

Hama bead witch designs using the princess pegboard

I used the versatile princess pegboard (you can find a link at the bottom of this post) to make some Halloween witches. I used lots of purple and black beads!

Hama bead Halloween witches

These designs can then be used as Halloween decorations, maybe to make a Halloween witch display.

Hama bead Halloween coasters

I love using Hama beads to make coasters, the small circular pegboard is just the right size. These coasters all have a Halloween theme.

Hama bead Halloween coasters

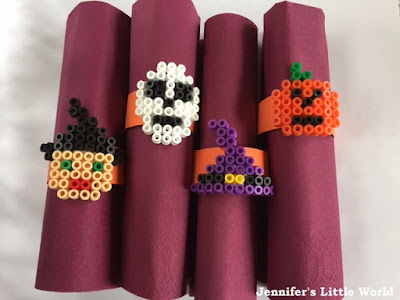
Hama bead Halloween napkin rings

If you are planning a Halloween party then these Hama bead Halloween napkin rings would look amazing on the table!

Halloween Hama bead napkin rings

Halloween house using the Hama bead house pegboard

I used the Hama bead house pegboard (there's a link at the bottom of the post) to make this Hama bead haunted Halloween house, complete with bats and pumpkin.

Hama bead haunted Halloween house

Hama bead sugar skull Halloween picture

Remember the Hama bead sugar skull bunting I shared earlier? I used the same pattern to make sugar skulls which I arranged on black cardboard to make a spooky Halloween picture.

Hama bead sugar skull Halloween picture

The following crafts use mini Hama beads. These tiny beads can be fiddly, so it's a craft better suited to adults, but the results can be very intricate and satisfying. “Crafting with such detail allows you to bring out creativity in small but powerful ways. It’s the patience and care in these tiny projects that make them so rewarding, transforming simple materials into meaningful Halloween decor." says John Webber of Carved, a handmade goods company.

Halloween pin badges using mini Hama beads

These little pin badges don't take long to make and would make a great subtle Halloween accessory.

Mini Hama bead Halloween pin badges

Mini Hama bead sugar skull earrings

I used the Hama bead sugar skull pattern once again but this time with the mini Hama beads to make some little Halloween earrings.

Mini Hama bead sugar skull earrings

Phew, I didn't realise that I had shared quite so many Halloween Hama bead crafts over here! I do hope that you found something to inspire you!

Monday, 9 October 2023

Felt crafts for Halloween - a round up

I love crafting with felt! It's such a versatile material, you can cut it easily, it doesn't fray, it's easy to sew and it comes in a range of gorgeous bright colours and pretty pastels. I've shared a few Halloween crafts using felt on my blog over the last couple of years and I thought I'd bring them all together here in case you are looking for some Halloween felt crafting inspiration.

Last year I made this Halloween felt bunting using scraps of felt and other bits and pieces from my stash. 

Halloween homemade felt bunting pendants

Each pendant has a different theme, alternating black and orange along with plenty of embellishments like buttons, sequins, ric rac and ribbon. I love the variation in the pieces!

Halloween felt bunting embroidered with embellishments

This year I made a really simple Halloween felt garland which I'm going to string up next to the bunting. All you need are small scraps of felt in Halloween colours like black, orange, grey and purple. The pieces are cut into small shapes about 3-4cm across and quickly sewn together using a sewing machine. I added some sequins to make them sparkle. 

Simple homemade Halloween felt garland

Another great Halloween felt craft for using up scraps are these embroidered felt sugar skulls. My skulls measure about 10cm in height so they are a good size to use as hanging decorations. You can use a range of coloured scraps along with sequins and small beads to make each one unique. I used white for the background of the skulls but I'm also very tempted to make some in vibrant pinks and purples!

Halloween craft felt sugar skulls

For my next Halloween felt craft I'd like to try a Halloween themed picture. I found this full video tutorial linked below for a circular piece which I love, so I might attempt something similar:

Finally, if you are looking for more beautiful felt craft ideas then I love Bugs and Fishes as a source for inspiration and tutorials.

I've shared many Halloween crafts on my blog over the years, if you are looking for more then you might also enjoy these last minute Halloween crafts for children. 

Thursday, 10 August 2023

Different ways that you can document a holiday or vacation

This post contains Amazon affiliate links

I'm fortunate enough to have enjoyed some amazing travel experiences around the world, and I love reliving my holiday memories whether that's looking through photographs or re-reading my old travel journals. Documenting your travel memories is a great way to preserve them, whether for your own personal reminiscences or to share with others, and so I've put together a list of different methods. 

A written travel journal (with ephemera)

This is my personal favourite! A travel journal can either be written as you go along or on your return. I used to keep notes in a temporary notebook and copy them up later, but recently I've been writing straight into my current journal. A lot depends on the type of holiday - if you will be rushing about from place to place then you might just want to take quick notes, if you will have time to sit and write while you are travelling or in the hotel during the evening then you can take more time over it.

I always preferred to write on my return because I didn't want to run the risk of losing it or of anyone else reading it. I also didn't want to be distracted from enjoying the holiday or feeling too much pressure to keep up with writing it. But these days our holidays tend to involve a little more chill out time, and I don't have as much free time at home to catch up with it all!

You can either have a journal just for writing, or go with more of a collage style. I personally love collecting bits and pieces to stick into my journals - leaflets, tickets, maps, food packaging, business cards, coins or paper currency, stamps, stickers, themed washi tape and so on. I like to include practical details in case I want to refer back to them - the addresses of where we stayed, attractions that we visited and prices, what and where we ate, important dates.

Pile of travel journals with ephemera

If you are writing while you are away you might want to include sensory details - sights, sounds, smells, tastes, textures. You can also write lists either as you go along or at the end - favourite places, best meals, top beaches, most memorable moments, favourite souvenirs. Also think about whether you are writing a personal journal or one that you want to share with others, because your writing style will likely change depending on your audience.

An illustrated travel journal

An illustrated journal is more like a sketchbook, containing drawings, paintings and perhaps also travel ephemera. It could be scrapbook style with photographs (either polaroids, using a mini photo printer, or added in on your return). Drawings can either be done in situ or else working from photographs when you get back. 

For my next travel journal I'm intending to add some quick sketches and watercolours. We don't often have time to sit still long enough to work on a picture so I'll probably use photographs, hopefully finding some time in the evenings!

A printed photobook using your travel photos

If you enjoy taking photographs, a great way to make sure that you don't forget all about them is to have them printed into a photobook. There are lots of different companies that offer this, and you can usually arrange the photographs how you like, along with captions and larger sections of text. 

It would be nice to include candid photos rather than just staged shots of the main sights. You could also include pictures of your accommodation, meals, photographs taken while travelling for example in the plane. Just make sure to live in the moment and not worry too much about getting the perfect shot!

Photobook showing a couple on the beach
Photo credit Arun Prakash via Unsplash

An online journal or blog

If you want to share your experiences with others then a blog is a great way to do this. You could set it to private for friends and family, or open it up and share it with the world. There are plenty of free blogging platforms, for example Blogger which is what I use, and it's easy to add texts, photos and links to the different places that you've visited.

It's easy to update anywhere as long as you have an internet connection, so you can write it on the go and add in your photos.

A shadow box display

When you get home, a shadow box display is a great way to display bulkier items like small souvenirs, maps, leaflets and tickets. You can buy a readymade frame or look for an online tutorial like this one - Ticket stub memory box tutorial - it's really easy to do.

Vacation memory jar

Either for physical items like seashells, pebbles, coins and so on, or write down memories on slips of paper then take them out to re-read, maybe on New Year's Eve. 

Wall displays and frames

You can display postcards that you've brought back in a hanging pocket postcard pockets (affiliate link) or a hanging postcard display (affiliate link). Or simply collage them into a frame or stick directly to the wall - my student bedrooms always had colourful postcards stuck all over the walls with BluTak! You could choose to display printed photographs or a mixture of photos, postcards, ticket stubs and other ephemera.

Postcard wall display of travel memories
Photo credit Mick Haupt via Unsplash

Personalised travel maps

There are lots of different ways of sharing your travels using a map. For example, I've shared my cross stitch map (affiliate link) before, very much a work in progress but then so are my travel adventures!

Cross stitch map to record travel memories

You can also find other examples, like scratch off maps (affiliate link) or a travel destination bucket list scratch off poster (affiliate link). Alternatively you could just buy a large map and some pins to stick into the places that you have visited!

I hope that this post has given you lots of inspiration for recording those travel memories. My final tip would be to make sure that you actually go back and read through those travel journals and look through those photographs! I'm guilty of keeping all my journals stuffed in a cupboard, even though I wrote them with the intention of revisiting them. It's my intention to set aside some time with a cuppa and a biscuit and enjoy reading back through them.

Pile of old travel journals and notebooks

Tuesday, 8 August 2023

Some little extras that I always pack for a cruise

This post contains Amazon affiliate links

I like to think of myself as a bit of a seasoned cruiser, and as I start to put things together for our next cruise I thought I'd write a little list of the things that I always make sure to pack!

These are things that aren't expensive, don't take up too much space, and that a first time cruiser might not necessarily think of!

Magnetic hooks - these are brilliant. I have a set of four magnetic hooks (affiliate link) and they are brilliant, tiny to pack and surprisingly strong. We place them near the door and use them to hang lanyards, baseball caps, bum bags, swimming goggles - all sorts of things that you don't want lying around and getting lost!

However it's best not to pack over the door hooks or over the door hanging pockets. These may be confiscated by the cruise line as they can damage the doors. There is usually plenty of storage in the room for smaller items.

Travel adaptor plugs - I've seen cruise ship staterooms with both US and European sockets. If you can bring a couple of each then you'll have more charging options.

Travel adaptor plugs
Photo credit Call Me Fred via Unsplash

A lanyard - this is a personal preference thing, cruisers use it to keep their room card accessible, which can also be used for onboard purchases like drinks. I don't tend to wear one, but the children like to. Some cruise lines will provide them, especially as you move up through the tiers, but they will be expensive to buy on board if you suddenly decide that you want one!

Velcro cable ties - on a couple of our Disney cruises we came back to our room to find that the stateroom attendant had organised all our messy loose cables with little velcro cable ties! We left the ties behind but I bought some reusable velcro cable ties (affiliate link) as soon as we got home. It's a really good way to save space on the small desk area when you all have several devices that need charging at once. 

A spare, non valuable, credit card sized card - some cruise ships have a slot by the door for a card in order for the lights and air conditioning to work, and it's easy to forget that you've left a card in there when you leave. I have a couple of credit card sized cards which have a magnet stuck to the back so when we leave the room we can stick it to the wall ready for our return.

A small magnetic whiteboard and pen - this is especially useful if you are travelling with others. You can stick it on your stateroom door and then people can leave you a message - helpful if you don't have the onboard Wi-Fi or data roaming while you are travelling. An A4 magnetic whiteboard is a good size. You might find that people leave you little messages saying things like 'happy cruising!'

A small bag to hold a phone and room card - most of my clothes don't have pockets, and I do like to take my phone around with me for photos and the cruise line app. I bought myself a small bag which I can use for a few essentials, and it's worth spending a little more for a smarter bag that you can use with more formal clothing in the evening.

Small hand gel - we've found that since covid restrictions eased not all cruise ships have hand gel around the ship outside of the food areas, so it's nice to have a little bottle to take around with you.

Person sanitizing hands
Photo credit Engin Akyurt via Unsplash

Waterproof phone cases - we discovered these on a recent holiday and they were brilliant! Even if you aren't going on a beach cruise you may want to use the pools, and having a waterproof case means that you can take photos and not worry about getting your phone splashed while you sit nearby. I bought these waterproof phone pouches (affiliate link) and was very pleased with them (test them at home first by placing some kitchen roll inside and leaving submerged for a few hours!) They are also a good idea for any other electronics that you may want to use near water, like a Kindle or tablet.

Laundry supplies (if your ship has self-service laundry facilities) - I usually take a couple of my own laundry pods. They will be available to purchase but my family can sometimes have sensitive skin so we stick to what we usually use.

I also like to take a small mesh bag which I use for socks. This way there's less chance of losing one, especially if you are late back to the machine and someone empties your things out. A larger laundry bag is also useful for all the dirty washing that you'll be taking home. Something like this set of mesh laundry bags (affiliate link) would work well.

A tip - if you are doing laundry on a cruise ship avoid the first day, the last day, and sea days. Try for early in the morning or later on during dinner. Disney cruise ships have an app which will let you know when your washing is finished and also lets you know which machines are free.

A refillable water bottle - there are usually plenty of free self-service drinks options on board, but it can be awkward to carry cups of water back to the room and I find a water bottle more convenient to keep on my bedside table for drinking at night, especially when space is limited. Just note that you may not be allowed to fill them directly from a dispenser, instead I fill a cup and pour it into the bottle. It's also useful for when you leave the ship.

Lady holding a refillable water bottle
Photo credit Bluewater Sweden via Unsplash

Towel clips - if you are planning to sit out on deck then towel clips can be very helpful to keep your towel safe in the breeze while you go in the pool or to get some food. They are also a good idea if you want to dry swimsuits or towels on your balcony - you can clip them safely to the furniture! Towel clips (affiliate link) are larger than normal clothes pegs so they will fit easily around a sun lounger or chair. 

Sandwich bags - we are a family of fussy eaters and it can sometimes be difficult to find food when we are out and about. I always take some pre-packed snacks that we can take with us on shore excursions, but sometimes we take a few bread rolls or cookies from the buffet just to have handy and sandwich bags are great for keeping them fresh.

Photocopies of our passports - you must always check whether you need to take your original passports off the ship with you, as it varies between ports and many places will require it. But if you are leaving your passport on board the ship it's a good idea to at least take a copy with you. I'm old school so I have a paper copy, but these days a photo on your phone is probably just as good!

I hope that these packing tips were helpful if you are preparing for a cruise, do let me know about any essentials that I may have missed!