Friday 28 September 2018

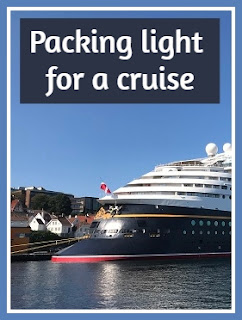
Packing lightly for a cruise

Packing light for a cruise holiday vacation

When it comes to packing for a cruise, it's difficult to think how to pack lightly. With different dress codes to cater for, as well as days out and activities, you need lots of clothes. Alongside the very generous luggage limits (if there even is one!) and plenty of people to help carry your bags for you, it's very tempting to over pack. But if you can limit what you take on board there are many advantages - lots more space in your stateroom for a start!

Another big advantage is the flexibility to disembark when you choose. Generally on a cruise you will leave your suitcase outside your room on your last evening, and it will be waiting for you in the terminal at a specified time the next morning. We prefer to work to our own timetable and walk our luggage off ourselves in the morning when we leave, meaning that we need to be easily able to manage our own luggage.

Finally, for me the main reason that I like to pack lightly is because I find it far less stressful. You don't need to worry about what to wear if you only have a limited selection to choose from, and you are able to stow everything away tidily and not be tripping over things all the time.

So here are some tips for minimising your luggage if you are packing for a cruise:

It's tempting to take plenty of clothes, especially if you want to dress for dinner each night. I try to limit myself to one pair of formal shoes and one pair of smart yet comfy shoes that I can change into after dinner. I don't take a dress for each night, instead I recycle a couple of them - I generally only wear the dress for dinner so they don't get that dirty, and I'm sure no-one notices me wearing the same one again.

If you are on a longer cruise, or the cruise is part of an extended holiday, you may need to wash clothes while you are away. There will likely be a pull out washing line in the bathroom for drying. Many ships have self service laundry facilities on board, or if your budget stretches you can have your washing done for you. Once when we were on a two week cruise with Royal Caribbean there was a special offer for laundry at some point during the cruise which we took advantage of - such a treat to have the washing delivered back all clean and ironed!

You don't need to take towels - there will be plenty in your stateroom and for the pool. If you are cruising to a beach destination you are usually allowed to take the pool towels off the ship with you rather than having to take your own, although do check this with your cruise line. There will also be plenty of toiletries provided. For toiletries of your own that you want to take, decant them into smaller containers to save weight and space.

A good investment for travelling with electronics is a USB Charging Station. This allows you to charge many devices from just the one socket - really useful as there many not be many sockets in your stateroom and means that you can just take the cables and not the plugs. Check also which adaptor plugs you may need as they do vary - in our experience we've found both US and European (not UK) sockets in the room.

You don't need to take your own food, unless it's needed for medical reasons or you have super fussy children. There will always be snacks available somewhere on board, and you can also take food from the buffet restaurants and snack bars to keep in your room for later. There will also be room service, either free or at a low cost. My only exception would be a few chewy bars or similar (any food you take onboard will probably have to be factory sealed in original packaging) to take out with you on port days if you don't plan on buying food off the ship.

If you have children, you don't need much in the way of toys. Check the facilities on your ship - some have a toy library service and others will have open play sessions for children. There isn't much room for toys in the room anyway, so if you need something to keep the children busy in the room books and sticker books are best, or card games for older children.

A few extra tips for cruise packing:

Once you have boarded the ship, you may not receive your main suitcases until early evening. So you need to make sure that you have everything that you need in your carry on luggage. This includes things like essential medication and favourite stuffed toys, but also anything that you may need to entertain yourself on that first afternoon, like swimwear or books.

I always split our clothes and toiletries between suitcases. It's unlikely, but still possible, that your suitcase doesn't make it on the ship, and as the first day of a cruise is often a sea day it could be difficult to get hold of suitable replacement items.

You can read some more tips for light travel here - Packing light for family travel - some tips

If you enjoyed this post, you might also like some of my other posts about cruising:

Thursday 27 September 2018

Four easy ways to save money on plus-size clothing

This is a collaborative post in association with Simply Be.

I recently discovered that in the UK, the average woman is a size 16. It was a surprise to me because I know that it can be difficult to find good-quality, fashionable clothes that actually fit properly, as well as being expensive. So today I'm sharing some tips for finding stylish yet reasonably priced 16+ sized clothes.

Plus sized dress from Simply Be

Shop in the right places 

My first tip is to start your search with those retailers who specialise in 16+ fashions. For example, Simply Be stock plus size fashion and have been doing so since 1999. Back then they were virtually the only retailer to offer clothing in sizes bigger than a 22.

The best specialist retailers make clothes that are specifically designed for the curvier figure, rather than simply scaling up clothes that were made for women who are a size 8 or 10. As a result, their clothes fit properly - their blouses are not too tight across the chest and baggy elsewhere. So if you want to wear a semi-tailored top you can when you shop with a proper 16+ fashion retailer.

Importantly, their clothing is usually reasonably priced. The fact that they buy and sell in bulk gives them a competitive edge over regular retailers, which helps them to keep their prices down.

Look for vouchers and coupons 

Before you hit the buy button, take the time to look for vouchers online. You will be pleasantly surprised by how often you can find them for plus-size clothing.

Get notified early of special offers

If your favourite retailer has its own website, check to see if they produce a newsletter and sign up to receive it. Usually, when they have special offers available or are planning to hold a sale they will notify their subscribers of this fact first. Knowing this gives you the chance to get in early and grab yourself a bargain before the best deals sell out.

Plus sized jumper from Simply Be

Learn to sew 

Being able to make simple adjustments to your clothes can end up saving you a lot of money. Often, using your skills, you will be able to breathe new life into items that you already own. When you know how to make simple adjustments you can potentially buy items that are a bit too baggy or long and turn them into something that fits perfectly.

There is no need to feel nervous about learning to sew. You just need to get started slowly. Making doll’s dresses is a great way to learn the basic skills you need and get a better understanding of how clothes are put together. Here I explain how to make a simple doll’s dress. Why not give it a try? You’ve got nothing to lose and it is an easy way to learn a new skill that could potentially save you a lot of money.

If you really do not want to learn how to sew, there is another option. As you can see from this very short video, some adjustments can be made using fabric glue and other materials. So, you do not necessarily have to put a heavily discounted item back on the rack simply because it is a little too long for you.

Wednesday 26 September 2018

Crafting for Diwali with Twinkl Resources

In 2018, Diwali will be celebrated on the 7th November. I always like to remind my children of the Diwali story as the time approaches, and we celebrate with family as well as doing some themed crafts and activities. Today I'm sharing some Diwali themed printables from Twinkl Resources that you can use at home with your children to help them learn about the Diwali story and to decorate your home.

When it comes to telling the Diwali story, a great place to start is the Diwali Story PowerPoint (Premium resource). The Diwali story is told in simple language with engaging illustrations, and finishes by explaining briefly why Diwali is celebrated today. You can bring the story to life with these Diwali Story Puppets (Premium resource) or put together this Diwali Paper Toy Character Set (Premium resource) to make some fun Diwali toys. They make great decorations too! If you are looking for a free resource, you could make your own puppets using these Diwali Colouring Sheets.


Decorating for Diwali is lots of fun, and Twinkl have plenty of resources to help. I like to decorate the mantelpiece in our living room for special occasions, so I started with some Diwali Bunting (Premium resource). The bunting is bright and colourful, featuring characters from the story and Diwali symbols like lanterns and diwa lamps.


At each end I added a Simple 3D Diwali Decoration (Premium resource) that you can either print already coloured, or in black and white so that it can be coloured yourself.


There are plenty more of decorations to print, including these Diwali Themed Paper Chains (Premium resource) as well as lots of craft ideas in this Diwali Craft Activity Pack (Premium resource) which would make great decorations.

When it comes to making Diwali cards, Twinkl also has plenty of different options. If you are looking for a free resource, I really like these Diwali Card Templates which are lovely and bright. You could also use the free Diwali Colouring Sheets that I mentioned above, perhaps by printing to different sizes, colouring them in, and using them to decorate blank cards.

There are also some lovely Happy Diwali Card Templates (Premium resource) that children can colour themselves, and my favourite cards are the Diwali Pop Up Cards (Premium resource), we'll definitely be sending some of these this year!


As you can see, Twinkl have plenty of Diwali themed crafts to keep you and your little ones entertained and to bring some colour into your home!


If you are looking for ideas for more Diwali crafts to do with your children you might like my other Diwali craft posts:

Large Hama bead Rangoli
Diwali salt dough divas
Diwali dyed rice Rangoli
Simple Diwali cards
Simple Burfi sweets for Diwali

If you are teaching your young children about Diwali, here are some books that they might enjoy:

The Best Diwali Ever (affiliate link) - A heart warming picture book about Diwali, siblings and how very special this celebration can be.

Diwali colouring book for kids (affiliate link) - A simple coloring book for young children, suitable for ages 2-5. Contains all sorts of things to colour including lamps, fireworks, candles, lanterns, food & rangoli patterns.

First Festivals: Diwali (affiliate link) - Featuring simple text, gorgeous illustrations and satisfying lift-the-flaps, this book explores common Diwali traditions and helps young children understand the importance of this special holiday.

Mr Men and Little Miss Happy Diwali (affiliate link) - The five-day festival of lights is celebrated by millions of people across the world and the Mr Men and Little Miss can't wait to join in. They're busy cleaning their homes, creating Rangolis, lighting lamps and enjoying all the festivities, including large feasts that Mr Greedy is particularly looking forward to. It’s going to be a busy five days of light and laughter!

I've also collected together lots of fun Diwali crafts and activities on my Diwali Pinterest board:

Follow Jennifer Jain's board Diwali Crafts and Activities on Pinterest.

I'm a Twinkl blogger and have been provided with a subscription in exchange for sharing the resources on my blog and social media.

Monday 24 September 2018

Jam jar spider lantern for Halloween

Halloween is a great time to make some spooky, seasonal decorations. I'm sharing how I made this Halloween lantern from a jam jar with a spider theme, using some craft products from Bostik.

Make a Halloween lantern from a jam jar

You need:

A clean jam jar
Spray paint - I used silver
Masking tape or low adhesive stickers
Black paper
Bostik Micro Dots
Bostik Glu Dots
Ribbon
A tea light candle

Instructions:

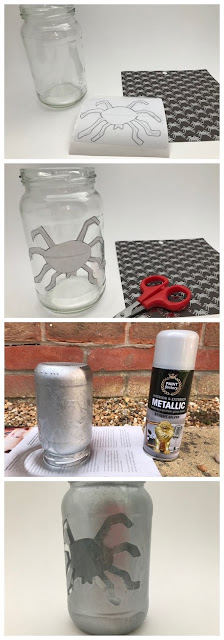
First you need to mask off part of your jam jar. I chose to use a spider shape, inspired by some spider Halloween paper that I had in my stash. I used some address labels that are very low adhesive, you could also use strips of masking tape, stuck together if you need to cover a larger area. Draw your outline, cut it out, and stick firmly to the jar. Cover the entire jar with spray paint, making sure you are a well ventilated area. When the paint is completely dry, remove the sticker. You can tidy up any smudges or blurred edges using a cocktail stick to scrape away the excess paint.

Masking off an area of a jam jar for spray painting
Next take a strip of black paper long enough to wrap around the base of the jar. Use sharp scissors to cut some spooky shapes, making it as intricate as you can.

Bostik Micro Dots for intricate crafting

Use the Bostik Micro Dots to stick the paper cut out to the jar. The Micro Dots are tiny spots of clear adhesive on a plastic sheet, which can be pressed on to any item to turn it in to a sticker. They are brilliant for tiny, intricate and irregular shapes like this, and stick firmly to almost any surface. Make sure that the entire area of the cut out is covered by the Micro Dots, then press firmly to the jar.

Bostik Micro Dots for decorating a Halloween spider themed lantern

Finally use some black or Halloween themed ribbon to cover the screw top of the jar. I held my ribbon in place using Bostik Glu Dots. The Glu Dots are really easy to apply, you just need to remove the protective plastic from one side, press the dot in position, remove the second piece of plastic, and apply your decorative item. It's easiest to apply them to the firmest surface first, so I stuck them to the rim of the jar and then removed the second protective plastic before applying the ribbon.

Bostik Glu Dots to stick ribbon to a jam jar

Place a tea light candle into the jar, and your Halloween lantern is complete!

Spider themed lantern craft for Halloween

The lantern really comes alive at night when you can see the spider silhouette more clearly. These would be great to place on mantle piece or windowsill to welcome trick or treaters.

Spider themed Halloween lantern

This is a collaborative post in association with Bostik

Friday 21 September 2018

Craft project ideas for minimalists

I love crafting, but I also love having a house that isn't cluttered with craft supplies and finished products. I've shared a few tips in the past about combining minimalism with being a crafter, and today I thought I'd share a few crafts that are perfect for minimalists.

They need to fulfil several criteria:

1 - They don't need many supplies, or the supplies don't take up too much space
2 - They don't require too much space to work on, and are easy to tidy away
3 - They don't create large finished products that need to be stored or displayed

Craft project ideas for minimalists

So here are some ideas for craft projects if you are a minimalist:

Sewing - You can sew useful things for the home (like cushion covers, curtains, tablecloths), or perhaps clothing for yourself and other family members. You just need to be careful to only buy fabric and other supplies for a specific project, and not just because you like it!

Cross stitch - As long as you can limit yourself to work on one project at a time then cross stitch supplies take up very little space and it's easy to pack away. I always buy a kit so you have exactly what you need for a project and don't need to purchase extra fabric or embroidery silks.

Seasonal decorations - If you use natural materials for crafting such as twigs or flowers, then your creations can be recycled or composted when the season has passed. You could decorate eggs for Easter, or make wreaths and other foliage decorations for Christmas.

Writing or blogging - You need very few supplies to write, and if you write or blog digitally then your hobby will take up no space at all.

Photography - Digital photography lets you take thousands of pictures and you only need to print out your favourites, which can be easily displayed or shared electronically with friends and family.

Card making - Cards are always needed for occasions throughout the year and a homemade card is much more personal.

Jewellery making - Jewellery making supplies take up very little space and homemade jewellery also makes lovely gifts.

Baking and cooking - You can get by with very little in terms of extra cooking equipment and get creative with different ingredients or cake decorating techniques!

You can avoid lots of finished craft projects around the home by working on commissions for people - maybe making quilts or blankets for others. Only of course if the person has specifically requested something, and decide in advance whether you are charging them for materials and/or time spent!

I'd also recommend buying kits for craft projects so that you aren't left with lots of excess supplies, especially if you want to try something new. Pass on supplies when you've finished a project, and try to work on only one or two things at a time so that you don't have unfinished projects all over the place.

I hope that you find something to inspire you!

Ribbons for crafting
Photo credit Rhodi Alers de Lopez via Unsplash

Title photo credit Tim Arterbury via Unsplash

Wednesday 19 September 2018

Cruising with an inside cabin - pros and cons


We've cruised with an inside stateroom twice now, a few years back on Allure of the Seas with Royal Caribbean, and more recently on the Disney Magic. When we booked our first cruise back in 2011, with no experience of cruise ships and as a sea sickness sufferer I was adamant that I was only going to go on a cruise if my room had a window. Fortunately I've since come around to the idea of an inside cabin, because with some of the European itineraries in particular you can save a lot of money by choosing an inside stateroom.

Inside staterooms can vary a great deal according to the cruise line, and some of the newer ships in particular have made great efforts to replace the outside porthole with something exciting. For example on Royal Caribbean you can choose a virtual balcony which streams real time views, or on some of the Disney ships a virtual porthole with a real time view combines with some Disney magic. We've not tried out anything like this - our first interior stateroom had a blank wall, and our second had a large porthole shaped mirror.

Inside deluxe stateroom on the Disney Magic cruise ship

So here are some of the pros and cons that I've found of cruising with an inside cabin. I'll get the negatives out of the way first, because to be honest if it comes down to a cruise with an inside cabin and no cruise at all I'm definitely taking the inside cabin!

Cons


The biggest drawback is of course that you can't see outside. You can't watch the waves, you can't see the sunset, you can't check the weather, and you miss the excitement of pulling back the curtains in the morning and finding yourself docked somewhere new. Sometimes you can't even tell if you are moving or not. The only way to mitigate this is a glance at the stateroom television, which on most cruise ships will have a channel dedicated to a live view outside the ship.

If you suffer from claustrophobia you might find yourself feeling a little shut in. I've found this from time to time, especially if we were all in the stateroom at once and it felt very crowded. Luckily cruise ships are big and there are plenty of open spaces a short walk away that you can visit.

Rough seas - I do suffer with seasickness on smaller boats and ferries but fortunately it's never really been a problem on a cruise ship. However I find it easier to have a view of the waves and the horizon if I'm feeling a bit wobbly.

Noise - there will always be some noise on cruise ships either from the corridor or from the decks above and below. On our recent cruise I did wonder if we might have a service corridor next to the wall because I could occasionally hear what sounded like a trolley being wheeled along next to our bed. It wasn't a big problem for us, but having an inside wall does add another potential source of disturbance.

Pros


The biggest pro is the cost saving. Inside cabins can be significantly cheaper, and having an inside stateroom makes a big difference to us when pricing up a cruise.

In our experience you can get away with spending very little time in the room, both on port and sea days. Even if you aren't leaving the ship on a port day, it's so much nicer to sit up on deck or in an area with larger windows near the top of the ship where the views are much better.

Portholes can be quite small anyway and low down in the ship. It might be that the view from a window isn't that great, and being able to see the sea close up when it's rough can make you feel worse.

Even without a window, it won't be pitch black at night. Light comes in from around the door, and a surprising amount of light is generated by electrical items charging, standby lights on devices and so on. If you need to have some light at night for small children, or to find the bathroom, you can take a small nightlight or just leave the bathroom light on and the door slightly ajar.

I hope this helps you to make a decision if you are wondering what an inside stateroom on a cruise ship would be like!

You can see a video tour of our deluxe inside stateroom aboard the Disney Magic below. As you can see, it's a small room yet surprisingly spacious with good use of space and plenty of storage.


If you enjoyed this post, you might also like some of my other posts about cruising:
Friday 14 September 2018

Scroll free September - how is it going?

We are nearly halfway through September, and so I thought I'd post a little update as to how I'm getting on with Scroll Free September! For my version of the challenge, I am committing to no phone use in the bedroom either in the morning or at night, and no scrolling after 3pm.

It took me a couple of days to get fully in the swing, mainly because I came back from a wi-fi free holiday and I had lots to catch up on. I was also finding it difficult to make a distinction between quickly checking for messages or updates and mindless scrolling. It felt that any form of looking at my phone was cheating, but I did need to keep up to date with notifications.

I decided that I was happy to open a social media app if it really was just a quick check for notifications. But in reality I've been finding that these catch ups have been happening less and less often as the days have passed and I realise that I'm not actually missing anything. Apart from an occasional and brief check for messages I've mainly been leaving my phone to one side once I've picked the children up from school.

To help me prepare for the challenge I wrote about identifying my trigger points for scrolling. This was a real help, and I've been bearing them all in mind as I go through the day. I've noticed a big difference to my mornings - I'm getting straight out of bed when I wake up, and the morning routine is much quicker when I'm not distracted by my phone every few minutes. Not using my phone in the evening just before bed has meant that I've been reading instead, which leaves me feeling more relaxed at bed time and more likely to turn the light off at a reasonable hour.

Talking of reading, the first week I took the children to the library after school and took out six books which were a mix of easy fiction, in depth fiction and non fiction. To my surprise I'd easily finished them all well within a week!

I've also noticed a difference to my evenings. They seem much longer now once the children are in bed and I've got in the habit of putting my phone upstairs in the bedroom. Before I do this I close down all my apps and delete my search history, which seems to help draw a mental line under it for the day. The other night I found myself sitting on the sofa and leafing through our wedding photo album which was lovely. I've also been doing some logic puzzles, working on my cross stitch, and I've just got out a jigsaw to start.

My biggest challenge still is during the day when I'm trying to work and social media is too tempting. It's not my phone but the desktop PC where I work, it's just too easy to open another window. I'm not sure the best way to combat that yet apart from disabling particular websites, the trouble is that I still need to use social media websites for my work!

I still feel the very strong urge to check my phone throughout the day, and it's worse when the phone is in my sight. Interestingly if it's in another room the urge is less, and fortunately I have noticed it decreasing as the month progresses. It's very scary how addictive it can be to want to reach for my phone, and how quickly time disappears once I am sucked in. Taking part in Scroll Free September has definitely made me think a great deal about my phone usage, and when the month finishes I'm not planning on going back to my old ways!

Scroll Free September progress update

Wednesday 12 September 2018

An update on my current craft projects

As an Amazon Associate I earn from qualifying purchases.

It's been a while since I wrote about my crafting on here, so I thought I'd do a little update! Over the last few months I have mainly been working on my cross stitch Christmas ABC Sampler. At the beginning of the summer holidays, the thought crossed my mind that if I got a real move on there was a chance that I could finish it by Christmas this year. However my crafting time reduced considerably once the holidays were in full swing, and rather than rush it and spoil my enjoyment I decided to take my time with it. Crafting for me is a lot more about the process than the product!

Christmas ABC Cross Stitch sampler

I think that I'm progressing nicely with this sampler. I've completed eighteen of the twenty seven boxes, and I'm really pleased with how it is looking so far. There are still lots of beads to add to the design which I think will take quite a bit of time as I've not used beads before and it might take me a while to get comfortable with them. There are also a few gold bits that need to be added in. I hate working with the metallic thread so I put it off!

Parts of the design are quite complicated to work on. Areas that are green and red are each made up of three different shades that are very similar. It gives a lovely effect but it's very time consuming to work it out. P for Poinsettia, that I'm working on at the moment, was a square that I'd been dreading since I first saw the pattern as it has both the red and the green shades. I took a photo of the pattern, printed out an enlarged version, and coloured in the different areas with felt pens which makes it much easier to follow.

I don't want to hang my finished sampler somewhere permanently as it's so seasonal, so I've been looking at some sort of stand that I can use to display it once it has been framed. I just need to find one that is sturdy enough because it will be large and heavy.

Cross Stitch Christmas ABC sampler in progress

Secondly, a very last minute craft project that I loved doing was making up some Disney magnets to hand out on our recent Disney cruise. I only decided to make them the day before but I'm so glad that I did - they were fun to make and lots of people thanked me for them in our cruise Facebook group. I came up with a quick design based around the Mickey ears using a photo from our past cruise to Stavanger, which was also very similar to the photo used as the Facebook group header image. I added the year and the name of the cruise along with the Norwegian and Danish flags.

I ended up making about 60 magnets so it was quite time consuming! The pieces were cut out, laminated, cut out again and then had a small piece of magnet glued to the back - I used a small square cut from magnet sheets. On the back there is a little note saying Happy Cruising and our name and stateroom number. The magnets measure about 5cm across so they were super easy to pack, and the children loved wandering around the ship and choosing which doors to leave them on. I hope that they brought a smile to people's faces!

Disney magnets for cruise door pixie dust

If you want to follow my crafting progress, don't forget our crafting community over on Instagram. Just take a look at #craftingismytherapy_september (the hashtag changes each month) and you'll see some beautiful crafty projects.

Post contains Amazon affiliate links.

Monday 10 September 2018

Tivoli Gardens, Copenhagen

Tivoli Gardens, Copenhagen

The very first port on our recent Disney Cruise was Copenhagen. I'd never been to Copenhagen before, and so I was very much looking forward to our visit. One of the places that I knew I wanted to visit was Tivoli Gardens, and so after a brief stop to see the obligatory Little Mermaid statue we headed straight there.

Tivoli Gardens in Copenhagen

Tivoli Gardens is an amusement park in the centre of the city, set in beautiful grounds. It opened in 1843 and it's wonderfully old fashioned, with the rides blending in fantastically with their surroundings. You first need to buy tickets to enter the gardens and then pay extra for various ride options - choosing whether to pay for rides individually or to purchase a wristband for unlimited thrill seeking.

Tivoli Gardens in Copenhagen with the family

The gardens themselves are lovely to stroll around and there are plenty of places to sit and relax. There are also plenty of different dining options, shops and fun fair style games to play.

Tivoli Gardens Copenhagen pirate ship

There are around thirty rides in the park which are suitable for all ages, ranging from nostalgic gentle rides to roller coasters and other attractions that swing you about all over the place. Luckily my children aren't really into the thrill rides, because some of them looked very intense! Instead we had a lovely trip around the lake in these little self steered boats, enjoyed a sweet little ride which took us on a journey through different fairy tales, and braved a small yet speedy roller coaster suitable for even the little ones.

Boat ride at Tivoli Gardens, Copenhagen

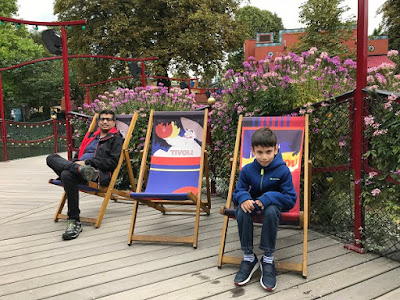
We also spent some time wandering around the gardens, and enjoying a picnic on some of the colourful Tivoli deckchairs.

Family day out at Tivoli Gardens, Copenhagen

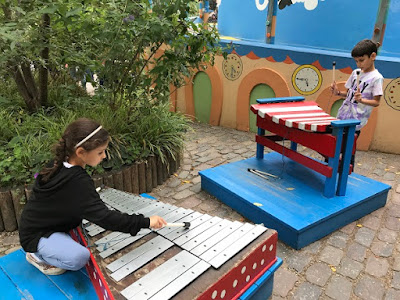
We finished our day in the playground, which is included in your entry fee to the gardens. It was a lot of fun, with instruments to play outside and plenty of climbing equipment to explore inside. The children were very happy here for a long time!

Playground at Tivoli Gardens, Copenhagen

Unfortunately we couldn't stay late as we had a ship to catch, but I have heard that the gardens are especially beautiful at night. 

You can see plenty more of our visit the little video that I put together of our day!


We received complimentary entrance to the garden and access to some of the rides in exchange for a blog post and video about our day.

Friday 7 September 2018

The Norwegian Canning Museum, Stavanger

The Norwegian Canning Museum, Stavanger

One of the stops on our recent Disney Magic cruise was Stavanger in Norway. We first visited Stavanger a couple of years ago on a different itinerary, and I immediately fell in love with the town. The cruise ship docks right in the centre of town so it's easy to get to where you want to go, and Stavanger is such a lovely town with its gorgeous wooden houses along with plenty of museums.

On this visit we decided to visit the Norwegian Canning Museum, just a few minutes walk from where we docked. The museum is situated in the heart of beautiful Old Stavanger, with its wonderful white wooden houses and cobbled streets. The museum is housed in the premises of the former canning factory, and it aims to document the part of the canning industry which based its production on fish as the raw material.

We were lucky enough to have a guided tour with the curator of the museum, Piers Crocker, and this really brought the whole experience to life. He walked us step by step through the production process, with plenty of opportunities for the children to get involved and take part themselves.

Tour of the Norwegian Canning Museum, Stavanger

After a quick introduction, we had a go at threading sardines onto narrow skewers through their eye holes. Luckily these were pretend sardines, I can't imagine what a messy and unpleasant job it must have been to do in real life! It's a lot more fiddly than it looks and it took us quite a while, although I assume that if you are doing it all day you soon pick up the knack. Once each skewer is threaded with fish it is slotted into a wooden smoking frame. We also saw a special threading table which lets you thread multiple fish at once by holding the fish in place while the skewer is threaded through - just one of many opportunities to appreciate how changes in technology over time speeded up and improved the processes.

Threading sardines at the Norwegian Canning Museum, Stavanger

The wooden frames are placed into the large ovens, which are still in use today, to be smoked. Smoking was such an important part of the process that the smokers were very highly valued as they had to control so many different variables in order to achieve the best results. 

Smoking ovens at the Norwegian Canning Museum

The heads of the fish are removed using a special decapitation machine, with the heads being collected for animal feed and fertiliser, and then it's time to pack the sardines into the tins. This process is called laying and it's something which is actually done faster and better by humans than machines. There are various different configurations depending on the size of the fish, the volume of the can, and the number that need to be packed.

Luckily the 'fish' that we had to work with were all the same size and fitted neatly into the cans, so laying them wasn't too difficult. The children loved doing this although were amazed to learn that efficient packers can fill a can in just 5-6 seconds - I must admit that it took us a lot longer than that! I think they could have stayed here all day busily filling up the cans, it was such a satisfying process.

Packing sardines at the Norwegian Canning Museum

Once packed the cans are sealed, another part of the process which has speeded up considerably over time. Originally each can was soldered shut at the rate of about a can a minute, which obviously wasn't nearly fast enough to keep up with the rest of the production. We saw a demonstration of one of the early machines that made mass production possible by folding and sealing the can, and increasing the rate to around 7000 cans per day. 

The technology steadily improved over the years, and you can see a selection of different machines which each offer an improvement on the previous one, both by working faster and by sealing more than one can at once. Harry loves any kind of machinery and learning how it all works, so this was all fascinating to him. 

On the top floor of the museum we watched a short video which took us through the process and brought each part to life, beginning with the catching of the fish and finishing with the boxes being loaded for transport and the canned fish being enjoyed at a tea party. There's also a display of advertising posters and labels through the years. The labels are very collectable and I can see why, they really appealed to me with their bright colours and cheerful designs!

The Workers Cottage

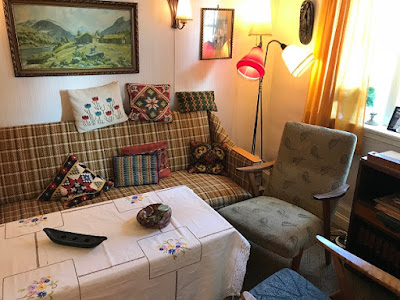
As part of our visit we also enjoyed a tour of the Workers Cottage. Located right next to the museum, it's an authentic 1800s house, with the ground floor rooms restored to around 1920 and the upper floor to around 1960. As well as being renovated and decorated, the rooms are filled with authentic items from those time periods which were fascinating to see, and I particularly loved all the examples of handmade embroidery. Definitely make sure not to miss it if you are visiting!

The Workers Cottage, Norwegian Canning Museum

We really enjoyed our visit to the museum, and we all learned a lot. There was plenty to keep the children interested and they loved the hands on activities - Harry has been telling everyone about sticking the skewers through the eyes of the fish, it made a big impression on him! I'd definitely recommend a visit to the Canning Museum if you are in Stavanger, it's such an important part of the history of the town.

You can see a short video below of my children getting stuck in to the canning process.


If you are visiting Stavanger you may also enjoy the Petroleum Museum, which I wrote about after our previous visit - The Norwegian Petroleum Museum. When visiting with children I'd also really recommend a visit to the Stavanger Geopark, an amazing playground made from recycled materials from the oil industry located right outside the Petroleum Museum.

We received a family ticket to the Canning Museum and a tour, in exchange for sharing on my blog and social media.

Tuesday 4 September 2018

A second cruise through the Norwegian Fjords on the Disney Magic

We have just returned from a fantastic end to the long summer holiday - a week long cruise aboard the Disney Magic. We have cruised the Norwegian Fjords before with Disney and loved it, so we were excited to be returning. Although billed as a Norwegian Fjords cruise, this one was a bit less fjordy than the last, with stops in Copenhagen, Oslo, Kristiansand and Stavanger. I'll be sharing lots about what we got up to in port!

This time I was determined to really enter into the spirit of the Disney cruise experience. We improved our door magnet display with an Olaf printout and individual family snowflakes. A lot of people on a Disney cruise hang 'fish extenders' from the fish hook outside their door and exchange gifts with other cruisers. I wasn't brave enough to sign up for a fish extender group, but I made a last minute decision to join a 'pixie dust' list that was organised through our cruise Facebook group. I put together about forty small gifts and also handmade nearly sixty magnets. On our first day at sea, the children and I roamed the corridors handing out the gifts to other people on the list, and choosing some of our favourite decorated doors to leave a magnet. Then I hung a small gift bag outside our door to see if we received anything back.

Disney cruise stateroom door with magnets

I'm pleased to say that people were very kind, and we received some really lovely things back! The children were thrilled to come back to the room and find a present, and it was so much fun to take part. I'm already putting together ideas for next time in case we are lucky enough to book another Disney cruise!

Mia's highlight for the cruise, as always, was the princesses. The princesses are so good with the children, she met some of them several times and they always remembered her and had such a lovely chat with her. She had a huge smile on her face after meeting them.

Disney cruise meeting Princess Tiana

Our children won't do the kids club by themselves which is a shame as they look excellent. We did have fun with some of the family activities though - making masquerade masks, trying origami, attempting to draw Disney characters, a Disney music trivia quiz, making flubber - there is always lots going on! We also went to the cinema and watched all the main shows in the theatre, some of them twice, they are all amazing.

The cruises in this part of the world all have a bit of a Frozen theme, with a special Frozen meet and greet gathering and a Frozen themed day which finishes with a Freezing the Night Away deck party (you can see my previous video of the show here - Freezing the Night Away)

Freezing the night away on board the Disney Magic

I do love a cruise. I like the chance to get dressed up for dinner (even if I'm back in my jeans for the air conditioned theatre later on!), the excitement of waking up somewhere new to explore in the morning, having everything organised for you, and no cooking, cleaning or washing up. You really do feel like you in a bubble away from the real world. I hope that it's not long until we are back on board again!

Dressed up for dinner on the Disney Magic