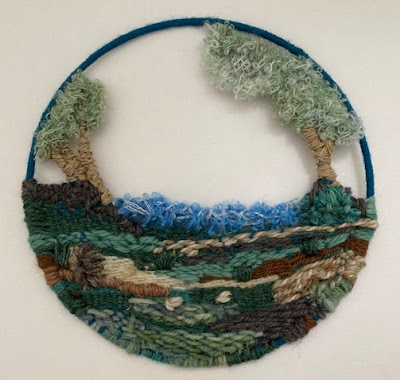
I'm attempting to complete one of my unfinished projects each month this year, and for the month of March I chose my circular weaving kit!
I had been putting this one off for ages as I'd made a couple of starting attempts that I wasn't happy with, but I knew that if I put my mind to it I could create something which I'd be pleased with.
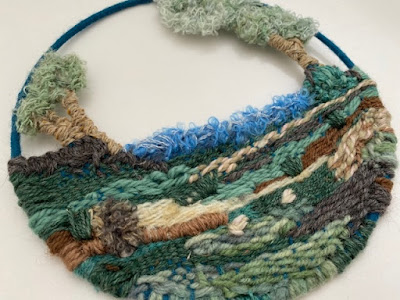
And here it is!
I'll start by that I found this really difficult! For a kit, the project was very open ended and the instructions made it sound easier than I actually found it. The problem that I had was creating warp threads to weave through over a circular ring. The threads kept slipping out of place and I couldn't get them as close together as I wanted due to the shape of the ring. Wrapping them also made a front and back for each warp thread which were difficult to work with and keep separate.
But after about three attempts I managed to get some warp threads in place that I was happy with. The top threads for the trees ended up being removed as they were making the horizon thread too tight and I was worried it would snap! I didn't really know the best way to weave in the different colours, but I think I made a pretty good attempt.
The kit that I used was put together by The Threshing Barn and my Mum bought it for me at a knitting and stitching show a couple of years ago.
I loved that the kit came with such a huge variety of different types of yarn - different colours, thicknesses and textures. The fluffy yarns were really good for the leaves in the trees and the sea, and the thicker yarns were good for the places where my warp threads were quite far apart and I needed to fill in the gaps.
The bright blue fluffy yarn caught my eye and so I decided to change the design a little bit and use green for fields at the bottom with a patch of blue to be the sea in the distance. My horizon ended up being pulled down a little lower than I would have liked, so I tried to make the trees nice and fluffy to fill some of the empty space at the top.
I also added in lots of extra embroidery areas which was my favourite part of working on the kit. The white blobs are supposed to be sheep and then there are various bushy and plant bits which add some texture.
It would have been easy to give up on this but I feel an enormous sense of satisfaction from having persevered with it and I'm pretty pleased with the finished product!
That makes three projects completed now and ticked off my list. I'm not sure yet what will be up next, but I think it might be a mini Christmas cross stitch kit that has been hanging around for far too long!
Monday, 30 March 2020
Thursday, 19 March 2020
A craft using the spare dotz and drills from diamond painting
A craft that I'm really enjoying at the moment is diamond painting. After working on my diamond painting sugar skull last year, and helping Mia out with a unicorn kit that she received for her birthday, I've just made a start on a really large piece - Van Gogh's Starry Night - that is going to keep me busy for a long time!
One thing that has been bothering me is all the tiny plastic diamond drills or dots which are left behind after the project is completed. I have loads of teeny plastic bags filled with little dots, all neatly sorted by colour. I don't think that you can buy the canvas for the kits by itself, and even if you could I probably wouldn't have all the colours that I'd need. So I'm keen to come up with some crafty ways to use up the leftover dots and drills once the original kit is complete.
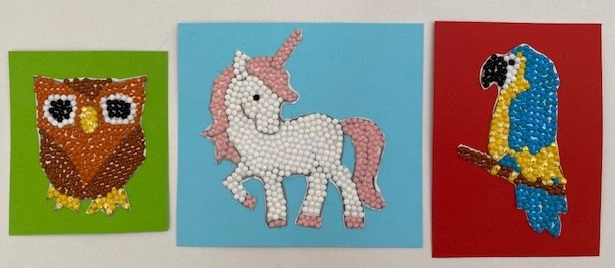
My first idea was these sweet little pictures that Mia made for her friends! We found some pictures online and copied them onto some white card - see below for my tutorial on how to simply transfer an image.
Then I covered the area of the drawing with double sided sellotape, or you could also use a thin layer of glue. She used the usual diamond painting tool to fill in the picture using the diamond dotz in the colour that she wanted. When she had finished I left the pictures underneath some heavy books overnight to make sure that the drills were firmly stuck down. Then we cut around the picture and mounted it on some contrasting coloured card.
I really like the way that the diamond drills work just as well when they are used to fill in the different areas - they don't need to be placed in a grid pattern like on the pre-printed canvases. These would make lovely greetings cards, and we are definitely going to be making some more for friends and family!
Here's how I transferred the images to the white cardboard:
1 - First trace your image onto tracing paper (you can also use baking paper from the kitchen), either from a printout or directly from a computer screen. Make sure that you have a nice strong outline.
2 - Turn the paper over, place it onto some scrap paper, and scribble over the back of the outline that you have drawn.
3 - Turn the tracing paper back the right way up and position it where you want to transfer your image.
4 - Draw back over your original lines. You should be left with a faint impression of your drawing, which you can go over again if necessary. The tracing paper image can be reused several times, handy if you make a mistake!
Monday, 16 March 2020
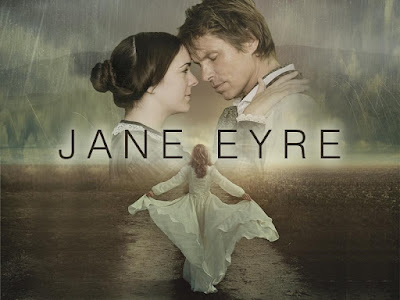
Jane Eyre with Blackeyed Theatre at the Connaught Theatre Worthing
I received press tickets for this performance.
Charlotte Bronte's Jane Eyre is a classic novels in English literature. The story begins by taking the reader through Jane's miserable and neglected childhood, then follows her into adulthood where as the governess in a wealthy household she falls passionately in love with her employer Mr Rochester, before discovering his terrible secret.
I've read the book many times over the years and I'm very familiar with the story, so I was very interested to see how it would be brought to life for the stage. This production by Blackeyed Theatre is currently touring internationally. The play features a cast of five actor musicians, with live music performed on stage throughout written especially for the production.
On the night that I saw the show one of the actors was unfortunately ill and unable to perform. Instead of cancelling the show, the company had found a replacement actor with only the afternoon to rehearse the show, and she did an amazing job!
Because of the small cast it is necessary for the majority of the actors to take on several roles. Most of the time the actors wore the same costumes throughout. With the clever use of accessories, and most of all incredible acting talent, the actors were entirely believable performing as a wide variety of characters. The show was cleverly staged, and although the set and scenery were simple it was easy to imagine the different settings. Jane's narrative asides to the audience made the timeline of the story easy to follow, her monologues were intense, and the story was gripping.
I really enjoyed the production and would definitely recommend it!
You can find details of the upcoming performances here - Blackeyed Theatre - Jane Eyre.
Thursday, 12 March 2020
Five books that I've enjoyed recently
This post contains Amazon affiliate links.
Since I read and paid attention to How to Break up with your Mobile Phone last month, I've read a huge number of books. Some of them are old favourites that I've re-read, some are classics inspired by a books scratch off bucket list poster (affiliate link) but some of them have been new books which I've bought with birthday money or book tokens, and so I thought I'd share some of the more newly published books that I've read recently and really enjoyed.
I hope that they give you some reading inspiration!
The Body: A Guide for Occupants by Bill Bryson
Bill Bryson is one of my favourite authors, and when he releases a new book I buy it immediately in hardback, no question. I'm just amazed by his knowledge and the way that he weaves the facts together in a really readable and absorbing way. This book, all about the workings of the body, is a fascinating read!
The Giver of Stars by Jojo Moyes
I really enjoyed reading this book about Alice, who moves with her new husband to America and discovers that it isn't the adventure that she had expected. But when she begins working with a group of ladies that have started a travelling library to take books out to isolated homes by horseback, she finds what she's really been looking for. I found it a really gripping read and loved the historical setting.
The Garden of Lost and Found by Harriet Evans
This book is about the history of a family over the years, starting with a world famous artist that destroys his best known painting, The Garden of Lost and Found, which captured his children on a perfect day in the garden. There's lots of mystery and intrigue as the true story is revealed throughout the book, it was a captivating read.

The Binding by Bridget Collins
In the world of The Binding, unpleasant and unwanted memories can be captured and stored in beautiful books. Emmett Farmer begins an apprenticeship as a binder to learn the craft, and then one day discovers a book with his own name on it. Another book which kept me hooked!
The Family Upstairs by Lisa Jewell
I do like a psychological thriller, the only trouble I have with them is that I'm always desperate to find out the ending, and so I read them far too quickly! This story about two families and their secrets was an easy and satisfying read with some good twists.
Since I read and paid attention to How to Break up with your Mobile Phone last month, I've read a huge number of books. Some of them are old favourites that I've re-read, some are classics inspired by a books scratch off bucket list poster (affiliate link) but some of them have been new books which I've bought with birthday money or book tokens, and so I thought I'd share some of the more newly published books that I've read recently and really enjoyed.
I hope that they give you some reading inspiration!
The Body: A Guide for Occupants
Bill Bryson is one of my favourite authors, and when he releases a new book I buy it immediately in hardback, no question. I'm just amazed by his knowledge and the way that he weaves the facts together in a really readable and absorbing way. This book, all about the workings of the body, is a fascinating read!
The Giver of Stars
I really enjoyed reading this book about Alice, who moves with her new husband to America and discovers that it isn't the adventure that she had expected. But when she begins working with a group of ladies that have started a travelling library to take books out to isolated homes by horseback, she finds what she's really been looking for. I found it a really gripping read and loved the historical setting.
The Garden of Lost and Found by Harriet Evans
This book is about the history of a family over the years, starting with a world famous artist that destroys his best known painting, The Garden of Lost and Found, which captured his children on a perfect day in the garden. There's lots of mystery and intrigue as the true story is revealed throughout the book, it was a captivating read.
The Binding
In the world of The Binding, unpleasant and unwanted memories can be captured and stored in beautiful books. Emmett Farmer begins an apprenticeship as a binder to learn the craft, and then one day discovers a book with his own name on it. Another book which kept me hooked!
The Family Upstairs
I do like a psychological thriller, the only trouble I have with them is that I'm always desperate to find out the ending, and so I read them far too quickly! This story about two families and their secrets was an easy and satisfying read with some good twists.
Monday, 9 March 2020
Simple Mother's Day crafts for toddlers and young children
In the past I've shared lots of ideas for simple Mother's Day crafts that you can make with young children, and so I thought I'd re-share some of my favourites. These crafts are all really easy to do, and with a bit of help your toddler can make some lovely gifts for Mother's Day that are either useful or can be proudly displayed. Just click on the links to find the full tutorials.
I really enjoyed making these Pom Pom frames with a quote about Mothers. They are so easy to make, just a cardboard frame covered with plenty of glue and a pile of brightly coloured craft pom poms that toddlers can push into place. Finish off the frames with a printed quote or a photograph of the child.
These Hama bead covered jam jars make a lovely, practical gift, and are really easy to make. Just help the child make a strip of patterned Hama beads, perhaps in simple stripes or just random colours, then when you iron them, before they cool completely you can wrap them around the jar so that they cool to a curved shape which can be glued on to the jar.
Papier mache gift bowls are a great way to give a gift of sweets or chocolate, and can be re-used around the home once the treats have been eaten. They are fun to make with glue and paper, and can then be painted by the child to make a really personalised gift.
A Hama bead flower wreath looks complicated, but all you need is a small Hama bead flower pegboard and you can let the child loose creating different designs which can be assembled into a lovely decoration for the home. The individual flower designs can also be used to make magnets or key rings.
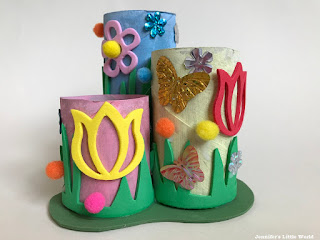
The classic cardboard tube pen and pencil pot desk organiser is something that I remember making for my own parents when I was little! Just paint some cardboard tubes, stick them together, and decorate with stickers and sequins.
Finally why not use some Hama bead photo frames to gift a photo or drawing. The frames are really simple to make and could be made in colours that match the photo or the recipient's decor.
Happy Mother's Day!
Friday, 6 March 2020
My Paint by Numbers Kit - Fishing Village
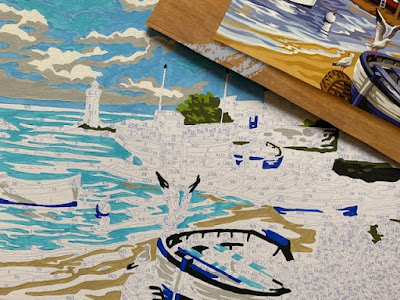
At the beginning of the year I shared my crafting plans for the year ahead, and my intention to complete one unfinished craft project each month. Last month I finished my little heart cross stitch, and this month was the turn of my paint by numbers Fishing Village scene.
I bought this paint by numbers kit from Hobbycraft recently for a bargain £5 - you can see it here Fishing Village Paint by Numbers kit. There were several different kits in the range and I chose this one because I'm always drawn to things with a sea related theme, and I thought that it looked challenging but not too difficult.
The kit comes with 12 pots of paint, and then quite a lot of the colours need to be mixed to make the different shades. The first thing that I found when I started painting was that the colours included weren't very true to the colours on the box, they were a lot more vivid and the distinction between the different shades wasn't as subtle. Also some of the colours that I mixed up needed a bit of tweaking and repainting to make them match with the existing colours and not stand out too much.
I'm pretty pleased with my finished painting through. I did run out of paint so I wasn't able to do a second coat of paint on the areas in the sky which do need it really. The smaller areas of colour and the darker parts look much better.
I really enjoyed the challenge of the painting, there were some very intricate areas which were fun to work on and I like the finished scene. Maybe it wasn't the best quality product, but for £5 I think you can't really go wrong and it was well worth it for the enjoyment that I had completing it! I'll definitely think about picking up another kit like this next time I'm looking for something crafty to keep me busy!
My craft project for March is one that I've had on my list for far too long and I really want to complete. It's a circular weaving kit that I've been struggling with because I can't get the warp threads to do what I want them to around the circular frame. So I'm going to do the best I can and not worry too much if it doesn't look exactly like the picture. I'm sure that I can use my craft and sewing skills to produce something that I'm proud of and that will look nice on display.
Wednesday, 4 March 2020
How I got on with the Minimalism Game in February
One of my Ten Things to do in 2020 was to play the minimalism game at some point. I've completed this month long decluttering challenge several times over the past few years and I always find that February is a good month for it. Not only does it give you a start on the spring cleaning, February is also a shorter month so you don't need to find quite as many items to declutter!
To take the challenge, you need to remove the same number of items from your home as the number of that day in the month, one item on the first, two on the second and so on. You need to make a few decisions - will you count shared items towards the total? Does a bag of smaller items count as one item or many? Do you count accessories that go with an item separately?
I'm a very list oriented person, so I kept track of my progress using a card within my personal Trello organisation system, making a note each day of what I'd decluttered. Yes, I'll admit that sometimes I got a day or two ahead of myself, and it took me a couple of days into March until I had found my final items, but I'm still going to count my #minsgame as a success!
Because I'm fairly decluttered already, this challenge is always an opportunity for me to hunt about in the backs of drawers and cupboards. Needing to get to my total also gives me the extra bit of motivation to pass on something that I've been umming and ahhing about.
Mostly things went into charity bags (I filled two big bags), into a pile for a garage sale that we'll hopefully be taking part in this summer (if not they'll be moved on at a later date!), into the recycling or into the bin.
There were some things that were easy for me to get rid of and some which I struggled with at the time, but now that they are gone I know that I made the right decision.
I've definitely noticed a difference in my surroundings, my bookshelves are tidier, my surfaces are clearer, and I've freed up lots of space in cupboards and drawers. The minimalism game isn't something that I can play that often, but I'm definitely going to attempt to give it a go once a year or so!
 |
| Photo credit Samantha Gades via Unsplash |
Subscribe to:
Posts (Atom)

