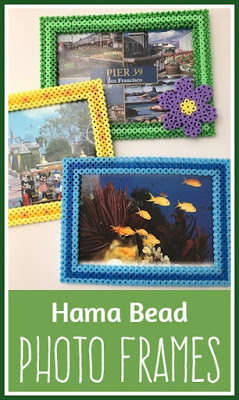
It feels like ages since I last shared a Hama beads craft on my page! The truth is that I've not had the Hama beads out for a while. But I was recently inspired to pull them out again, and it reminded me how much I love crafting with them! So here is my most recent Hama beads craft, some cheerful photo frames which you can use to display your holiday photographs or some favourite postcards.
I make my Hama bead photo frames using two square Hama bead pegboards. The boards are designed to clip together so that the position of the pegs remains consistent across the join. You could easily make them using just one square board, but you'd probably have to crop your photo or postcard to fit. I find that for a standard photo print or postcard you want a frame with an inner height of 18 beads and an inner width of 26 beads. This allows some overlap on the back so that you can secure your image to the back of the frame.
You just need to arrange your beads on the peg board in the usual way. You can adapt the size to match the photograph that you want to frame, and choose colours which complement it. When it comes to ironing I iron my creations on both sides - you can find some ironing tips for Hama beads here. As the design is on the large size I find it a good idea to press the design flat while it is still warm, you can sandwich it between two large books to do this. Here are the three different frames that I came up with:
The third design features a flower embellishment. This was created using beads placed on to a small flower peg board which were ironed separately and then glued to the outside of the frame. Hama beads can be tricky to glue, I find that a super glue type adhesive works best as other glue can sometimes peel away from the beads.
You can use Blu Tack or tape to stick your picture to the back of the frame to keep it firmly in place. Make sure when designing your frame that you leave enough of a border to do this. Then the finished frames are light enough that you can 'hang' them by sticking with Blu Tack or you can attach a magnet to the back so that they can be displayed on a fridge or other magnetic surface. I like to prop mine on my bookshelf for a splash of colour!
If you liked these Hama bead frames you might also like the frames that I've made in the past:
Hama bead photo frames
Hama bead heart frames
You can find all my Hama bead crafts on my Hama bead crafts page.


No comments:
Post a Comment
I love reading your comments!