Wednesday 30 April 2014

Mini Artist Trading Cards

When I was sorting out my Ikea wooden drawers at the weekend I came across some remnants from a craft which I very much enjoyed a few years ago pre-children. Artist Trading Cards, or ATCs, are miniature works of art, about the same size as a trading card (64mm x 89mm). You can use all sorts of media to produce the art - collage, paint, ink, even fabric.

Mini artist trading cards craft

I used to belong to a Yahoo group to do with altered art, as I was also interested in altered book making. I received the messages as a daily digest, and I loved spending my time reading through everyone's ideas. I don't remember sharing so many pictures on-line in those dark days before Pinterest, but I took part in several swaps and in my collection I have some gorgeous cards which I received from people around the world.

For the swaps I cut cardstock to the right size to make my cards, but for my own cards I used old playing cards. I generally made collaged cards, using pictures and text from magazines and scraps of coloured paper. I found that I could make up a whole bunch of them pretty quickly, and I loved matching together different words and pictures.

My favourite cards were made using some miniature playing cards which I bought in a toy shop. They each measure about 4cm x 3cm. As I remember most of the text and pictures in these cards came from a single magazine, and I made them all in one crafting session.

Mini artist trading cards craft

As for what to do with them when I'm finished, I'm not sure yet. I used to leave some in geocaches, which was another hobby that we were enjoying at the time. I'm sure there are still plenty of swaps going on if I look into it. I've also toyed with the idea of making my own business cards with my URL and Twitter handle, although I'm not sure I'd be brave enough to hand them out!

Mini artist trading cards craft

I'm planning on having a go at some more cards soon, and to get me started I've began (what else!) a Pinterest board which will soon be filled with inpiration! I'd really like to move away from collage a bit, and perhaps incorporate some drawing or painting. See some of my inspiration below!

Follow Jennifer Jain's board Artist Trading Cards on Pinterest.

Tuesday 29 April 2014

Review - Disney Mickey Mouse Cozy Coupe from Little Tikes

Even if you're not a parent, I think that you'd be familiar with the iconic Cozy Coupe car from Little Tikes. I can certainly remember them being around when I was little. Although we've never had one ourselves before, my children have loved playing in them at toddler groups and friend's houses, so I was very excited to have the chance to review the new Mickey Mouse Cozy Coupe.

Review - Little Tikes Mickey Mouse Cozy Coupe

This brand new character look has been launched by Little Tikes this Spring, and as well as Mickey Mouse you can also buy a Minnie Mouse Cozy Coupe. Each comes with ears on top and themed stickers, as well as all the usual features - a working horn, storage area at the back, petrol cap and clicking ignition key.

The Cozy Coupes are recommended from age 18 months. At five Harry can still easily fit inside, although to be fair he's on the small side. At almost three Mia fits perfectly inside and can easily drive the car about. For younger children that can't quite manage the legs yet, they are easy and safe for an adult to push them around in, as they are very light and manoeuvrable. Little ones soon pick up the technique for pushing themselves along, and although to me it looks like quite hard work it doesn't seem to bother them, it's certainly fantastic exercise!

I did find that the Cozy Coupe wasn't very easy to assemble. It definitely takes two adults, and sometimes quite a bit of brute force to push the elements into place and screw through the plastic. You also need to concentrate on the instructions to make sure that all steps are completed in the correct order. After assembly we realised that one of the front side pieces wasn't in properly, and we had to take it apart and rebuild. But once it's assembled correctly it is very sturdy and robust, there's no way that it's going to fall apart.

Review - Little Tikes Mickey Mouse Cozy Coupe

I was very interested to notice how differently Mia played with the car. Harry has always been happy to just drive them around, but Mia really involved herself in role play. She drove it around the house to take her teddies to pre-school and the supermarket, and she loved having a little compartment at the back where she could stow things. Although it has only been used in the house at the moment, as the weather improves we'll be moving it out to the garden for even more adventures. It's definitely durable enough to cope with different surfaces outside.

Review - Little Tikes Mickey Mouse Cozy Coupe

Mia adores her car, and she has been playing with it constantly since we received it. If you have toddlers I would absolutely recommend one.

I received the Mickey Mouse Cozy Coupe to review.

Sunday 27 April 2014

Ikea wooden drawers upcycle

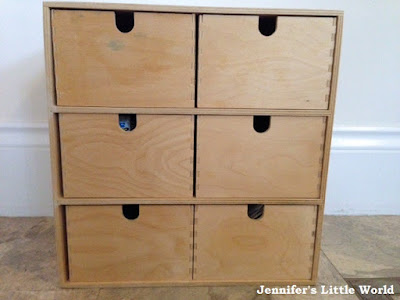
I bought these little wooden drawers from Ikea a number of years ago. I don't think that you can still buy these exact drawers, although a similar version is still available - the Ikea Moppe mini chest of drawers. I always felt that I should do something to make them a bit more interesting but for some reason never got around to it. Then I discovered Pinterest, and one of the very first things that I pinned to my popular Craft Inspiration board was some decoupaged Ikea drawers. I've seen some other fab examples since, and so I decided it was time that I had a go!

Ikea Moppe wooden drawers upcycle with patterned paper

This is how the Ikea drawers started out, not only plain but also looking a bit battered and faded after sitting on my bookshelf in sunlight for several years.

Ikea Moppe wooden drawers upcycle with patterned paper

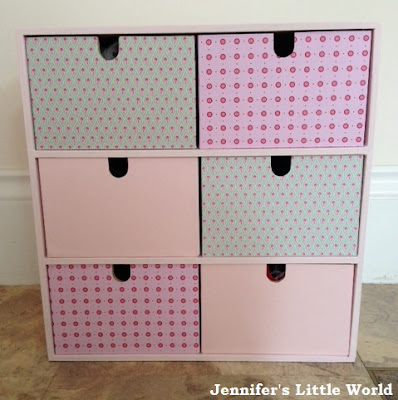
I began by removing the drawers and painting the outside frame. I lightly sanded the wood, then used white emulsion to paint, with a small amount of red poster paint mixed in to make it a very light pink. I painted the top and sides, then along the fronts. I didn't paint all the way inside the box, but I did go in 1-2cm around the insides, as the drawers are not a completely snug fit inside the frame and you can see inside a little bit.

Ikea Moppe wooden drawers upcycle with patterned paper

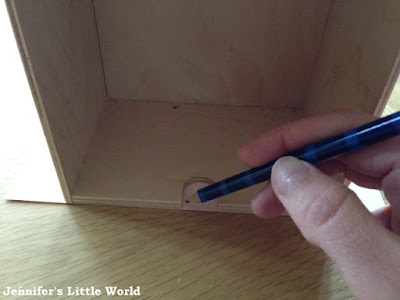
Then I looked at covering the drawers. I experimented with both paper and card, and found that although the paper did work well, the card was really best. I used plain pink card and some pieces of patterned card that I received from Baker Ross as a member of their blogger network - Spring Patterned Card and Paper. I found the easiest way to do it was to place each drawer face down on the piece of card, lining up the smooth cut edge with the top of the drawer. I cut it out so that there was a border of approximately 2cm around the sides and bottom, then marked out and cut the finger hole in the top of the drawer.

Ikea Moppe wooden drawers upcycle with patterned paper

To glue the card to the drawer I just used PVA glue. I glued the front on first, then folded the card around the bottom and sides and glued that in place. To secure it firmly I used sellotape, which I hope will also make sure that the drawers slide in and out easily and the card doesn't catch.

Ikea Moppe wooden drawers upcycle with patterned paper

My drawers are not used very frequently, so I'm hoping that this will be strong enough to last. For drawers that are in more frequent use I would probably cover them with clear contact paper or perhaps a layer of glue. I also chose not to put labels on the drawers as I'm likely to change their function regularly.

I'm so proud of them!

Ikea Moppe wooden drawers upcycle with patterned paper


And the best thing about this project? I completed it all with small children around! Harry occupied himself, and Mia did her own painting and cutting alongside me while I did mine, and considering how long I've been putting it off it really didn't take long at all!

I went on to do another Ikea upcycling project - decorating some Ikea wooden magazine files - another really simple project that has made a big difference to the look of my bookshelves.

Thursday 24 April 2014

Mia, and finally taking an interest in books

Mia has never taken much of an interest in books, something that has been bothering me for a while. I was showing books to Harry at two days old and reading him The Gruffalo at three months, but Mia has never been particularly interested. She has never had the patience to sit down for a longer picture book, and when we go to the library she still goes for the baby books with a simple illustration and couple of words on each page.

Because of this I've not pushed it with her. Until recently, she didn't really even have any books in her room at all, only ones that had migrated there from elsewhere. But at the weekend we redecorated Harry's room, and we bought him a large bookcase, moving his smaller one into Mia's room. At the same time we had a sort out, and moved all the baby and toddler books onto her shelves. She's always had access to them in Harry's room and around the house of course, but something about putting them into her room and calling them 'Mia's books' has had a massive influence. 

For the very first time at bedtime the other night she asked for a story, and then another one, and then another one. She will also sit there happily and read the books to herself. She's still going for the ones with the lift up flaps and the different textures, but she is actually paying attention to a story, repeating words, and talking about what she can see in the pictures. It's wonderful!

Toddler reading a book

I've always longed for the day when I can sit down with the two of them and read them both a book at the same time. Unfortunately whenever I've sat down to read to Harry with Mia around she gets bored very quickly, and will usually just scream for attention which doesn't make for a pleasant reading experience. Perhaps that day will soon be here!

Wednesday 23 April 2014

Review - What If? Pet Parlour jigsaw puzzle from Ravensburger

I've always loved jigsaws, although these days I don't have quite as many opportunities to complete larger, adult puzzles as I used to, both from lack of time and lack of space to leave them out undisturbed! I like to make the time for them when I can though, as I do find jigsaw puzzles relaxing and satisfying.

This week I was sent a puzzle from the What If? range by Ravensburger to review. The What If? range is a collection of puzzles which are a little bit different to a traditional jigsaw. As a twist, the picture that you see on the box is not the image found on the jigsaw inside. Instead, the concept behind the puzzle is that you need to imagine what might happen if things do not go to plan. The puzzle I was sent is called What If? Pet Parlour, and you are invited to imagine what might happen if Pamela's Pampered Pooch Parlour diversified. 

What if? Pet Parlour jigsaw from Ravensburger review

As with all Ravensburger puzzles, the quality of the jigsaw is excellent and the pieces are sturdy, fitting together evenly and solidly. It's not as easy as completing a normal puzzle where you can follow the picture on the box, but the clues are there to help you complete it and the extra thought that you need to put in provides a satisfying challenge.

What if? Pet Parlour jigsaw from Ravensburger review

I received this Ravensburger puzzle to review.

Monday 21 April 2014

Me and knitting socks

I knitted my first pair of socks several years ago. I'm not a fantastic knitter, and I do require a lot of support while I'm knitting. If I make a mistake I have to stop and take it up to my Mum to sort out for me. But a few years back I became quite successful at knitting socks, which is surprising because they aren't the easiest things to knit. You have to make three knitting needles into a sort of triangle and then knit around them all, keeping track of all the needles at once and trying not to stab yourself. Then you have to do some complicated manoeuvres to turn the heel, pick up stitches, increase and decrease and all sorts. I needed a lot of help the first few times, but a few socks later I got the hang of it and produced five or six pairs of socks that looked pretty good, if I say so myself.

I think I particularly liked knitting socks because of all the fantastic sock yarns that you can buy. You buy a ball that is all different colours, and then when you knit it up it turns into stripes and other patterns that you couldn't imagine before you start knitting.

Somewhere along the way though some children came along, and the sock knitting was put aside. Abandoned right in the middle of a sock in fact.

Sock knitting in progress

I was reminded of my neglected sock again while I was hunting out my blanket knitting bits. I can't believe that I abandoned this gorgeous, brightly coloured sock. I was knitting a different pattern to my standard one which is mainly worked in rib, and it looks as though it will be so stretchy and comfortable when it's finished. The yarn is Wendy Happy 4 ply 2504 Capricorn and I can't even remember where I bought it from or when.

So I took it up to my Mum and she helped me to identify whereabouts in the pattern I'd got to, and she encouraged me to get started with it again. I don't have much to do to finish the first sock, then hopefully I'll be able to knit another one that looks pretty much the same. Then maybe by next winter I'll have a new pair of socks!

Saturday 19 April 2014

Breakfast with the Easter Bunny at Findon (Worthing) Garden Centre

This Easter weekend we were invited to have breakfast with the Easter Bunny at Findon (Worthing) Garden Centre, one of the centres in the Garden Centre Group.

We had a lovely time! The whole experience felt very individual and welcoming. We had a personalised Easter card waiting for us on the prettily decorated table, and the restaurant manager was very friendly, making sure that we had everything we needed and telling us what would be happening.

Breakfast with the Easter Bunny at Findon (Worthing) Garden Centre

The garden centre restaurant has a good sized soft play area, and the children were able to play for a while before breakfast was served. It was lovely and empty because it was first thing in the morning, and the little ones were perfectly happy there while we waited at our table. We had a vegetarian full English breakfast which was very tasty, and we were able to request it without the bits that we're not so fond of. 

Breakfast with the Easter Bunny at Findon (Worthing) Garden Centre

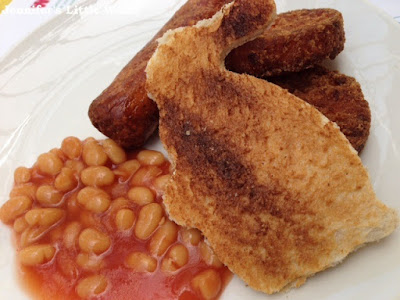
Our children are generally rather fussy when it comes to food, but they had lots to choose from and there was plenty of toast to go around. They were particularly delighted with the bunny shaped toast, which was a great touch! When they had finished eating they could go off and play again while we relaxed and enjoyed our own breakfast.

Breakfast with the Easter Bunny at Findon (Worthing) Garden Centre

Then they both had the chance to decorate their own Easter nest cake with plenty of mini eggs and sprinkles. They both loved doing this, and all the children were surprisingly neat in their efforts!

Breakfast with the Easter Bunny at Findon (Worthing) Garden Centre

When they had finished, it was time for the Easter Bunny to make an appearance. She hopped over to the children, and they had the chance to go up to her before being presented with a lovely little stuffed rabbit and some Easter Eggs. There was plenty of time to sit down, to have a chat and to take our photographs. Although fascinated, Harry wasn't keen to get too close, but we bribed Mia with a balloon and she sat still just long enough for a nice photo!

Breakfast with the Easter Bunny at Findon (Worthing) Garden Centre

The whole experience took around an hour and a half which was perfect, not at all rushed, but no chance for the children to get bored. Breakfast with the Easter Bunny isn't something that I'd ever heard of, let alone thought of doing, but I'm really glad that we had this opportunity as it was a lot of fun!


Our visit was complimentary, in exchange for a review.

Friday 18 April 2014

Review - Hans Sloane Drinking Chocolate

I've never been a tea or coffee drinker, but sometimes I still want to sit down and relax with a nice hot drink. On these occasions I always turn to a hot chocolate, and so I was delighted when I was asked if I'd like to try a sample of Hans Sloane Drinking Chocolate. Sir Hans Sloane launched his first drinking chocolate in London over 325 years ago, and today the range includes three main variants - Smooth Milk Drinking Chocolate, Rich Dark Drinking Chocolate and Natural Honey Drinking Chocolate.

Hans Sloane Drinking Chocolate doesn't look anything like the powder that I'm used to adding to water. Instead it's a box of pure chocolate beads, which are melted together with hot milk or water to produce a hot chocolate drink which really is chocolate actually made for drinking.

I made my first mug using milk. The recommended quantity is three heaped tablespoons of the chocolate beads melted into 200ml of water or milk. I couldn't resist trying one of the beads on its own and it was delicious, you could easily just eat them by themself! The hot chocolate drink itself was equally yummy, it really was just like drinking actual chocolate. The texture was beautifully smooth, and the only slight remnants left in the bottom of the mug were pure chocolate, a pleasure to finish with!

My Dad happened to be visiting, so he tried a  mug of the Rich Dark Drinking Chocolate. He's a fan of dark chocolate anyway, and he pronounced it delicious!

Hans Sloane drinking chocolate review

The recommended retail price for the packet is £4.99, and each packet will make approximately six servings. It's not cheap, although having said that that, my usual hot chocolate brand doesn't work out particularly cheap either, and the quality is nowhere near as good as this. And of course it's nothing compared to what you would pay for a hot chocolate when you're out and about. But the fact that it's 351 calories per serving (when mixed with semi-skimmed milk) also means that it's a drink for indulging rather than every day drinking! A packet would make a lovely, luxurious gift for someone like me that doesn't drink tea or coffee.

I would imagine that the chocolate beads are pretty versatile too. As well as simply snacking on them, you could easily use them in baking - perhaps in cookies, or to flavour icing. You could even just sprinkle them across the top of a chocolate cake, or melt to make fridge cake or rice crispy cakes.

I'm certainly not going to have any problems getting through my boxes!

I received two boxes of Hans Sloane Drinking Chocolate for the purpose of this review. 

Thursday 17 April 2014

Mamma Mia, here we go again...

Mia isn't named after the Abba song. Obviously we couldn't avoid thinking of it when we chose the name, and I do remember singing it to her occasionally when she was a baby (often while she was screaming, and the 'here I go again' line really resonated with me). But other than that I wasn't particularly familiar with the song at all.

Then a couple of months ago I had her in the car and she was making a bit of a fuss. This makes me stressed as I'm an anxious driver and I need to concentrate, so I asked her if she wanted to hear the 'Mia song'. Luckily my husband has some kind of USB set up in the car so we can access all our music through it. Of course she said 'yes', so I put it on for her and she was delighted. She kept repeating 'they're saying Mia!' in a kind of awed voice. It finished and she demanded 'again!' so I kept it going for the rest of the journey.

This made the journey very pleasant, so the next time she was in the car and asked for it I put it on. It kept her quiet when we arrived at school early to collect Harry on a rainy day and had to wait in the car. It motivated her to even get into the car in the first place if she knew that she could listen to it. Harry is fairly easy going and so he tolerated it too, and I'm always one for an easy life.

Of course, fast foward a few months and we are all totally sick of the song. Even good natured Harry has started to rebel and demand the Frozen soundtrack from time to time. If Mia is in a good mood then she'll let him listen to one song before making her demands. If she's not then she'll scream all through his song, then brighten up miraculously when Mamma Mia is turned on. I'm trying to teach her to take turns, but the lesson doesn't really seem to be going in.

Then the last few nights she has been asking to listen to it on the iPad before she goes to bed. Last night instead of the usual lullaby that I sing her she wanted Mamma Mia. When we are about to go out in the car, before we even leave the house she is checking that she can listen to it on the way. If I'm sitting at the computer she'll come up to me, force her way onto my lap and ask to watch it on YouTube.

I know it's not unusual for a toddler to become obsessed with something. And I also know that it won't last, which is why I've written this post as it's another little part of her childhood that I don't want to forget!

Monday 14 April 2014

Dyed eggshell Easter Egg mosaic craft

With term having broken up two weeks before Easter this year, we seem to have had plenty of time for Easter crafting. Harry has also developed a bit of an obsession with Easter Egg hunts after I made him a treasure hunt with clues, which is no bad thing as it's giving him lots of practice with his writing as he writes out clues for me to follow.

Dyed eggshell Easter Egg mosaic craft

A little while ago I experimented with dyeing some eggshells, with no clear idea what to do with them when they were finished. Then it struck me that making them into Easter Egg mosaics would be the perfect craft for the dyed bits of eggshell, and it was a great craft that we could all do together.

Dyed eggshell Easter Egg mosaic craft


I used the egg shells saved from four eggs and I went for three colours - red, blue and yellow. I just used normal food colouring, with a generous amount added to water in three bowls. The red worked the best and the yellow the worst, as by the time we came to use the eggshells it had faded to white. I thoroughly washed and dried the eggshells, then left them in halves to soak in the dye for a couple of hours.

How to dye egg shells

Then I removed them from the dye and left them to drain and dry on kitchen paper before breaking them up into smaller pieces.

How to dye egg shells

I cut the egg shapes from pastel cardboard, drawing round a template which I found on-line. I kept them quite small so that they wouldn't be overwhelming. Then we used PVA glue to stick the pieces of shell to the egg. I encouraged the children to make patterns, but Mia was quite happy to just cover the egg with glue and sprinkle the pieces on. Harry also used a few bits of shell to decorate an Easter card that he had made. You could easily use the egg shells for more complex mosaics, as they can simply be broken up to fit the size of gap that you want to fill.

Dyed egg shell Easter craft mosaic

I think they look really pretty, we'll be using them as Easter decorations of some sort, perhaps stringing them up to make bunting.

Sunday 13 April 2014

Blog Your Heart Out

Fab blogger Swazi at Chocolate is Not The Only Fruit has tagged me in this meme, Blog Your Heart Out, a way to share a bit of information about me and my blog. All I have to do is to answer some simple questions! So here goes:

Who/What encouraged you to start blogging?

I had actually had several blogs before I started this one but this is the only one that I've stuck at for a reasonable amount of time. I was probably originally encouraged by my sister Anna and her blog Beep Beep. I also read a few big US blogs which inspired me at the time although they did set the standard rather high. The only UK blog that I had ever discovered was Red Ted Art after seeing it featured in Tesco magazine, so I was a bit taken aback when a couple of months in I discovered the UK blogging community and realised how huge it was!

How did you choose what topics to blog about?

I just write naturally about the things that interest me and the things that I get up to, the things that I've made. I knew that the blog would have a crafty focus because that's what I'm interested in. I deliberately chose a name for my blog that didn't include the word Mummy or make any reference to my family size, because I hoped that it would be something that I would continue, and I wanted it to be future proof. Although my other blogs didn't last long, I really wanted Jennifer's Little World to be something that I'd continue with, and so far it has!

What is something most people don't know about you?

It's difficult to find something about me that hasn't already been shared on my blog! Um....two of my teeth are the wrong way round, I have a swapped canine and a molar on one side of my mouth. It just happened that way when I had a tooth removed and a brace when I was younger and I didn't think anything of it, but now whenever I see a new dentist they are fascinated by it, one even called his assistant in to have a look!

What three words describe your style?

My blogging style? Crafty, chatty, and rambling!

What do you love to do when you're not blogging?

I love reading, all sorts of crafts (at the moment mainly cross stitch, I'm re-discovering knitting, Hama beads...), organising the house, swimming, going on days out with the family, travelling, watching films with my husband and eating pizza.

I'm terrible at tagging people in these things, but if you are reading this and would like to take part please do consider yourself tagged!

Friday 11 April 2014

Easter sensory tub

Easter themed sensory tub

With Easter fast approaching, I decided it would be fun to put together an Easter sensory tub. It's been a while since I last made one, and I knew that I had lots of things around the house that I could use to put one together. I love setting up a sensory tub in an inviting fashion, even though I know that my beautiful set-up will be completely destroyed within seconds!

How to make an Easter themed sensory tub for toddlers and young children

The base material in the tub is dyed rice. This particular brightly coloured rice has been around for a while now, it is the mixed up remains from our dyed rice Rangoli and beach sensory tub. It's very easy and cheap to dye rice, you just need some basic white rice and food dye. Mix up the rice with a few drops of food colouring and leave to dry for a short while. If you want to speed up the drying process you can use a couple of squirts of an anti-bacterial hand gel, but I find that it dries pretty much instantly anyway, and certainly within a few hours.

Of course the rice does end up everywhere. I place the tub in the centre of an old table cloth to try and minimise the mess, but I've found that it's easiest to just clear as large a space in the room as I can and stand by with the hoover for when they've finished, making sure to brush the children down thoroughly before they stray into the other rooms! I also make it clear to them that any rice that ends up off the tablecloth will be hoovered up, so there will be less for them to play with next time.

I found our small plastic eggs very cheap in the Costco sale a few years ago, they are exactly the same size as real eggs and came filled with tiny sweets. I've also seen similar ones in the supermarkets over the years. I arranged them inside a cardboard egg box. I find that my sensory tubs are more successful if there is some sort of activity for the children to do, and with this tub I provided spoons so that they can fill the eggs and the compartments of the egg box with the sensory materials.

The pastel pom poms were in the craft supplies that I was sent by Craft Merrily as a MAD Blog Award finalist. I don't remember exactly where the (somewhat misshapen) little chicks came from, but they are quite easy to find in craft shops at this time of year and it's a nice activity to hide them inside the plastic eggs.

How to make an Easter themed sensory tub for toddlers and young children

As you can see, it was the first day of the Easter holidays, and Harry was having a onesie day! At the moment I'm working on colours with Mia, so we used the egg box together for sorting and naming colours using the pom poms. Including a good range of pom pom sizes also lets you sort by size and order from largest to smallest. Her favourite activity though was using the spoon to fill the eggs and then putting them back in the egg box. I had to go and retrieve all our other plastic eggs so that she could fill them up!

How to make an Easter themed sensory tub for toddlers and young children

Being that bit older, I wanted to encourage Harry with some small world play, so I included some shredded paper with the idea that he could use it to make nests for the chickens. Again it's something left over from previous crafting projects. He didn't disappoint, and made up some lovely stories with the chickens, also putting them inside the eggs, and then building them nests and making sure that they had plenty of food. I also caught him pretending to lay an egg himself!

How to make an Easter themed sensory tub for toddlers and young children

We had a lot of fun with this sensory tub and I know that it will be coming out again and again over the Easter holidays, before I adapt it into a new theme!

Some of my other sensory play ideas:

Spring sensory tub
Firework sensory tub
Halloween sensory tub
Beach sensory tub
Dinosaur Island

How to make an Easter themed sensory tub for toddlers and young children

Tuesday 8 April 2014

Finding a new long term craft project

So a few weeks ago I finally finished my cross stitch sampler. I had been working on it for around seven years, not continuously, but it had always been in the drawer close at hand. One of the reasons that it took me so long was because I liked knowing that there was always something there that I could pull out to work on. I'm so pleased with the finished sampler, and the final push that I put in to make sure that it was completed. I keep going into the room where it is hanging to admire it.

But I will admit that now I feel at a bit of a loss. I'm not sure that I'm ready to commit to another large scale cross stitch project yet, and I do have a couple of very small pieces that I can work on if I feel the cross stitching urge. But I am thinking that I would like to have something else around to work on.

The idea of making a crochet blanket has been at the back of my mind for some time, but after my attempt at crochet failed last year I don't think I'm going to get far with that idea. But around that time my Mum did set me up with a simple knitting pattern to knit little hexagons that can be joined together in a blanket. Each one measures about 7cm across. I worked very hard on it, and over about six months I produced thirty six hexagons that I was very proud of. Or at least I was, until I worked out that to make a blanket measuring a reasonable size I was going to need over a thousand, and so I became disheartened and put it away.

Knitted blanket hexagons

But now I feel that it's time to have another go. The hexagons are very quick to knit up even for me (I'm not a great or confident knitter) and I can just about manage to complete one around the children, for example while they are in the bath is a good time to get one done. I'm trying not to think yet about the amount of time that it will take to sew all the things together!

Look out for a post in at least ten years time, when I proudly show off my new blanket!

Monday 7 April 2014

I'm a MAD Blog Awards Craft Finalist!

I'm a little late to be writing this post. I think it's because I'm so chuffed to find myself a Craft finalist in the MAD Blog Awards that I find it very difficult to imagine that I could be in a position to actually win the award! I want to thank everyone that nominated me in the first round, it really does mean such a lot to me.

I've written about all sorts of things on my blog over the last few years, but it's always been the craft posts that I enjoy writing and sharing the most. In particular I write a lot about crafts that you can do with young children, especially those to help celebrate and learn about special occasions throughout the year. In particular I'm very proud of my Diwali crafts, and you can find all my seasonal crafts here.

We've recently discovered Hama beads, and I've loved sharing all the crafts that I've made, both with the children and by myself. So much that I've even created a dedicated page to share our Hama bead crafts! Although ostensibly purchased for the children, I find that I have just as much fun playing and designing with them!

I also write about the other crafts that I enjoy myself. I've tried out lots of new things over the course of my blog - including soap making, candle making, Fimo and plenty of crafting with felt. I've also documented the progress of a very long term craft project, my cross stitch sampler, which I finished a couple of weeks ago and I'm very proud of.

I'm very lucky that the sponsor for the Craft category is the wonderful Craft Merrily. If you are looking for anything craft related then you will find that they sell it. In particular they stock an amazing range of Hama beads and accessories, for example an excellent range of supplies like the mini Hama beads which are hard to find elsewhere. As a finalist, they sent me an amazing package of crafty bits and pieces, both things to enjoy with the children and things to do for myself. I was delighted to find plenty of Hama beads!

I couldn't wait to get started with the tissue art kit, I love revisiting crafts with the children that I used to enjoy when I was little, and the way that this kit from Alex Toys is designed with a sticky background and squares of tissue paper cut to the exact size needed means that it's really easy and fun for little ones. Harry actually completed his fish while I was getting on with some baking, a rare occasion when he has finished making something independently!

Child working on a tissue paper craft kit

I now have plenty to keep us busy over the Easter holidays, and I'm already planning some pom pom sensory play and some evening Fimo crafting for myself!

Sunday 6 April 2014

Toddler free time

Now that Harry is at school I spend a lot of time alone with Mia. I do enjoy it, and it's becoming more fun as she gets older and able to do more things. But I also feel that Harry is missing out, because whenever I have time to spend with him she is always around. Although she has moved on from disrupting crafting sessions because she no longer quite tries to eat everything, she is still pretty disruptive when it comes to almost everything else that Harry is trying to concentrate on.

He could quite happily play for hours with his Lego or his Playmobil, but if Mia is there she just wants to play too, and she gets in the way of what he's trying to do. He becomes frustrated, she gets cross, and it ends up with them both screaming and Harry missing out on the opportunity to play.

Mia also has a much shorter attention span, meaning that when I take something out for them to play with together, like play dough or a sensory tub, she will become bored before Harry. I then have to take her away and find something else for her to do, so Harry will get lonely playing on his own and come over to see what we are doing, meaning that activities that I set up are finished with far too quickly.

I know that things will improve as Mia gets older, and things are so much better than when she was a baby. But I do very much enjoy the times when it's just me and Harry. At the weekend we had a lovely morning where we were able to play one of the board games that he received for Christmas (while making a good start on my Mother's Day Maltesers), then he set up a treasure hunt for me with clues (excellent writing practice), followed by a chance to play with his Playmobil castle and train set, undisturbed.

Child playing a board game

He's such a lovely little boy, funny, chatty and interesting to talk to. But the two of them are developing such differing personalities that they each require dealing with and entertaining in different ways, it certainly keeps me busy!

Friday 4 April 2014

Embroidery hoop art with button flowers

I wrote recently about my embroidery hoop art house picture, and I'm finding it an addictive new craft form. I decided I'd like to try a smaller framed version, so I bought a couple of frames which measure 10 cm in diameter, quite a sweet size which fits nicely in the palm of the hand.

Embroidery hoop art with felt and button flowers

I've got an enormous collection of buttons and I've been looking for a craft to use them, so I decided to make some button flowers, very simple with some felt and embroidery. I used some off-white cotton cloth for the background and fixed it firmly inside the hoop, leaving some hanging around the edges. I cut out a circle of felt for each flower and stitched it to the background. When I'm working with felt I always use contrasting colours of thread and quite large stitches because that's the look I like. Then I sewed a button into the centre of each circle, again with thread in a contrasting colour.

When it was finished I made sure that the fabric was pulled across tightly and then I trimmed it around the edges. I glued the edges to the frame and secured it with some tape, then added a circle of felt glued on the back to keep it all tidy. It's not really necessary if the embroidery hoop is going to be hung on the wall, but I like it to be neat!

Embroidery hoop art with felt and button flowers

When I made these I was toying with the idea of building up an Etsy shop. I love the idea of making things to sell, but the cost of the materials and postage means that you need to charge quite a lot to make it all worth it. You also need to build up quite a collection of stock in order to get noticed, which of course means financial investment, and I'm not sure that I've got the time, money or energy to invest in it all right now. It's definitely something that I'd like to think about for the future though!

Embroidery hoop art with felt and button flowers

Tuesday 1 April 2014

Mini Hama bead Easter Egg cake toppers


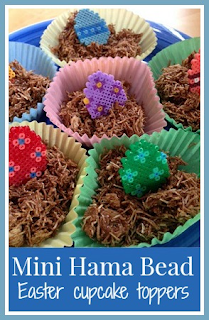
Since I received a big bag of mini Hama beads for Christmas I've been busy making all sorts of things. I blogged about some of them here - mini Hama bead projects - and one of the designs that I really enjoyed making was some mini Hama bead Easter Eggs.

Mini Hama bead Easter decorations for cupcakes toppers

The bag of mini beads had all sorts of different colours in, perfect for making the little multi-coloured eggs.

Mini Hama bead Easter Egg cake toppers


Each egg is about 3cm in height, and I thought that they would make lovely cupcake toppers. You could either glue a cocktail stick to the back to stick them firmly into the cake, or else just place them on top of the icing. Our favourite Easter treat is chocolate nest cakes, so I made up a batch and used the mini Easter Eggs as a little decoration.

Mini Hama bead Easter Egg cake toppers


My Easter nest cakes are made with four Shredded Wheat biscuits mixed with 100g melted chocolate (although a little more chocolate wouldn't have hurt) then placed into cupcake cases to look like nests. A lovely Easter treat!

The designs for these mini Hama bead Easter Eggs are taken from the Hama Mini Beads Inspiration 13 idea book.

Mini Hama bead Easter Egg cake toppers

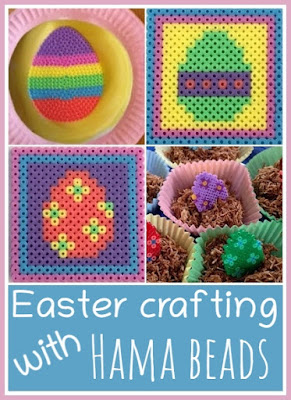
If you are looking for other Easter crafts using Hama beads, you might like some of the ideas in my full round up of Easter crafts using Hama beads!

Easter crafts using Hama beads ideas

Mini Hama bead Easter Egg cake toppers