Monday 30 December 2019

My crafting plans for the year ahead

It's the time of year when I start to make my plans for the year ahead, and those plans include the crafting projects that I want to work on and complete. I've got a long list of craft projects in progress at the moment, so I've decided that each month I'm going to concentrate on one project, and with any luck I'll complete it during the month.

So my first project for January is going to be finishing this cross stitch piece. I only started it a few weeks ago, so it's not been hanging around for ages, but I have owned the pattern for quite a while!

Heart cross stitch by Awesome Pattern Studio

The design is Heart from Awesome Pattern Studio, and I bought it on Etsy for what I thought was a very reasonable price - at the time of writing £3.79. The centre of the design is a white heart containing the word 'Love', which is framed by a border of colourful butterflies. It appeals to me because of the cheerful bright colours, and the fact that it should be easy to frame in an embroidery hoop once completed. I have lots of odds and ends of embroidery silks in my stash, so I'm hoping to complete it without needing to buy any more. It might mean that some of the colours don't match up exactly to the original, but it should be close enough!

If I put my mind to it I should definitely be able to complete it by the end of January.

I have my project for February lined up already. It's a paint by numbers seaside scene, which I bought using some birthday Hobbycraft vouchers. I fancied having a go at some painting, and thought that a paint by numbers kit would be a good way to practice my brush skills. I made a pretty good start on it back in November, and then it got put away as the house filled up with Christmas bits. I'm looking forward to having it completed!

Paint by numbers sea scene in progress

Stay tuned, and hopefully this time next year I'll have twelve completed projects to share!

Monday 23 December 2019

Hama bead mini Christmas wreath magnets

Hama bead Christmas wreath magnets

These Hama bead wreath magnets are really simple to make and make a lovely gift at Christmas, especially when they contain the photograph of the giver!

The mini Hama bead wreath design can be made on any size circular pegboard, and all you need are some green and red beads. If you have them it's nice to have a selection of different green beads, but if you only have the one shade then that will work well too. You could also use different colours instead of the red beads - maybe a variety of different colours to look like coloured fairy lights!

Once the beads have been ironed, I like to leave them flat under some heavy books until they are cool, so that they keep a nice flat shape.

Related post - Ironing tips for Hama beads

Hama bead mini Christmas wreath design

In the centre of each wreath you need to glue a photograph. I like to keep the sample photographs that come from our school photographer as they are the perfect size for crafts like this and I know that my children will be looking smart!

Hama bead photograph magnets using magnetic tape

To turn the Hama bead wreaths into a magnet I used some magnetic tape. The tape is self-adhesive, and I find that it sticks really well for small Hama bead projects like this. But you can use any type of magnet, and if you aren't confident in the quality of your glue you can also add a piece of tape over the back to hold it firmly in place. I've found that glue dots work very well for sticking magnets down. 

Hama bead magnets with a Christmas theme

The wreaths are finished off with a small bow made from some narrow red ribbon glued into place. The children loved making these magnets, and it would be fun to make some each year with updated photographs so that we can see how they change over the years!

Hama bead Christmas gift magnets with photograph

If you enjoyed this craft you might like to see some more of my Hama bead crafts for Christmas.

Friday 20 December 2019

What happened when I deleted Facebook from my phone

For a while now I've been concerned about how much time I spend scrolling on my phone. It's something that was on my mind again recently after completing Scroll Free September. Although I could never be without my phone as I have many useful apps that I use regularly, I definitely waste a lot of my time in front of a screen. In particular it's Facebook, as I'm in lots of groups and am constantly hunting for something new to read.

So I decided to try an experiment and delete the Facebook app from my phone. For good measure I removed Twitter too, and when I discovered that I was turning to the BBC news app instead, that went as well. I wouldn't remove myself from Facebook entirely because I enjoy using it to keep up with family and friends and I do pick up useful information. But it's limited to when I'm on my desktop PC.

Here's what happened:


* I got out of bed quicker in the mornings without reaching for my phone and being pulled into all the new information on my screen.

* I found more productive ways to fill odd minutes of spare time, like having a quick tidy up or preparing something to help me later on, like getting things out ready to make dinner.

* I started going up to bed early to read, and the amount of reading that I've been doing has increased massively. I've also left a book in the car for when I'm waiting outside school.

* I've started new hobbies, like painting and watercolours, and picked up some of my neglected craft projects.

* I discovered that when I wasn't logging in to Facebook regularly the urge to check it faded immensely as I didn't know anything about what I might be missing.

* I also didn't feel the need to check Facebook when I was at my PC. Even though I'd not set any restrictions on myself I found it easy to avoid.

* I didn't miss out on anything important anyway.

* When I did log in, the algorithm began to show me more updates from family and friends, the things that I actually wanted to see.

* I started to see my phone more as a helpful tool rather than a guilty time suck.

* I got stuck in traffic. Well, it can't all be good. Because I hadn't checked in with our local village group over my lunch I didn't find out about a nearby road closure which added half an hour to my journey. Luckily I had allowed extra time!

Getting rid of Facebook on the phone
Photo credit Thought Catalog via Unsplash

The experiment has been a massive success for me. I really feel like I've gained so much extra time in my day and I've been so much more productive. I've not missed it at all, and it's made me think about my other apps and whether I really need them too. I definitely won't be putting it back on!

Monday 16 December 2019

Why I've started drinking tea

Despite growing up in a tea drinking family, I never drank a cup of tea until I was pregnant and tried raspberry leaf tea. Even though I liked it, as soon as the babies arrived I didn't have the chance to sit down with a hot drink. Ram doesn't drink any kind of hot drink either, so we just aren't in the habit of putting the kettle on throughout the day.

But recently I started taking a cup when it was offered to me, and trying out some different flavours during the day at home. I think it's because I finally realised that it's not about the taste of the tea, it's about the whole ritual. Taking the time to sit down with a hot drink, whether that's by myself at home or when out and about with friends. It's also a chance to sit down and gaze into space while I enjoy the hot drink, and it always makes me feel as though I'm living in Unsplash.

I always eat cake when I'm out for a drink with a friend, so having a cup of tea instead of my other preferred drink, a hot chocolate, means that I can save a few calories - especially as I rarely add milk. I love having a cup of tea in a cafe served from my own teapot, I feel so grown up!

Despite my growing familiarity, I'm still nervous to make a cup of tea for someone else at my house because it's such a personal thing and the process remains a little mysterious to me. Luckily, regular visitors to the house know that they will get a better cuppa if they make it themselves!

Cup of tea and some biscuits
Photo credit Rumman Amin via Unsplash

I am going to draw the line at starting to drink coffee though. Not only do I not like the taste, but the whole world of coffee is far too mysterious for me, I wouldn't have a clue where to start!

Friday 13 December 2019

Public transport etiquette

Collaborative post

As anyone that regularly travels on public transport will tell you, there is a certain etiquette to abide by which helps to make what can be a packed and unpleasant experience a little bit easier to manage. It is hard to know what the do’s and don’ts are for someone who does not use public transport often which can make it even more intimidating. Here is all that you need to know.

Keep Conversation to a Minimum 


First, you should always try to keep conversations to a minimum especially if you are on a packed train/tube/bus. People do not want to hear your conversations when in a cramped environment like this, so it is best to stay quiet. While it is okay to listen to music on headphones, you should avoid having a conversation on your phone or playing music through your phone without headphones.

Keep Bags Out the Way 


It is frustrating when you are on packed public transport when somebody is taking up a huge amount of space with their bag. This is why you need to keep it out the way as much as possible and never place the bag on a seat which someone could be sitting on.

Respect Privacy 


As with any situation, you should always respect people’s privacy while on public transport. This means not staring at people, being respectful and not initiating unsolicited conversations.

Give Up Seats 


If you have a seat on public transport but there is someone that gets on that needs it more than you, such as an elderly person, pregnant woman or someone on crutches, you should always offer your seat to them.

 Keep a Clear Walkway 


If possible you should try to avoid being in the aisle so that there is always a clear walkway. This can be challenging during rush hour during which you simply need to be willing to move out the way and help people to get on/off if they are struggling.

Let People Off First 


One of the biggest gripes that people have when using transport is people trying to get on before people get off. This is because these people need to get off at that destination and also because it means that there are more people on the transport than need to be which takes up more space.

Short & Long Distance 


You may find that the etiquette changes depending on the type of transport and the length of the journey. For a short 20-minute train journey from Hatfield Herts to Stevenage, for example, you should try to get a seat near the door, keep quiet, avoid eating and give up seats to those that need them more.

It is important to learn the proper public transport etiquette as not to annoy others while travelling. Generally, using common sense and decency is key and it is easy to quickly get the hang of things after a few trips.

Waiting on a train platform
Photo caption Roman Fox via Unsplash

Wednesday 11 December 2019

Counting down to the end of term

The end of the term is nearly here already! It's been a long term, but it has really flown by. These last weeks before Christmas are always so manic at school with all their festive events. The children are so tired, and it's much worse with the dark mornings, miserable weather and a string of colds. We all definitely need a break!

Even though school holidays are full on when I have the children all day, I do love having them at home. I'm glad to have a break from the stressful school run, from making packed lunches, and from trying to get everyone to bed at a reasonable time. I find it so much easier even if it does come at a cost - by January I'll be ready for some of the peace and quiet and uninterrupted time that I normally enjoy during the week!

I always spend the last week or so of term preparing myself and the house - making sure that the housework is all caught up, we have plenty of food in, and I have a few blog posts written and scheduled - I won't have much time for my own hobbies and ongoing projects!

It's been a good term for the children. Harry had a bit of a shaky start as he entered year six, and he felt a bit overwhelmed with a new timetable and new responsibilities. He is completely settled now but it did make me realise that we'll need to think ahead and plan for when he starts senior school next year. We definitely need some planning and coping strategies that we can put in place to help him.

Mia is feeling much happier and settled in her friendships which is wonderful, she's always felt a bit on the outside when it came to the girls in her class so it's been really nice to see her form some new friendships this term.

We had a bit of a wobble a few weeks ago when the children told us that we didn't spent enough time together as a family. We do spend lots of time together (this was just after we came back from holiday!) but Ram does work away from home a fair bit and I must admit that I'm often distracted by housework, cooking dinner, or just my phone. So I've been making a big effort to try and save those things for when the children are at school. We've begun playing a daily board game after dinner, much easier now that they can stay up a little bit later and much more fun now that they are old enough to play some proper games!

Children visiting Father Christmas

Here's to a fun last few days at school, and lots of family memories to be made over the next few weeks!

Monday 9 December 2019

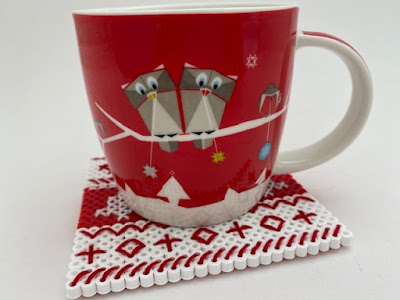
Scandi inspired Hama bead Christmas mat

I've often looked at Hama bead projects and thought that they would make a great base for cross stitch, so I decided to experiment a little by making a small Hama bead mat and seeing how well cross stitch would work. I was really pleased with the result!

Hama bead and cross stitch Scandi inspired coaster

I wanted to create a Christmas, Scandi inspired design, so I used red and white beads to make a large base for the mat. When ironing the base you need to make sure that you don't over iron and there are still nice big holes in the beads that you can easily fit your needle through. I also like to place large flat pieces underneath something heavy, like a pile of books, while they are still warm. This means that when the beads cool the piece will remain flat and not warp.

Related post - Ironing tips for Hama beads

Then you just need to stitch your design through the beads using embroidery floss! Be aware that it can take quite a bit of floss to complete the design. I googled for Scandi inspired images to get some inspiration.

Using cross stitch with Hama bead projects

The back of the piece looked quite messy when it was finished, so I used a small piece of felt on the reverse side, glued into place. This also helps to make sure that all the ends are secure. Just be careful to choose a shade of felt which matches the mat, as it may show through the holes.

Backing a coaster with felt

 Now I have a lovely little mat which makes a great festive coaster for my Christmas hot chocolate!

Hama bead and cross stitch Scandi inspired coaster

If you liked this craft, you might also like my Scandi inspired Hama bead battery candle holders which are designed to hold battery powered tea light candles.

Scandi inspired Hama bead battery tea light holders

I also designed some Scandi inspired Hama bead baubles for the Christmas tree with a free pattern!

Scandi inspired red and white Christmas baubles made with Hama beads

Friday 6 December 2019

Christmas gift ideas for readers

If you are looking for a fun or useful gift for the reader in your life this Christmas then look no further - I've collected together a lovely range of book and literary gifts that you may not have thought of, and that will definitely be appreciated by the book lover on your gift list!

Gift guide ideas for readers

For reading in bed


Bed is my favourite place to read, it's warm, cosy, and away from the rest of the house. We don't have many cushions so it can get a bit uncomfy, I'd love a proper support cushion so that I could sit up properly! I've also got my eye on one of these portable tables that you can prop up over your lap, the perfect place to keep a notebook and pen, a drink, and a plate of biscuits!

For reading on the move


When I go on holiday or for travelling I always take my Kindle, because I like having access to as many books as I can, including new titles and old favourites, so I always have something that I'm in the mood for reading. I find a waterproof case really useful, it's great for reading on the beach or by the pool (and I also use it at home for reading my Kindle in the bath!) A personal reading light is always useful, as the ones on planes don't always point where you want them to or might disturb fellow travellers. If you are reading while sitting in once place for long periods I like this tool that holds the pages open without causing you cramp in your hands

To mark a place


You can never have too many bookmarks! I know that I have loads, and yet I'm always hunting for a scrap piece of paper to use when I need one! You could buy a lovely personalised bookmark, or even have a go at making one yourself.

To make sure that books come back home


My library is very fluid, I'm always lending out books and passing on the ones that I've finished with. If you want to make sure that a particular book always returns to you it's a good idea to mark it in some way, whether that's with an embossed stamp or just a simple book plate.

To store and display the book collection


I love having my books on display, and there are some really unusual bookshelves around if you are looking for something a bit different. I can't also never have too many bookends, they are a great way of making your shelves look tidier, especially if you like to display other items as well as books.

I hope that you find some inspiration here!
Photo credit - Prasanna Kumar via Unsplash

Wednesday 4 December 2019

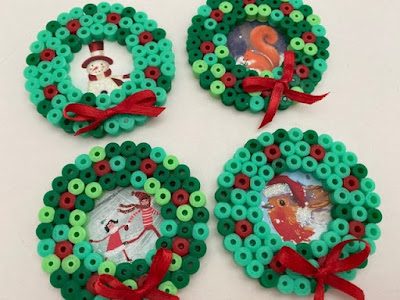
Hama bead Christmas wreath hanging ornaments

Hama bead Christmas wreath ornaments craft

These simple Hama bead Christmas ornaments are made using a basic wreath design. All you need is a circular pegboard (either the small or large size) and a selection of Hama beads in different shades of green along with a few red beads. If you only have the one shade of green, that will work too, and you could use different colours instead of red for some variety. For the decorative picture behind the wreath I used old cut up Christmas cards, and added a small piece of red ribbon to make a bow for the bottom.

First you need to make your Hama bead wreaths, and they are very simple to make. Once ironed, while they are still warm, I like to press them under a couple of heavy books while they cool to make sure that they keep a flat shape.


Small Hama bead wreath design and pattern

I chose to use a Christmas themed picture to fill the centre of the wreath, although I think they would work just as well if you left them empty! I delved into my collection of old Christmas cards which I cut up each year for making gift tags. You could also use Christmas wrapping paper, or pictures cut from festive magazines. You need a picture with a design small enough to fit neatly into the centre circle. Cut the picture to size and glue to the back of the wreath, I used white PVA glue to stick them firmly. You might also want to add a circle of coloured card to the back of the wreath so that the back looks neater, or you could even glue two of these ornaments back to back so that they can spin freely and look good on both sides.

Hama bead mini wreaths for hanging ornaments

I finished my Hama bead ornaments with a small bow made from a narrow red ribbon and glued into place. 

Hama bead wreath mini Christmas ornaments

Then all you need to do is to add a loop for hanging. I used red embroidery floss and used a needle to thread it through one of the Hama bead holes at the top. Even if you have ironed your project more than I have and the hole has started to close you should still be able to poke a needle through, or else you can just use glue or tape to attach the string. And you're done!

Hama bead mini wreath ornament tutorial

If you liked these Hama bead Christmas ornaments, then you might also like these Hama bead and ribbon baubles!

Hama bead and ribbon Christmas bauble ornaments

For more Hama bead Christmas crafts, take a look at my selection of Hama bead Christmas crafts for children.

Monday 2 December 2019

The crafting projects that I'll be working on this Christmas

I love crafting at Christmas time. I'm an indoors sort of person anyway, and when it's cold and dark outside I'm always happy sitting somewhere warm with a craft project on the go. This Christmas I have a few things lined up that I want to work on, and hopefully I'll be able to get a few of them finished!

My current large project is my Persian Tiles crochet blanket which I received for Christmas a couple of years ago. I've been working on it in bursts and I'm doing really well with it - I only have three octagons, eleven triangles and the border to do. I've already sewn together the pieces that I've finished and it's looking really good, it's definitely given me the motivation to get on and get it completed.

Persian Tiles crochet blanket nearly finished

Then I have a few Christmas themed craft kits to work on. I bought this mini cross stitch kit from Hobbycraft last year. They quite often have some reasonably priced little cross stitch kits, usually cleverly displayed by the checkout so that you can't miss them as you enter or while you are queuing. It's a sweet little design, I might turn it into an ornament or small framed picture.

Hobbycraft mini Christmas cross stitch kit

I received these felt Christmas ornament kits to review earlier this year, and while I've finished the owl I still have the others to work on. They are quite quick and easy to complete and there is plenty of scope to experiment with different colours and stitches to make them unique.

Felt Christmas ornament kits

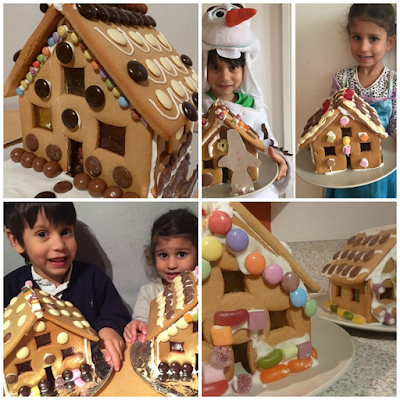
I definitely want to make gingerbread houses again this year. I've always got on well with making them (the trick is to use royal icing, and to make it nice and thick) and it's a lot of fun. They taste delicious too! For the last couple of years I've made two mini houses so that the children have one each to decorate, maybe this year I'll make one all to myself!

Selection of our gingerbread houses

And finally of course there is one Christmas crafting project which I'm really pleased to have completed well before Christmas - my Christmas ABC Sampler. I was always intending to have it finished ready for Christmas 2019, and right on schedule it's all framed and ready to be displayed proudly by the fireplace.

Christmas ABC cross stitch sampler

Will you be working on any crafting projects this Christmas?

Saturday 30 November 2019

Review - Hidden Wonders and Wild in the City - two new kids books from Lonely Planet

I received a copy of these books to review. This post contains Amazon affiliate links.

Today I'm sharing a review of two wonderful new books from Lonely Planet - Hidden Wondersand Wild in the City. We are big fans of Lonely Planet books in this house and these two are great additions to our collection - they are both brilliant books for children to browse through and pick up all sorts of interesting and fun facts.

New books from Lonely Planet kids review

Hidden Wonders

Hidden Wonders brings together a collection of strange and wondrous places from all around the world, both natural and man-made. There are 150 delights to be discovered, like Hidden Beach which is only accessible through a water tunnel linking it to the Pacific Ocean, or Lake Hillier in Western Australia which is bright pink! Some are places that anyone can visit, but many of them are a little more difficult to get to.

Hidden Wonders from Lonely Planet Kids

This collection of the planet's wildest and weirdest places is divided into sections according to their lines of longitude, and each attraction has a dedicated page with such enticing photography and descriptions that you want to rush there and see it immediately. I'm fairly well travelled and almost all of these places were new to me - it's an amazing book to spark a desire for exploration and discovery!

Hidden Wonders book review inside

Wild in the City

Wild in the City shares the secret lives of more than 30 extraordinary creatures that share our cities. Although the city might seem an unlikely place for animals to thrive, there are a surprising number of animals that have learned to make the most of city life, whether they have recently moved in or have learned to adapt to their surroundings.

Wild in the City from Lonely Planet Kids

The book features animals from around the world, from the Red Foxes that we are used to seeing around where we live, to more intimidating creatures like the Reticulated Pythons that roam Jakarta or the Polar Bears that wander the town of Churchill in Canada. The book is beautifully illustrated, and is divided into sections that cover each type of animal, for example mammals, reptiles, bugs and birds.

Wild in the City book inside

There are several pages dedicated to each animal, along with information about how the animals survive in this environment and how they are affected by human activities and buildings. There are also tips for spotting them, and the signs to look for that point to their presence. The book includes lots of information as to how we can make sure that our cities are a home for both us and the local wildlife.

Children's books from Lonely Planet Kids

Both of these books would make a wonderful gift for a child this Christmas!

Friday 29 November 2019

Launching my social media Advent Calendar of Christmas crafts

Christmas crafting countdown logo

Every year as Christmas rolls around I go back through my catalogue of old blog posts and pull out my favourite Christmas crafts ready to share them again on social media. I've been blogging now for over eight years, and during that time I've published a lot of blog posts, many of them featuring seasonal craft projects that I've worked on by myself or with the children.

This year I was pleasantly surprised to discover just how many Christmas crafts I've shared here on the blog over the last few years! So I decided that I wanted to make the most of them, and I've put together my favourite 24 crafts to share on my social media channels as a Christmas Crafting Countdown. Every day in December I'll be publishing a link to one of my Christmas crafts on both Twitter and Facebook, and hopefully it will give my followers some fun ideas for Christmas crafts to keep themselves and the children busy as we look forward to Christmas.

As a reminder, if you aren't following me already you can find me here:

Twitter - Jennifer Jain


Facebook - Jennifer's Little World blog

I hope that you will come and follow along!


Wednesday 27 November 2019

Hama bead gift ideas for all ages and abilities

Where would my Hama bead craft blog be at this time of year without a Hama bead gift list? I've used many different Hama bead products and kits over the last few years, and so I thought I'd put together some gift ideas if you are thinking about buying Hama beads for friends and family. I've included some ideas for Hama bead crafters of all ages, as well as a couple of extra ideas for those people that already enjoy Hama beads and might be looking for something a bit different.

For young children - the very first Maxi Hama bead kits


Maxi Hama beads are the very largest size of bead, and are aimed at children around 3 or 4 years old. I must confess that my children started on the next size up, the Midi beads, straightaway so we never used this size of bead, but they look like a brilliant product for young children and would also be very easy to reuse if you didn't actually iron them - a great way to improve fine motor skills. A kit would probably be a good place to start although might be a bit limiting as the boards can only be used to make one shaped design. A tub of beads and a simple pegboard or two would be a fab way to spark their creativity.

For older children - working with the Midi Hama beads


The Midi Hama beads are the most popular size, and are aimed at children aged five and over or adults. They can be used by younger children (I wrote here about my daughter using them when she was two) but little ones will need to be very carefully supervised to make sure that the beads don't end up somewhere that they aren't supposed to be.

If you know that your recipient already enjoys using Hama beads, then you can't go wrong with a large box of mixed colours. If you want to introduce them to the craft then there are some brilliant gift sets available to get them started by working on some fun and easy projects. In my experience these kits always contain plenty of beads so that there will be some left over to make some other items, and they often come with some fun, shaped boards.

For adult crafters - making projects using mini Hama beads


Related post - Hama bead projects for adults

I personally love working with the Mini Hama beads, because you can use them to create some really intricate and detailed projects. They can be fiddly to use though, especially at first! If you are buying Mini Hama beads for an adult crafter I'd recommend beginning with a kit to get them started. However if you know that your recipient already enjoys using the mini beads, then there are some really good value packs of mixed beads available which include many beads in a wide range of colours.

Related post - A guide to mini Hama beads

For seasoned Hama bead crafters


I'm pretty sure that any regular Hama bead crafter would be very happy with a massive tub of mixed Hama beads in either mixed or plain colours - I know that I would! But there are also some fun themed Hama bead kits available that might inspire them to try out some new ideas. Finally, a pretty and practical storage solution for all those beads would definitely be welcome!

You could also point them towards my blog post sharing an entire year of Hama bead project ideas - An entire year of Hama bead project ideas

Monday 25 November 2019

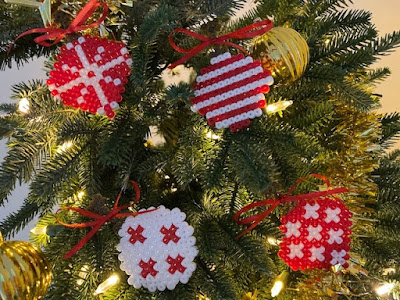
Scandi inspired Hama bead bauble Christmas decorations

This post contains Amazon affiliate links

These Hama bead baubles are inspired by a Scandi Christmas theme of red and white. They are really easy to make using the square Hama bead peg board, and the only colours that you need are red and white, with gold Hama beads or yellow to make the hanger at the top. You can find links to buy the products that I used at the bottom of this post.


I have designed these Hama bead baubles in two different patterns - a round bauble and an elongated bauble - and you can find the simple patterns that I used below. You can easily reverse the colours to make them look different, and there are plenty of ways that you can come up with your own designs!

Round Hama bead bauble free pattern

Free pattern for round Hama or Perler bead baubles

Elongated Hama bead bauble free pattern

Free pattern for Hama bead or Perler bead Christmas ornament designs

Make your designs on the square peg board, using Hama, Perler, or similar branded beads, then iron them so that the beads melt together. When I've ironed my Hama bead pieces I like to leave them underneath something heavy for a short while so that they cool flat.

Related post - Ironing tips for Hama beads

Hama bead baubles with Scandi design

To finish the baubles you can tie some ribbon in a bow around the top. If you want to use a thinner ribbon then you can reduce the size of the hanger. Or you don't need to use ribbon at all - just don't add in the hanger part at all, or make it much smaller, and thread the cotton for hanging the ornament through the top beads.

Hama bead Christmas baubles with ribbon

You could also experiment with different colours and patterns of ribbon - I think that a red and white checked or striped ribbon would look good!

Scandi baubles made using Hama beads

I also think that these Hama bead baubles are perfect to pop inside a Christmas card, or to use as a gift tag on a present!

Hama bead Christmas ornament baubles with a Scandi theme tutorial

To hang them on the tree, just thread some cotton through the top of the bauble. I find that the hole is usually large enough to fit a needle, or else the beads are soft enough that the needle can be easily pushed through them.

Hama bead Christmas ornaments on the tree

If you like the way that Hama beads can be used to create Scandi themed ornaments then you might also like these Scandi inspired Hama bead battery candle holders which are designed to wrap around battery tea lights for a festive glow.


I also made this Scandi inspired Hama bead mat for my daily mug of hot chocolate.

Scandi inspired Hama bead drinks mat pattern

And if you like these Hama bead Christmas ornaments and want to try a different variation, you might like these Hama bead bauble Christmas tree ornaments made using different coloured beads and festive ribbon.