Showing posts with label mini hama beads. Show all posts

Wednesday, 4 October 2023

Free - mini Halloween pixel art designs for Hama beads or cross stitch

With Halloween approaching, I thought I would use my newly organised Hama bead supplies to make some little Halloween Hama bead pieces! These designs are very small (they measure about 3-5cm across) and so they don't use too many beads. They would also be great for cross stitch or other pixel art crafts. I came up with designs for a moon and star, a bat, a skull, a ghost, a pumpkin and a witch's hat.

Free Hama bead Halloween designs and patterns

Here are the patterns for the designs. You can vary the colours of course based on what colour beads you have available - I have plenty of grey beads so I used those for the ghost, and the skull is made from an unusual off white shade that I found in my stash.

Free mini Halloween pixel art designs for Hama beads or cross stitch

These designs can all be assembled on the basic square pegboard. If you are new to Hama beads then you might find this post useful - Ironing tips for Hama beads. You can find links to some useful supplies at the bottom of this post.

Ways that you could use the finished Hama Halloween bead pieces:

To stick to place card for a Halloween party

Scattered across a Halloween party table

As Halloween party bag gifts

Make into magnets or keyrings

Make into bunting or strings as Halloween decorations

Use as gift tags for Halloween presents

Hand to trick or treaters for a sugar free alternative

Add a cord to make a spooky pendant

If you enjoyed this post then you might also like my round up of Halloween Hama bead crafts!

You can find all my Hama bead posts here - Hama bead crafts

Monday, 28 March 2022

Hama bead and cross stitch Easter egg designs

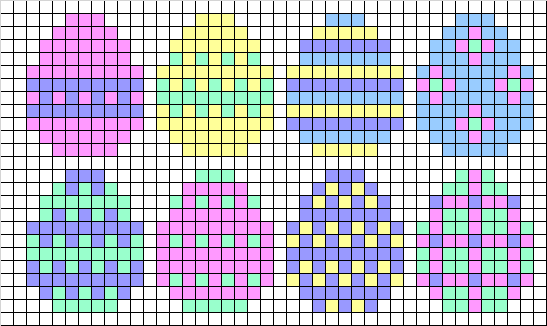
Today I am sharing some Easter egg designs which are perfect to use with Hama beads, or else they would also work really well for any cross stitch or other pixel art crafts.

These designs can be made using a square Hama bead pegboard, which most Hama bead crafters will have in their collection as it is easily available and comes with many Hama bead sets. They are a good way to make Easter egg designs if you don't have the specially shaped Easter egg pegboard (affiliate link).

To make my designs I used beads from a pastel mix of beads. I have used a slightly darker shade for the pattern so that the colours will show up well when printed. You need beads in pastel pink, blue, green, yellow and purple. But of course you can always mix and match with whatever coloured beads you have available.

The designs would also look good made up with the tiny mini Hama beads. You can see some of my mini Hama bead Easter eggs here where I have used a darker colour palette and used them to decorate some Easter nest cakes.

Hama bead and cross stitch Easter egg designs and patterns

To make the designs you just need to lay the beads out on the pegboard before covering with ironing paper and ironing so that the beads fuse together. If you are new to Hama beads then you might find this post helpful - Ironing tips for Hama beads.

These Hama bead Easter eggs can be used for a range of crafts and I have a few ideas in mind which I will be sharing here shortly!

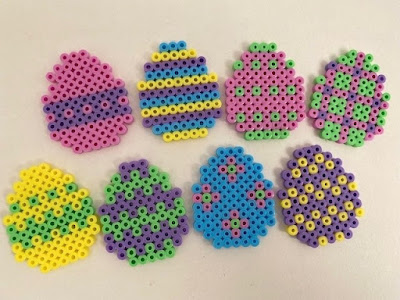
Hama bead Easter egg designs

If you have enjoyed this post then you might also like to see some other Easter crafts using Hama beads. Some of these Hama bead Easter crafts are made using the Easter egg shaped pegboard.

Friday, 14 January 2022

Winter snowflake lantern with mini Hama beads

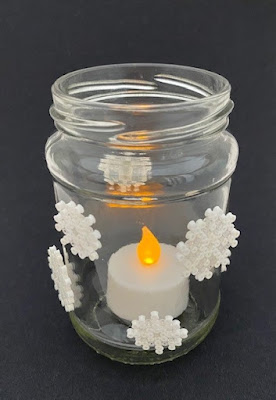
A few days ago I shared how I made some mini Hama bead snowflake embellishments and today I'm going to show how I used them to make a simple lantern from an upcycled jam jar. 

Snowflake lantern from a jam jar using mini Hama beads

To make the snowflake embellishments you need some mini Hama beads and a mini Hama bead pegboard. You can find links to the materials that you will need at the bottom of this post. The mini Hama beads are very tiny and take some practice to work with - you can find all the instructions and the free snowflake pattern in my mini Hama bead snowflakes tutorial as well as some tips for working with the tiny mini Hama beads. 

How to make mini Hama bead snowflakes

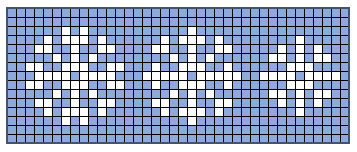
I made six mini snowflakes to decorate my jar. You will see that because they are so delicate the snowflake pattern includes transparent beads which are hardly visible when the snowflakes are in position on the jar. 

Mini Hama bead snowflake embellishments

Then you just need to find an old jam jar which is a good shape for holding a candle. One with a wide neck is best so that you can easily light the candle. This lantern is suitable for both battery powered candles and real tealight candles.

To stick the mini snowflakes to the jam jar a glue dot works really well as it is transparent and will hold the embellishment firmly. You can also use glue, or for a temporary lantern a blob of Blu Tack also works really well, although it may show through from the other side of the jar.

It makes a great winter or festive decoration!

Jam jar winter lantern decorated with snowflakes

You can find my tutorial for the mini Hama bead snowflakes here. Below are the products that you need to make the snowflakes. I have made these snowflakes using mini Hama beads which are not the size which is commonly used. Make sure that you are buying the correct size board and beads. 

Friday, 7 January 2022

Mini Hama bead snowflake designs

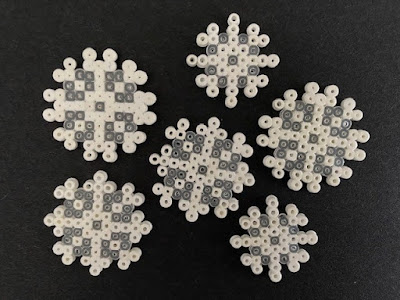
I love crafting with mini Hama beads, you can make some really detailed and delicate pieces which are great for embellishing cards or adding to other decorations around the home. Today I'm sharing some designs that I've created for mini Hama bead snowflakes. The mini Hama beads are so tiny that each snowflake measures about 1.5cm - 2cm in diameter. 

Just a quick note to say that I know a snowflake should have six sides, but having spent ages with my graph paper trying to design a six sided snowflake upon such a small scale I sadly had to admit defeat!

I began with these simple snowflake designs. These snowflake patterns will also work beautifully for all pixel art crafts, for example cross stitch, diamond painting or digital artwork. 

Free mini pixel art cross stitch snowflake designs

However these snowflake patterns will not work for Hama beads unless you create a background using the beads as they are too fragile and the beads cannot fuse properly. If you want the snowflakes to be used with Hama beads but without a background then you need to add some transparent beads to the design. The finished snowflakes are still fragile, but have enough stability to keep them together. The light grey squares represent the transparent beads. 

Free snowflake pixel designs for mini Hama bead crafts

These designs will work for all Hama bead sizes, but I have chosen to make my snowflakes using mini Hama beads as they are so delicate and I think they make perfect snowflakes. The beads are very tiny, about the size of a single cross stitch. If you are new to crafting with the mini Hama beads then you might like to read my helpful post - A guide to mini Hama beads which has lots of tips for using these tiny beads.

The snowflake designs are created using the square pegboard. Make sure that you are using the correct size pegboard for your beads. The best way to work with the tiny Hama beads is to use tweezers to position them on the board. 

Mini Hama bead snowflakes on pegboard

When you are happy with the layout of your beads you can cover them with ironing paper and iron to fuse the beads together. You need to be very careful when ironing mini Hama beads. Make sure that the iron is on a low or medium setting and only press for a second or two. You can find more tips for ironing Hama beads here - Ironing tips for Hama beads. I like to iron my designs lightly on both sides to make sure that the beads are firmly melted together in place. 

Here are my finished mini Hama bead snowflakes! I do have a craft or two in mind for them which I will be sharing shortly here on the blog. 

Mini Hama bead snowflakes craft

Please note that this craft uses mini Hama beads which are not the standard size Hama beads. Make sure that the beads and pegboard you buy are both same size, as the beads and boards are available in three sizes - mini, midi and maxi. If you buy a bag of mini Hama beads in mixed colours then you should have enough white and clear beads to make some snowflakes (although you'll have to sort through to separate the colours!)

Wednesday, 8 December 2021

Mini Hama bead Christmas pin badges

Mini Hama bead Christmas pin badges tutorial

I recently shared some free mini Christmas pixel art designs that I created, and I promised to share how I had used them for festive crafts. You can see the free patterns below, or you can download them here - mini Christmas pixel art designs to download. They are perfect for cross stitch, or any other pixel based craft like Hama beads. 

Free mini Christmas pixel art designs for cross stitch or Hama beads

I have already shared the mini Hama bead Christmas embellishments that I made using these designs, and I decided to use some of these embellishments to make some simple pin badges. Note that not all of these designs will work well as badges, you need to choose a design that has plenty of opportunity for several beads to stick together - the snowflake and star designs for example won't work for this craft.

Mini Hama bead Christmas designs

To make the pin badges first you need to create the design on the pegboard using mini Hama beads. If you haven't used mini Hama beads before then you might find this post useful - A full guide to working with mini Hama beads. The procedure is the same as for the larger beads but these beads are tiny and quite fiddly to work with. The best way to place them on the board is with tweezers. 

Mini Hama bead Christmas embellishments

When you are happy with your bead placement then it's time to iron them. If you don't have much experience with Hama beads then you might find this post useful - Ironing tips for Hama beads. In particular you need to take special care with the mini Hama beads as they don't require very much ironing at all. Make sure that the iron is on a medium or low setting and press lightly on the beads for no longer than a second at a time. I like to iron the beads on both sides to make sure that they are secure.

Mini Hama bead Christmas pin badges

Then all you need to do is to attach a clutch back and blank pin set, these are also known as butterfly pins. They are easily available to buy and are not too expensive for a big bag. I used superglue to stick the pin part to the back of the Hama bead design.

Mini Hama bead Christmas pin badges on Santa hat

Just note that these pin badges are not super sturdy, and they are best used in places where they won't encounter too much wear and tear. They are better used for display, or to embellish a Christmas decoration, like this Santa hat. 

I'm really pleased with my sweet little Hama bead pin badges!

Mini Hama bead pin badges close up

If you enjoy festive crafting with Hama beads then you might also like this post - Hama bead Christmas crafts

Wednesday, 24 November 2021

Mini Hama bead Christmas embellishments

Recently on the blog I shared some free mini Christmas themed pixel art motifs that can be used for many crafts, including cross stitch and Hama beads. I love working with mini Hama beads in particular, so I decided to use my designs to make some sweet little mini Hama bead Christmas embellishments. They could be used for Christmas cardmaking, as little cake decorations, as Advent calendar fillers or for all sorts of Christmas crafty projects!

If you are new to working with mini Hama beads you might like my post A complete guide to crafting with mini Hama beads. 

To make these mini Hama bead Christmas embellishments I used my free Christmas pixel art designs which you can find below. They are also available to download as a .pdf file here for easy printing - Mini Christmas pixel art designs to download.

Mini Christmas pixel art cross stitch designs and patterns for free

To create my designs I used a large square mini Hama bead pegboard, and you could also use the small square pegboard. When working with the mini Hama beads I find it necessary to use tweezers to place the beads on the board. They are very tiny and can be very fiddly to craft with! When you are happy with the position of your beads on the board then you need to cover them with ironing paper (baking paper will also work) and iron them very carefully.

Mini Hama bead Christmas designs on pegboard

To iron mini Hama beads I use the iron on a low setting and hold over the beads for a very short period of time, probably less than a second. There is an art to ironing these tiny beads which comes with practice. I iron my designs on both sides to make sure that the beads are firmly fused.

If you are new to crafting with Hama beads you might find this post helpful - Ironing tips for Hama beads. 

Then your mini Hama bead embellishments are finished! They are surprisingly durable and I love how they look when complete. Each one measures about 3cm in height. They are really fun to make, and I can think of all sorts of uses for these little pieces. 

Mini Hama bead Christmas embellishments

For example, I used some of them to make some mini Christmas Hama bead pin badges which are a great way to decorate a festive outfit or hat.

Mini Hama bead Christmas pin badges

Monday, 12 October 2020

Free cross stitch patterns - Simple small Halloween designs

Today I'm sharing some very simple Halloween pixal art designs that would be perfect for Halloween themed cross stitch samplers or Hama bead projects. Because I designed these patterns originally for Hama beads I've added some pictures so that you can see what they look like made up with both midi and mini Hama beads. I'm planning to use some of them for my cross stitch map, as we have often found ourselves celebrating Halloween while on our travels around the world!

This first set of designs are very small and simple, using just a few colours. I have a cross stitch witch's hat, a skull, witch's face and tiny pumpkin.

Mini cross stitch Halloween designs

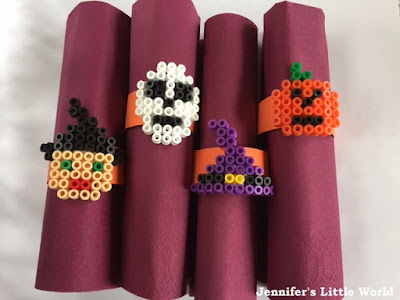
These simple designs were used to make these Hama bead Halloween napkin rings, a lovely seasonal decoration for a Halloween themed dinner table. 

Hama bead Halloween themed napkin rings

This next set of Halloween pixel designs are slightly larger. There's a pumpkin, a ghost, skull and witch's hat. 

Halloween free mini cross stitch designs simple

I used these designs to make some Mini Hama bead Halloween pin badges for some spooky Halloween party accessories. 

Mini Hama bead Halloween designs

Finally I designed these simple Halloween sugar skull patterns. The basic pattern can be changed to fit the colours that you have available or that fit your theme. You can use both pastel and bolder colours, and choose contrasting or complementary colours. There are all sorts of ways that it can be adapted!

Free Sugar Skull simple cross stitch design

I used this design to make some larger Hama bead Sugar Skull bunting and I used the midi Hama beads to make tiny Mini Hama bead Sugar Skull earrings.

Hama bead Halloween Sugar Skull designs

I hope that you like these Halloween themed designs! If you make something using them I'd love to see it! 

If you like Halloween style pixel art, you might also like to see some of my other Hama bead crafts for Halloween. 

Thursday, 11 June 2020

Top tips and tricks for crafting with Hama beads

I've been crafting with Hama beads for a long time, and over the years I've shared many of the Hama bead projects that I've made, both with the children and for adults. I thought I'd share a quick guide to crafting with Hama beads, the essential supplies, and a few tips and tricks for new Hama bead crafters.

Hama bead crafting tips and tricks

Hama bead supplies and equipment - what you need


To create a Hama bead project you need some Hama beads and a pegboard to lay out your design. You will also need an iron and some ironing paper. There are many Hama bead kits available that contain everything you need along with themed inspiration and ideas, but personally I prefer to buy my supplies separately and use them to work on my own projects. This means that you can buy the extra colours that you need (I seem to use a lot of black and red!) and over time you can build up a collection of different shaped boards. As for the ironing paper, baking or parchment paper that you can use for baking both work perfectly.

Hama beads are available in three different sizes - Maxi, Midi and Mini. The Maxi beads have a diameter of 10 mm and are aimed at young children completing their first Hama bead projects. The Midi beads measure 5 mm in diameter and are the most common size of bead. These are the beads that I most often work with, and they are suitable for both children and adults to use. The smallest beads are the Mini beads, and with a diameter of 2.5 mm they really are very tiny. It's easiest to manipulate them with tweezers, and they are definitely more suited to teenagers and adults as they are very fiddly to use.

If you are new to Hama beads I would recommend starting with the Midi beads. You can buy these beads in large tubs of beads in a range of colours, and the tubs often include a few pegboards to get you started.

If you are looking to buy a pegboard or two I'd recommend starting with a square, hexagonal and circular board as these will allow you to create a wide range of designs. The pegboards can be used over and over again, as long as you are careful not to over iron your projects (see more ironing tips for Hama beads below)

You might also want to take a look at my Hama bead gift guide for some more Hama bead inspiration.

Hama bead supplies and equipment - where to buy


I used to buy most of my supplies in my local craft store until they discontinued the range. Since then I buy most of my beads on Amazon as I find that they are the most reasonably priced, especially for the larger boxes. It's definitely worth keeping an eye out as the prices can fluctuate widely.

Hama beads can be expensive and sometimes it's tempting to look at the cheaper non-branded alternatives. In general I'd advise steering clear of these imitations, as the quality is very poor and they can be difficult and disappointing to work with.

However an exception is the Picture Beads sold by Hobbycraft. I've used lots of these Hama style beads and found that they are nearly as good as branded Hama beads. Hobbycraft sell their beads in mixed bags of related colours, like blues and greens, and they are much cheaper, especially if you catch them on special offer. They are exactly the same size as branded Hama beads and can be used interchangeably with your Hama beads and Hama branded pegboards.

I have also bought Perler branded beads when on holiday in the US and found that these work very well, although they are slightly more brittle in texture once ironed. Perler beads are available in a wider range of unusual colours as well as striped beads, so they are good for adding a bit of interest to a piece.

Hama bead kits


If you don't want to commit to buying too many supplies, or you are buying a gift for someone as an introduction to Hama beads, you might want to think about starting with a kit. There are so many available, and I've put a selection below. Some of the kits have very specific theming, for example based around Disney characters, and others are more general. In my experience the kits contain far more beads that you will need for the projects suggested, so if you find a kit on sale then it can be a good value way of building up your Hama bead collection.

Tips for working with and ironing Hama beads


To create a Hama bead project you just position the beads on the pegboard in your design. There is plenty of inspiration online including lots of projects right here on this blog. For example my entire year of themed Hama bead crafts! If you are creating your own design, make sure that all the beads touch each other, and preferably on more than one side. This is particularly important if you want to create a more durable item like a keyring or coaster.

Hama bead project ideas for all different seasons and holidays

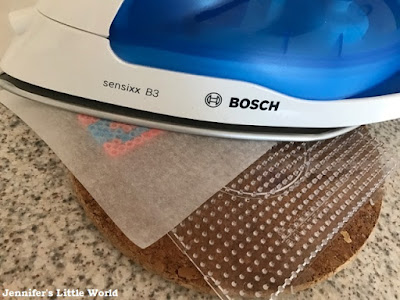
Then just lay a sheet of ironing or baking paper over the beads and press lightly with an iron to fuse the beads together.

I've shared some detailed tips for ironing Hama beads here - Ironing tips for Hama beads. In general you want to make sure that the iron is not too hot, that you keep the iron moving continously over the beads, and that you don't iron the design for too long - just a few seconds is enough before doing a quick check. When you can see the colour of the beads showing through the paper then that's a good indicator that it is ready.

It's a matter of personal preference as to how much you iron the beads. I like to leave the holes in the beads visible but some people like a smoother look. Just be careful not to over iron as this will make the beads impossible to remove from the board, and may warp and damage the board.

I like to iron my designs on both sides to make them more sturdy. Once I've ironed my design I place it underneath something heavy for a few minutes. This ensures that the finished design lays flat, which is particularly important for larger pieces.

How to iron Hama and Perler beads

How to store your Hama bead supplies


I like to sort my Hama beads by colour, and I store them in segmented storage boxes. I like the ones that can vary the sizes of the compartments, depending on how many beads I have in that colour. You can find some more of my tips here - How to organise Hama beads. If you want to sort your beads by colour it can be quite a tedious task, albeit a satisfying one! I found a brilliant tutorial for a simple Hama bead sorter which definitely looks worth a try!

I store my Mini Hama beads in pill organiser boxes which I find are the perfect size and make it easy to remove the beads.

I store my pegboards upright in a shoebox so that I can easily flip through to find the one that I need.

Hama beads sorted by colour in compartmentalised box


Some simple Hama bead projects to start with


I have loads of ideas for Hama bead projects right here on my blog! You can take a look at my dedicated Hama beads page for some inspiration.

You might like to make a start with some Hama bead mandala style patterns on a circular board, maybe experiment with some different Hama bead coaster projects or perhaps have a go at some Hama bead emoji magnets.

Hama bead emoji magnets

Hama beads for adults - Mini Hama beads


If you are an adult looking to craft with Hama beads you might be interested in taking a look at the Mini Hama beads. I've written a full guide on working with the Mini beads which you can read here - Mini Hama bead crafts - a guide

Because the Mini beads are so small they allow you to create some really detailed and intricate projects, and are a very satisfying craft to work on.

Selection of Mini Hama bead projects

I hope that this article has been helpful if you need some help using Hama beads, or if you are thinking about trying them!

Wednesday, 27 November 2019

Hama bead gift ideas for all ages and abilities

Where would my Hama bead craft blog be at this time of year without a Hama bead gift list? I've used many different Hama bead products and kits over the last few years, and so I thought I'd put together some gift ideas if you are thinking about buying Hama beads for friends and family. I've included some ideas for Hama bead crafters of all ages, as well as a couple of extra ideas for those people that already enjoy Hama beads and might be looking for something a bit different.

For young children - the very first Maxi Hama bead kits


Maxi Hama beads are the very largest size of bead, and are aimed at children around 3 or 4 years old. I must confess that my children started on the next size up, the Midi beads, straightaway so we never used this size of bead, but they look like a brilliant product for young children and would also be very easy to reuse if you didn't actually iron them - a great way to improve fine motor skills. A kit would probably be a good place to start although might be a bit limiting as the boards can only be used to make one shaped design. A tub of beads and a simple pegboard or two would be a fab way to spark their creativity.

For older children - working with the Midi Hama beads


The Midi Hama beads are the most popular size, and are aimed at children aged five and over or adults. They can be used by younger children (I wrote here about my daughter using them when she was two) but little ones will need to be very carefully supervised to make sure that the beads don't end up somewhere that they aren't supposed to be.

If you know that your recipient already enjoys using Hama beads, then you can't go wrong with a large box of mixed colours. If you want to introduce them to the craft then there are some brilliant gift sets available to get them started by working on some fun and easy projects. In my experience these kits always contain plenty of beads so that there will be some left over to make some other items, and they often come with some fun, shaped boards.

For adult crafters - making projects using mini Hama beads


Related post - Hama bead projects for adults

I personally love working with the Mini Hama beads, because you can use them to create some really intricate and detailed projects. They can be fiddly to use though, especially at first! If you are buying Mini Hama beads for an adult crafter I'd recommend beginning with a kit to get them started. However if you know that your recipient already enjoys using the mini beads, then there are some really good value packs of mixed beads available which include many beads in a wide range of colours.

Related post - A guide to mini Hama beads

For seasoned Hama bead crafters


I'm pretty sure that any regular Hama bead crafter would be very happy with a massive tub of mixed Hama beads in either mixed or plain colours - I know that I would! But there are also some fun themed Hama bead kits available that might inspire them to try out some new ideas. Finally, a pretty and practical storage solution for all those beads would definitely be welcome!

You could also point them towards my blog post sharing an entire year of Hama bead project ideas - An entire year of Hama bead project ideas

Wednesday, 30 October 2019

Mini Hama bead owl picture

This post contains an Amazon affiliate link.

I'm busy working through my crafting to do pile, and this weekend I picked up a mini Hama bead kit which I've been looking forward to working on - the Small Mini Bead Owl Kit (affiliate link). Although I often come up with my own Hama bead designs I also like working from kits - there are some really sweet ones out there!

Mini Hama bead owls kit in progress

The Owl kit contains everything that you need to make the four different owl designs - a hexagonal mini Hama bead pegboard, ironing paper, easy to follow pattern and plenty of beads. Enough beads in fact to make a few more owls, so you don't need to worry if you lose any. The only other thing that you would find useful for the craft is some tweezers, as they make positioning the beads much easier. You can find lots of tips for using the mini Hama beads, as well as a tutorial video, in my blog post here: Mini Hama bead crafts - A guide

Mini Hama bead owl designs

Mini Hama beads can be quite tricky to iron and even though I've used the beads before I still had a few mishaps! It's important to have the iron on a low setting and not heat the beads for too long as they melt very quickly. Unfortunately I have a tendency to be over cautious and not iron for long enough, meaning that the beads fall apart when I remove them from the pegboard - it's a very fine balance to get it right!

Related post - Ironing tips for Hama beads

Once finished, these owls would make lovely magnets, or you could even turn the smaller ones into pin badges like these Mini Hama bead heart badges. But I wanted to have them on display, as I like the fact that there are two adult owls and two child owls, reminding me of the members of our family.

I cut a small piece of poster board to an appropriate size (it measures about 18cm by 8cm), and mixed some acrylic paint to a shade of green that coordinated well with the colours of the beads. I painted a couple of coats, and when it was all dry I stuck the owls to the board using glue dots, which I've found work really well for mounting smaller and lighter Hama bead pieces. When mounting ironed Hama bead pieces, make sure that you choose the best side as sometimes the beads on one side will look better than the other.

I wanted to display the picture on my magnetic white board so I used some magnetic tape on the back, but you could just use blu tack or similar to stick it up as it's still very light.

I'm really pleased with my sweet little owl picture!

Mini Hama bead owl picture

If you liked this mini Hama bead craft, you might also like my Mini Hama bead Russian Doll picture which is made using mini Hama beads in a wide variety of colours, and mounted on a cardboard background in a similar way.

Mini Hama bead Russian doll craft

Monday, 28 October 2019

Hama bead gifts for adults

Gifts for adults made using Hama beads

With Christmas approaching fast, if you want to get creative and craft some of your own Christmas presents it's definitely time to be thinking about it. A few weeks ago I shared a blog post with some Hama bead projects that children can gift to their friends, and so I thought that I'd follow this up with a post on Hama bead projects that make great gifts for adults.

Some of these crafts are brilliant for children to make for the adults in their life, but there are also some projects, particularly those using the tiny mini Hama beads, that are fun to make for your own adult friends that can be both useful and decorative!

Related post - Ironing tips for Hama beads

These Hama bead covered pen holders are really easy to make, and take advantage of the way that an ironed Hama bead piece is pliable while still warm and can be moulded into different shapes. The Hama beads are ironed as a flat design, and then curved to fit the shape of the jar or tin before being glued into place. They are a fun way to brighten up the desk, and also make useful storage.

Hama bead covered pen holders made from jam jars and tins

I love the Tiled Russian doll picture that I made a few years ago, and it sits on a small wooden easel above my desk. It's a really nice decorative piece, and the mini Hama beads make for a really intricate design. I think a picture like this would make a lovely and unusual gift!

Mini Hama beads Russian doll picture

Related post - A guide to mini Hama beads

I also used mini Hama beads to make these Mini Hama bead decorative plant markers. They were fun and simple to make, and a great way to brighten up plant pots.

Mini Hama bead flower plant markers

Another decorative piece that I love is my Hama bead quilt style picture. This picture was a way to use up the odds and ends of Hama beads in different colours that we had left over from various kits. I keep it in the bathroom and it makes me smile while I'm brushing my teeth! A small child could easily put together a picture like this which would look lovely framed, and you could help them out by letting them choose from a selection of Hama beads in colours which work well together and which suit the recipient's decor.

Hama bead quilt style decorative picture

Coasters are always useful, and I've written a whole post with lots of different designs for Hama bead coasters, also with different themes like Halloween or Easter. A set would make a lovely gift!

Hama bead Autumn Fall leaves coaster design

Hama bead photo frames are another good present that children can make for adults, and they can then be gifted containing a photo of the child, or a relevant print or postcard. I've made several different types of Hama bead frames over the years, and I think that these cheerful summer themed ones are my favourites so far.

Hama bead photo frames on a bookshelf

Finally, magnets are always a useful gift, and these retro Tetris inspired Hama bead magnets will definitely appeal to adults like me that remember spending hours playing Tetris when they were younger! These designs are super easy to make and are also a lot of fun to play with!

Tetris inspired Hama bead magnets

And if you think that your adult recipient would also enjoy crafting with Hama beads themselves, you might like to point them towards this blog post - Ten Hama bead projects for adults!

Monday, 14 October 2019

Mini Hama bead sugar skull earrings

Mini Hama bead sugar skull earrings tutorial

I love working with mini Hama beads. The mini Hama beads are tiny, about a third the size of the standard beads, and they are placed onto specially sized boards. It's difficult to manipulate the beads with your fingers so I use tweezers to set them down into place - once you've got the hang of the technique you can work very quickly. The mini Hama beads are available in a huge range of colours, and you can use them to create some really intricate designs.

Here's how I used mini Hama beads to make some Sugar Skull earrings. This is the design that I used, once you've put the skull features in place you can use a range of different colours to complete the design.

Hama bead sugar skull design

When ironing mini Hama beads you need to take a little extra care as they melt very quickly. I use the iron on the lowest setting, and I don't hold the iron on the beads for very long. For this project you need to make sure that the hole at the top remains open so that you can push the earring pieces through.

Related post - Ironing tips for Hama beads

Adding earrings to mini Hama bead design

I turned the Hama bead sugar skulls into earrings by adding a simple earring hook. The ones that I use have a curved shape that fits perfectly into the top of the beads and holds it nicely in place.

Mini Hama bead Halloween earrings

Here is the design for the Hama bead sugar skull:

Free Hama bead pixel art sugar skull design pattern

If you like this craft then you might also be interested in my other sugar skull themed crafts:


If you are searching for Halloween crafts using Hama beads then look no further, I have also published a complete a round up of Hama bead Halloween project ideas.

You may also like these other mini Hama bead projects:

Mini Hama bead decorative plant markers

Mini Hama bead Russian doll tiled picture

Mini Hama bead Russian doll picture