Showing posts with label tutorial. Show all posts

Tuesday, 6 October 2026

Felt crafting ideas for Halloween and Autumn

The calendar may say that it's Autumn, but the weather seems to be taking a while to catch up this year! Nevertheless, today I'm sharing some of my favourite felt crafts for some Autumn and Halloween themed felt crafting. 

Follow the links for full details of each craft!

Felt Autumn leaves

These embroidered felt Autumn leaves were really simple to make using scraps of felt and tiny beads. I've displayed them in several ways - in the past I have gathered them together in a shallow bowl, and this year I have strung them on a length of cord across the mantlepiece using tiny wooden pegs. They measure around 10cm in height and I had a lot of fun varying the colour combinations and embroidery details.

Homemade felt Autumn leaves displayed in shallow bowl

Halloween felt bunting with ribbon and buttons


This homemade Halloween felt bunting was a real craft supply de-stashing project. I used large felt triangles for the background, then I designed each pendant individually using scraps of felt, ribbon, beads and buttons. I love putting it out each Halloween, often with a few fairy lights.

Homemade Halloween felt bunting using scraps

Colourful stuffed felt sugar skulls


These felt sugar skull Halloween decorations are another great project to use up those crafty bits and pieces in your stash. The basic skull design can be decorated in all sorts of creative ways using beads, buttons, ribbons, sequins - all sorts of craft materials that you have lying around! They can be displayed in a bowl, lined up on a shelf, or you can add a small hanging loop. I chose white for the background, but you could make them in all sorts of colours and sizes.

Simple stuffed felt sugar skull craft

Simple felt stuffed pumpkins for Autumn decor


These stuffed felt pumpkins were so simple and quick to sew together, and they look wonderful heaped together for an Autumn display. I used a gold cord which really sparkles, and you can really get creative with different colours and shades of felt.

Simple stuffed felt pumpkin craft

Halloween felt garland bunting


This Halloween felt garland is so easy to make, it just takes a little bit of time to cut out all the tiny shapes! They are strung together using a sewing machine and embellished with sequins.

Halloween felt garland bunting

Make a monster felt kit for toddlers


Finally, this make a monster kit busy bag was one of the earliest crafts that I shared on this blog! All you need to do is cut out some monster themed shapes from felt, add in a few other bits and pieces, and you have a sweet little busy bag craft for your little ones!

Make a monster homemade busy bag craft

Tuesday, 29 September 2026

Simple felt stuffed pumpkins for Halloween

Today I'm sharing another craft from my recent personal challenge to complete five batch prepped craft projects. This is my third craft - some simple stuffed felt pumpkins for Halloween. 

Simple stuffed felt pumpkins for Halloween craft

My pumpkins were made using a free pattern and tutorial from The Yellow Birdhouse - DIY Felt Pumpkins with Free Printable Pattern. It's a simple pattern, easy to follow, and there are plenty of ways that you could customise it. For example, I may re-visit it in the future using bolder colours and printing the pattern in different sizes. This website is filled with beautiful patterns, both free and for sale, and I'll definitely be looking for more ideas when I'm next sorting through my felt stash!

For all of my batched projects I wanted to use only materials that I already owned. So I've used green felt for the leaves instead of fabric, and I chose a thick gold thread for the decoration instead of brown twine. I was a little limited by the colours of the felt that I have remaining in my stash - I've made a few felt Halloween crafts over the years! However, along with plenty of grey and brown felt, I had just enough shades of orange felt to sew together a third pumpkin.

Halloween felt stuffed pumpkins craft

This project does require quite a lot of stuffing - not a problem for me as I have plenty saved from old pillows, but worth noting if you want to try this craft. The pumpkins were very quick to work up, and I love working with felt. The pieces are simply sewn together, the pumpkin is stuffed, then the stalk and leaf are attached with a glue gun. I really like the extra thread that is wrapped around the pumpkin and I think that my leftover Christmas gold cord works really well for a bit of sparkle.

Stuffed felt pumpkins Halloween decor

Another craft complete, and another tiny bit of space made in my craft stash cupboard!

Tuesday, 15 September 2026

Making a simple beaded fish keychain

This Autumn I've been working my way through my craft stash with some projects that I batch prepped in advance. Last week I shared my Autumn themed beaded bracelets, and this week it's another bead project - a beaded fish keychain.

I made my fish keyring using the tutorial below:


I watched the video through a few times before I began, and I worked out exactly how many beads I would need of each colour. Then I gathered all my supplies together ready to work on.

Beaded fish using craft supplies from craft stash

This is the first time that I've tried a beading craft with wire, and I will say that I did not find it as easy as I expected. It took me several attempts and a long time, to produce my beaded fish, and I had to undo my work many times. I changed the sequin that I used for the eyes to a larger one, and because my beads aren't all uniform sizes he has come out a little wonky.

Once I had got the hang of it I progressed quickly, and I think that I could probably make another one very easily. But this craft didn't really appeal to me, so I don't think I'll be making any more. I'll be looking for some other crafting options next time when it comes to de-stashing my beads!

I used slightly larger beads than the ones used in this tutorial so I cut myself a longer piece of wire which was a good move because I very nearly ran out.

Here are the exact quantities of beads that are needed for one beaded fish using this tutorial:

Tail - 10 (orange)

Mouth - 4 (red)

Colour 1 - 44 (green)

Colour 2 - 28 (gold)

Colour 3 - 19 (silver)

Eyes - 2 (black)

You also need:

2 round sequins for the eyes

1 jump ring (and pliers to open and close it)

1 keychain attachment

A length of wire, I used a 1m, which is thin enough to pass twice through the centre of each bead


This is a fun and meditative craft project, and if you have beads in lots of different colours you could easily and quickly bead up a whole aquarium. But for now I'm just going to enjoy my one beaded fish!

Tuesday, 8 September 2026

Simple Autumnal beaded bracelets

This Autumn I have challenged myself to work on five different craft projects, which I batch prepped back in August ready to work on when I had the chance. 

Welcome to the first completed craft project!

These Autumn themed stretch beaded bracelets are a really simple project that I had been putting off for a long time. Most of these basic coloured beads were purchased on our last trip to the US - which was nearly two years ago. I added them to my bead stash and just didn't get around to using them which was a real shame because in the end it took me just one evening to make this set of eight simple bracelets.

Stretch beaded bracelets with Autumn theme

Here are the supplies which I gathered together to make the bracelets, along with some superglue for finishing. The beads that I bought were sold in long strings and mixed together, so I had to sort out the different shapes and colours, but luckily that didn't take too long. Then I went through my remaining bead stash and pulled out a selection of beads that were similar sizes and matched my Autumn colour scheme of red, orange, brown, green and gold.

For stringing bracelets I always use Stretch Magic 0.7mm which works perfectly. It's a clear plastic stretch cord which fits most smaller beads and is really easy to tie tightly. I've never had a problem with it breaking.

Supplies for simple beaded stretch bracelets

This project is about working through my stash, so I made an effort to prioritise smaller quantities of beads that I could use up. I didn't have much of a plan apart from that, other than picking beads that looked good together and trying to space the more decorative beads evenly, like the gorgeous gold rose beads. 

I also made a couple of 'filler' bracelets that use random combinations of smaller beads, a great way to use up the odd beads. 

Stretch beaded bracelets in fall colours

To finish a stretch beaded bracelet you just need to tie a few tight knots in the elastic and then add a small blob of superglue. Cut away the loose ends, and the knot should be pretty much hidden by the beads. 

Eight bracelets felt like the perfect number - I love how they all overlap as you move around, and so it looks different every time you look at it. 

I'm really pleased with them and I'm so happy that these stashed beads are finally seeing the light of day. I'm planning to wear them a lot this Autumn!

Simple craft stretch beaded bracelets

If you liked these bracelets then you might also like my ocean themed stretch beaded bracelets which are very similar but using blues, greens, and pretty sea glass style beads. I still have plenty of beads left in my stash, so I'll soon be planning some more sets in different colour combinations!

Wednesday, 11 December 2024

Simple Christmas felt garland craft

I love crafting with felt, it's so easy to work with and I love the soft texture and bright colours. This Christmas I made a really simple felt Christmas garland to add to my collection of homemade Christmas decorations.

I the same method that has worked well for two previous projects - my simple felt heart garland and my Halloween themed felt bunting. Using scraps of felt and a sewing machine it's a quick way to make some simple bunting that can be switched out according to season. 

This was a stash buster project for me, so I was limited by the felt colours in my stash. I've run out of red which is a bit of a disaster for Christmas crafting! But I had some pre-cut red circles left over from another project which worked perfectly, and I chose shapes based on the colours that I had available. 

I ended up with a red circle, a green Christmas tree, a golden bell and a brown gingerbread man, with each shape measuring around 4cm in height. I cut 10 of each shape and for this project I attempted to keep the shapes in the same pattern throughout. 

Tips for cutting out the shapes - I made a paper pattern for each shape which I pinned to the felt while cutting. Use small, sharp scissors, and don't worry too much about perfection!

Small felt shapes for Christmas garland

When all the pieces are cut then I sewed them together. If you want to keep to an order make sure you know what you are doing, as once you start sewing it's easier if you can have the next one ready to go at all times. Before starting to sew, make sure to pull out a decent length of thread and then again at the end so that the felt garland will be easy to hang. 

Then just line up the shapes and sew them together! It's a bit of a fiddly job but it gets easier as you go along, I had several false starts! Just get the next piece ready to sew before you've finished the previous one, and squish them together a little bit as you sew each end.

Simple Christmas felt garland with festive shapes sewn together

The finished garland adds a lovely Christmas hint to the festive decorations, whether hung on the tree or elsewhere around the house!

Felt Christmas garland hanging on Christmas tree

Simple felt Christmas garland

Friday, 3 November 2023

Hama bead Christmas crafts and projects

I love crafting for Christmas, and over the years I've shared many Christmas craft ideas on my blog. Today I thought I'd share some of my favourite Christmas crafts and projects using one of my most used craft materials - Hama beads. All of these craft ideas are perfect for keeping children busy in the run up to Christmas, can be used to create some individual and unique Christmas décor, and are perfect crafts for both children and adults.

Make sure to click the links for each project to find a more detailed tutorial and patterns.

I love Scandi red and white theming and so I used just these colours to make some simple Scandi inspired Hama bead baubles, finished off with a narrow loop of red ribbon.

Scandi themed Christmas baubles using Hama beads

These Hama bead Christmas wreath ornaments are so easy to make, and perfect for using up any odds and ends of green beads that you might have leftover from previous projects or kits.

Hama bead simple wreath ornaments

These wreath designs can also be used to make some Hama bead wreath magnets, perfect as a small gift for relatives, as place names for the Christmas table or as gift tags.

Simple Hama bead Christmas wreath magnets

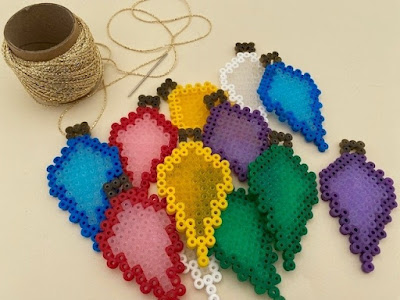
My Hama bead Christmas fairy light bunting uses transparent beads, although they could easily be made using solid colours for some cheerful, bright Christmas bunting.

Hama bead Christmas fairy light bunting

These Hama bead and ribbon bauble ornaments use festive Christmas ribbon for some extra embellishment.

Hama bead and ribbon Christmas bauble decorations

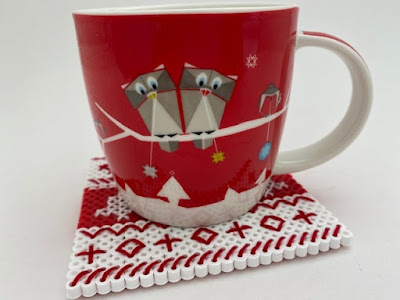
Some more Scandi inspired design with this Scandi style Hama bead Christmas mat which is a great place to put your Christmas cuppa.

Hama bead Scandi inspired Christmas mat

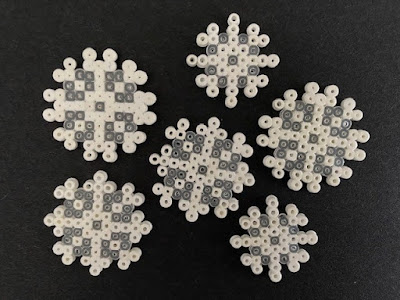
This Hama bead snowflake bunting was one of my very first Hama bead craft posts! I used the hexagonal and circular pegboards to make six different Hama bead snowflake designs which I strung up as bunting but which could also be used as festive coasters.

Hama bead snowflake designs and patterns

More recently I designed some more Hama bead snowflakes patterns which I used with mini Hama beads to make tiny Mini Hama bead snowflakes.

Mini Hama bead snowflake embellishments

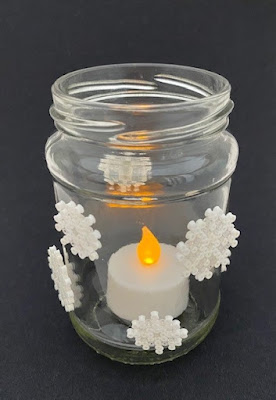
I used these tiny snowflake embellishments to decorate a winter snowflake lantern. 

Mini Hama bead snowflake lantern

I recently designed these free mini Christmas cross stitch designs which can be used for all sorts of pixel crafts, including of course Hama beads. I used them to make some Mini Hama bead Christmas embellishments which are perfect to decorate Christmas cards, to add extra interest to your Christmas decorations, to decorate place cards or gift cards...the possibilities are endless!

I used some to make mini Hama bead pin badges for some sweet little Christmas accessories!

Mini Hama bead Christmas embellishments

Another red and white craft, these Scandi inspired Christmas battery tea light holders are perfect for some festive decoration when they are filled with a battery tea light.

Christmas Scandi inspired Hama bead tea light covers

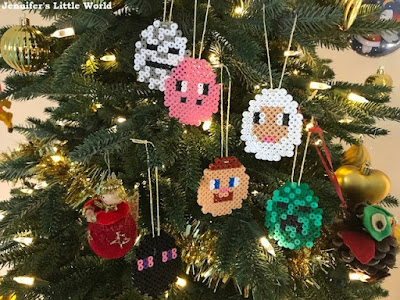
Finally if you have a Minecraft fan in the house why not keep them busy making some Minecraft Hama bead Christmas baubles.

Minecraft Christmas Hama bead crafts

I hope that you enjoyed this roundup of some of my favourite Hama bead Christmas themed crafts! I've published many different Hama bead crafts over the years, and you can find them all here - Hama bead crafts and projects.

Wednesday, 1 November 2023

Hama bead Christmas fairy light bunting craft

Recently I wrote about how I had been sorting out my Hama beads, and that seeing all my beads gave me some new craft ideas. I discovered that I had acquired quite a few transparent beads in different colours, and so I came up with a Christmas Hama bead craft! I designed a simple Hama bead fairy light pattern which can be made in lots of different colours and strung up to make fairy light bunting.

Hama bead fairy light bunting for Christmas

Below are my beads laid out on the board, and underneath you can find the printable image which you can use to work on your own designs. I used a solid colour for the outline and a transparent colour for the inside. If you don't have any transparent beads you could use beads in a lighter shade, or otherwise simply make them all in one solid colour. For the top I used some gold beads from my stash but many colours would also work, for example yellow, light brown or black.

Hama bead fairy light design template

Hama bead fairy light pattern to print

I made twelve lights in total, in six different colours. The Hama beads need to be ironed to fuse the beads together. It's a simple process, but if you need some help with ironing the Hama beads then take a look here - Ironing tips for Hama beads.

Hama bead Christmas fairy lights

Finally I used some gold sparkly thread to string the Hama fairy lights together. I don't over iron my designs, so I was able to use a large needle to thread the string directly through the beads in the corner of the gold top part. They stay in place along the string pretty well, but you might want to make a knot on either side of the light to make sure that it stays firmly in place. 

Hama bead Christmas fairy light diy tutorial

The bunting is light, so it can easily be strung up wherever you'd like. I have some small suction hooks which I use to hang decorations. The transparent beads mean that this bunting string would look really good on a window so that the light can shine through during the day!

Hama bead fairy light bunting craft tutorial

If you are looking for more ideas for Hama bead Christmas crafting then you might like these posts:


Wednesday, 27 September 2023

Halloween themed felt garland bunting craft

For a little while now I've been brainstorming craft projects with the intention of working my way through my craft supplies stash. One thing that I have in abundance is felt, and so I decided that with Halloween coming up I'd work on a simple felt Halloween craft!

I still love the simple felt heart garland bunting which I made a little while ago, and it hangs from our mantelpiece almost year round. I thought I could come up with something similar using Halloween colours and simple shapes. And here it is, embellished with sequins, my very easy Halloween felt garland:

Halloween craft simple felt bunting garland

I began by sketching out a few simple designs. I discovered some pre-cut black felt circles in my stash which I thought would fit well in between the shapes. I didn't have quite enough so I cut some more circles from grey felt, and made enough to alternate with my other designs. I made simple pumpkins, ghosts and witch hats, taking some shape inspiration from some gorgeous bunting at Easy Thing to Sew.

I cut my shapes a little smaller (about 3-4cm across) and designed them to be little more rounded so that they could be sewn closer together. I used some lovely dark yellow cotton for the sewing.

Halloween felt shapes for simple garland craft
 
I used a sewing machine to make up the garland. It's a bit of a fiddly job to sew the shapes together as they are so small. I found that I had to sew across a shape and then lift the presser foot a little to pop the next one into place, with the edges nice and snug together. 

Sewing together felt scraps for garland

I was really pleased with how it looked, but I felt that it was missing something, especially on the ghosts. Wanting to continue crafting only with my stash I hunted out my big bag of sequins and sorted out some black circles for the eyes of the ghosts, gold squares for a buckle on the hats, and green circles to add a bit of colour to the pumpkins. They are glued in place, and I added sequins on both sides in case the shapes flip around while they are hanging. Subtle yet sparkly!

Easy Halloween felt garland craft using scraps

I have my bunting strung up across the fireplace, along with some fairy lights (don't worry, the fireplace underneath is disconnected so there is no fire risk, remember to be careful where you display bunting!)

Homemade Halloween felt garland on mantelpiece

While I was hanging it I thought something like this would also be great hung down in long strings across a doorway, maybe if you are hosting a Halloween party or greeting Trick or Treaters! 

Homemade Halloween felt garland close up

If you like this Halloween felt craft then you may also like my Homemade Halloween felt bunting, using scraps of felt along with ribbon, buttons and sequins.

Friday, 22 September 2023

Hama bead Autumn leaves - designs and patterns

I've been trying to come up with some good designs for Hama bead Autumn leaves for a while now, and I've always found it really difficult! After sorting out all my Hama beads recently I found that I had lots of Autumnal colours with lots of different shades of brown, orange and red, and so I decided that I would have another go and attempt to make some seasonal Hama bead Autumn leaves to decorate my home now that the weather is turning cooler!

Hama bead Autumn leaves

Here is the pattern for the four Autumn leaf designs that I came up with. 

Hama bead Autumn leaves design and pattern to print

I used a variety of different coloured beads for the leaves, based on what I had in my stash. I tried to think about using darker beads for the base of the leaf and moving to lighter ones as I worked my way up, but the arrangement of the beads was pretty random! It was a great way to use up some of colours where I only had a small amount left. 

I used a square Hama bead pegboard and didn't over iron the beads. If you are new to Hama beads or want some extra guidance you might find this post helpful - Ironing tips for Hama beads. 

I've not decided yet how to display them. I'm thinking about hanging them from some long string and attaching them to suction hooks on the window. I also thought about making a few more and attaching them together for form an Autumn wreath - something like this Hama bead flower wreath. You could also attach them to sticks as a plant pot decoration, string them together to make bunting, add a magnet or keyring...lots of possibilities!

If you are looking for some more Autumn inspired Hama bead crafts then do take a look at these:

Autumn leaf Hama bead coasters

Autumn Hama bead battery tea light holders

You can find all my Hama bead crafts here - Hama bead craft ideas and projects

Monday, 24 July 2023

Felt anchor keyrings with an ocean theme

I've been a bit quiet with the crafty posts recently, but I've still been crafting away busily in the background! I am making a determined effort this year to work through some of my fabric and felt stash, and as we have a Disney cruise coming up I've been thinking of ways that I can use my stash to create some Disney cruise themed crafts. 

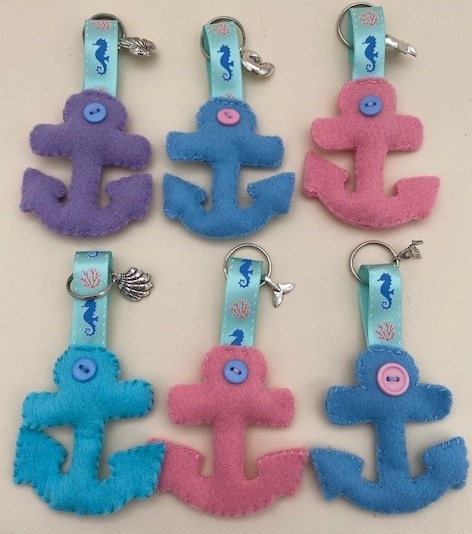
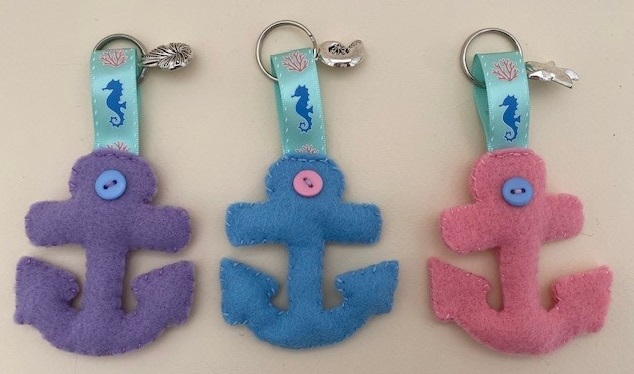
I decided to make a dent in my felt stash and make some simple anchor themed felt keyrings. I already had the keyring rings and some sea themed charms leftover from previous projects, and I picked up the gorgeous marine themed ribbon on my holiday craft shopping spree last year. It works perfectly for this project because the designs are vertical!

Felt keyring craft with anchor and ocean theme

The keyrings were very simple to make. I created an anchor paper pattern using Google image search for a simple anchor design and modifying it to fit what I wanted. I made sure that the top of the anchor was wide enough to fit the ribbon, then I cut out two anchor shapes for each keyring. I chose pastel shades because I have plenty in my stash and they co-ordinated well with the ribbon.

Felt anchor keyrings craft

I sewed the two halves together, adding stuffing into the bottom as I went along as it was quite fiddly to do it afterwards. The ribbon is sewed in firmly along the top, with the keyring and charm already in place. As a final touch I added a contrasting button to the front.

Marine themed felt keyrings in the shape of an anchor

I'm planning on using these along with some drawstring bags to present the gifts for my Fish Extender exchange.

Monday, 30 January 2023

Simple Hama bead heart coaster

The children might be growing up, but I still have plenty of Hama beads in the house! I was looking through the stash the other day and noticed that I had an abundance of red, white and pink beads and so I decided to make a simple Valentine's Day craft. 

The design for this Valentine's Day Hama bead coaster is based on my colourful mini Hama bead heart picture which lives above my desk. I used four of the heart squares to make the coaster, along with a single line of beads for the border.

Simple Hama bead heart coaster

The coaster is just the right size to sit under a mug for my morning cup of tea. It also makes a nice Valentine's Day decoration by itself, I think this heart design is simple but really effective.

Hama bead heart coaster craft

I have plenty of Hama bead project ideas on my blog. If you are looking for more Valentine's Day Hama bead crafts then you might like this post:

Hama bead crafts for Valentine's Day