Showing posts with label beads. Show all posts

Tuesday, 15 September 2026

Making a simple beaded fish keychain

This Autumn I've been working my way through my craft stash with some projects that I batch prepped in advance. Last week I shared my Autumn themed beaded bracelets, and this week it's another bead project - a beaded fish keychain.

I made my fish keyring using the tutorial below:


I watched the video through a few times before I began, and I worked out exactly how many beads I would need of each colour. Then I gathered all my supplies together ready to work on.

Beaded fish using craft supplies from craft stash

This is the first time that I've tried a beading craft with wire, and I will say that I did not find it as easy as I expected. It took me several attempts and a long time, to produce my beaded fish, and I had to undo my work many times. I changed the sequin that I used for the eyes to a larger one, and because my beads aren't all uniform sizes he has come out a little wonky.

Once I had got the hang of it I progressed quickly, and I think that I could probably make another one very easily. But this craft didn't really appeal to me, so I don't think I'll be making any more. I'll be looking for some other crafting options next time when it comes to de-stashing my beads!

I used slightly larger beads than the ones used in this tutorial so I cut myself a longer piece of wire which was a good move because I very nearly ran out.

Here are the exact quantities of beads that are needed for one beaded fish using this tutorial:

Tail - 10 (orange)

Mouth - 4 (red)

Colour 1 - 44 (green)

Colour 2 - 28 (gold)

Colour 3 - 19 (silver)

Eyes - 2 (black)

You also need:

2 round sequins for the eyes

1 jump ring (and pliers to open and close it)

1 keychain attachment

A length of wire, I used a 1m, which is thin enough to pass twice through the centre of each bead


This is a fun and meditative craft project, and if you have beads in lots of different colours you could easily and quickly bead up a whole aquarium. But for now I'm just going to enjoy my one beaded fish!

Friday, 7 October 2022

Some simple ocean themed stretch beaded bracelets

A few years ago I didn't buy a bracelet in Accessorize, and I've regretted it ever since! It was something like this one - Beaded Stretch Bracelet - a selection of different simple beaded bracelets that are complementary and worn together. When I was shopping the craft stores in the US this summer I found myself in the bead aisle, and my thoughts turned towards making myself something similar.

Beaded bracelet jewellery making supplies

I've not really done jewellery making before so I wasn't quite sure what to buy. But I was really pleased with the Stretch Magic cord that I ended up with. I bought the .7mm size which is small enough for the tiny beads. The beaded part of each of my bracelets measures 20cm, so allowing a few extra centimetres each side the 5m pack should be enough to make at least 15 bracelets. It is also available to purchase in the UK, and you can see it here (affiliate link) - Stretch Magic elastic cord. 

I bought three strings of smaller beads which I was able to mix and match with the beads I already had in my stash. The glass beads on the far right were chosen because they look just like sea glass. Then I bought one large string of coloured beads and one of shiny beads. It was a bit of a pain sorting out the colours, but it was worth it as it made making the bracelets much easier!

I wanted to make a bracelet with a sea/ocean theme so I went through my stash and gathered together all the beads I could find in different shades of blue, turquoise, white and silver. I had some small pearl beads, large shiny glass beads and lots of tiny beads. I made eight bracelets in total, some follow a strict pattern and some are more random. 

Selection of simple small beaded bracelets in blue and turquoise

To make the bracelets I just threaded the beads onto the elastic, which was quite easy as it's so stiff. When I'd reached the right length, which for me was 20cm, I tied a simple knot and pulled the elastic as tight as I could. Then I sealed the knot with a blob of superglue before cutting the ends. The hole in the beads wasn't big enough to hide the knot inside, but because it is transparent you can hardly see it. The bracelets seem pretty secure to me, hopefully they won't all fall apart!

Stretch beaded bracelet pile in blue and turquoise with ocean theme

I had such fun making these and I'm so pleased with them! It was quite addictive in fact, and as I have plenty of beads left in my stash I'm very tempted to myself a couple more sets in different colours. I think next up might be an autumnal theme with reds, browns and golds. 

And this is another of my ten craft projects that I'm aiming to complete by Christmas - I'm really working through them!

Simple stretch beaded bracelets with a sea or ocean theme

Monday, 14 July 2014

Keyring upcycle with Sugru and beads

Since I received some Sugru to review in my crafting I've been thinking of more and more ways that I can use it. Although it's similar in many ways to other polymer clay type products, a big advantage is that Sugru cures at room temperature, so you can use it for things that you don't want to put in the oven, for example if you are using it to customise objects.

Keyring beaded upcycle using Sugru craft

I wanted a more individual keyring for my keys, so I used some Sugru and some small wooden beads to upcycle this old metal keyring.

Keyring beaded upcycle using Sugru craft

 It was very easy to do. First I came up with a few designs, and chose the one that I liked best. I planned it out with the beads on my desk first, and took a photograph on my phone that I could refer to as I went along. Then I rolled out the Sugru and flattened it down to cover the keyring. One 5g pack was sufficient for this project. You can get the Sugru pretty smooth with your fingers, but I quite liked leaving it a little bit bumpy and uneven.


Keyring beaded upcycle using Sugru craft

Then I pressed the beads into the Sugru in my chosen pattern. I found it easiest to use tweezers to place the beads where I wanted them, and then pressed down with fingers. I left the keyring resting on a piece of cling film while it cured, as it's one of the only things that Sugru doesn't stick to and I didn't want it permanently attached to the desk! Sugru remains pliable for about half an hour after you open the packet, and then you need to leave it to cure for 24 hours.

Keyring beaded upcycle using Sugru craft

I'm loving my new keyring! If you are looking for more crafty ways to use Sugru you might like this post - Crafting with Sugru, a round-up of ideas.


I received both the beads and the Sugru that I used for this project as review products.

Sunday, 13 July 2014

The Bead and Button Company

I was recently asked to review some items from The Bead and Button Company. Such a treat! I spent ages browsing the site to choose a selection of products, and I was so excited when they arrived. I was completely spoilt for choice, as they sell not just beads and buttons but also fabric, jewellery supplies and all sorts of other crafty bits and pieces. Here are the goodies that I chose:

The Bead and Button Company craft products review

I wanted to come up with a few projects to showcase some of the things that I received. Even though I love buttons, and my button tin is filled to overflowing, I couldn't resist a few more mixed packets.

The Bead and Button Company craft products review

These buttons only actually come from two bags - the multicoloured and wooden buttons were from the 75g Random Mixed Assorted Buttons pack (and that's not all of them!) and the plastic buttons in the bottom right are from a bag of 50g Mixed Buttons (available in various mixes of colours). I now have enough buttons to fulfil my button crafting needs for a long while yet!


I've long been inspired by button tree craft pictures that I've seen on Pinterest, so I had a go at making my own felt and button tree picture using a selection of green buttons from each pack. For the background of the picture I used some gorgeous patterned material from the Jasmine Fabric Bundle, , the same basic pattern in six different colour combinations. I'm also going to use a darker version of the pattern to make a different tree picture, perhaps with pink buttons this time.


Felt and button tree picture craft


Then I moved onto crafting with beads. I ordered a pack of Random Mixed Beads, again excellent value for the number of beads that I received. A lovely selection of wooden, plastic and metal beads in all shapes and sizes. 


The Bead and Button Company craft products review


First, I pulled out some of the Sugru that I've been crafting with for a few weeks now, and upcycled an old keyring with Sugru to create a beaded keyring. It was so easy to do, and the beads just press straight into the Sugru. I used some of the tiny wooden beads for this.


Keyring upcycle with beads and Sugru

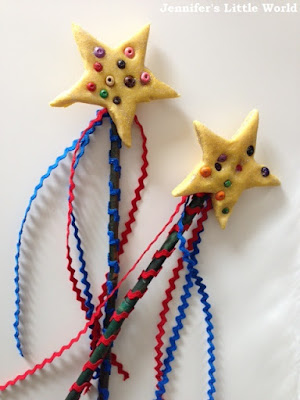
Then I worked with the children to make some salt dough fairy wands. Again we used the wooden beads, but this time I was brave enough to put the beads in the oven while the salt dough cooked. Fortunately they came out fine!


Beaded fairy wand craft

To decorate the stick and make streamers I used some ric rac, a crafting essential that has been missing from my craft box. I chose a roll each in red and blue. Again, there is plenty there to keep me going for a long time and it's lovely, really bold and bright in colour. I still have a packet of heart buttons to use, which I think I'm going to use to customise plain hair clips. I also chose a simple pom pom maker, as I've been after one for a while and I think that the children will enjoy making some pom pom creatures! 

You can also see some more fab ideas using products from The Bead and Button Company over at Baby Budgeting. 


I was given the opportunity to select these lovely items from The Bead and Button Company for review.