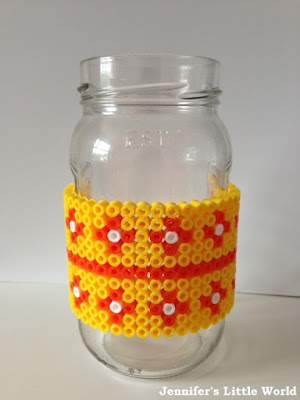
Recently I was ironing a larger square Hama bead piece, and I noticed how flexible it was before it had completely cooled. So that gave me an idea for another Hama bead craft - Hama bead jam jars and pencil holders!
Materials
Old, clean jam jars or similar containers
Large square Hama bead pegboard
Hama beads
Glue
Instructions
First you need to wash the jars and remove the labels. I've found that the easiest way to remove labels is to spray them with WD40 and leave for a few minutes. Most labels will peel off straight away, some may need a couple of applications. Then wash the jar thoroughly in soapy water.
Use the square peg board to create your design. A design made using one large square Hama bead peg board will not be enough to go all the way around the jar. You can get round this by making two separate pieces and sticking them together or by clipping two boards together (they are designed so that you can do this) to make a longer strip. I just made shorter designs that don't go all the way around my jars.
I went with a simple geometrical pattern, you could also use pictures or words to denote what will be stored inside the jar. Just bear in mind that your design will end up being reversed, so take care with text! You may notice lots of yellow in my designs - for some reason I have ended up with a disproportionate number of yellow Hama beads. I suspect that the large boxes of mixed beads do not contain an equal spread across the colours!
Iron well on just one side, taking special care to iron to the edges of the design. When you remove the beads from the board the strip of beads will be very floppy. Place the jar on its side and drape the beads over the top so that they will cool to the shape of the jar. If you are working with a long strip that will wrap all the way around the jar then you might want to secure it in place with an elastic band while it cools. When the beads have cooled the strip of beads will still be flexible enough that you can remove it from the jar.
I glued my strip of beads to the jars using normal white glue, or you could use a glue gun to make it extra secure. Here's the finished jar!
I made as many storage pots as I had jars lying around! I used a large pasta sauce jar, a chocolate spread jar and a smaller container that held dried yeast. You could also use the ever versatile toilet roll tube, with a cardboard base. They'd make great gifts for Mums from little ones, perhaps filled with flowers or chocolates. They'd also make a great desk tidy gift.


Ohh I like these, they are a great idea for teacher gifts. I know what we will be doing for Xmas! Thanks, Mich x
ReplyDeleteOoh, I've never used hama beads! These look very cute :)
ReplyDelete