Showing posts with label diamond painting. Show all posts

Friday, 10 November 2023

Christmas diamond painting kits inspiration

This post contains Amazon affiliate links

I love diamond painting, I find it a relaxing and mindful craft and I enjoy admiring my finished pieces, like my Starry Night diamond painting which always gets a comment from visitors. Diamond painting is a brilliant craft for Christmas, it's a fun way to get in the festive mood in the run up to Christmas and produces some lovely sparkly Christmas decorations. A larger piece is also something that you can work on over the festive period ready for display next year.

I've hunted out some different Christmas diamond painting kits, both traditional and a some that are a  bit different, for some festive diamond painting inspiration.

Smaller kits for beginners or groups

A set of small diamond painting kits is a great way to get started with the craft. They work really well for a Christmas crafting party as they are easy to divide up, quick to complete, and everyone gets to go home with at least one finished project. If you are working as a group it's a good idea to buy some extra pens, wax and trays so that everyone can craft at the same time. As well as being turned into ornaments, they can also be used to decorate Christmas cards or you can also make diamond painted Christmas gift tags (affiliate link).  

Large full drill Christmas diamond painting kits

These large diamond painting pieces (affiliate link) can be complicated and take a long time to complete, but they are very satisfying once finished as the entire piece is filled with the sparking diamonds. You need to be very organised when it comes to sorting out the different coloured pieces, I recommend a storage container with small, labelled compartments that you can decant the bags of drills into. It's also best to work on the piece in small sections so that you don't expose any more of sticky background than necessary to avoid it drying out.

Partial drill Christmas diamond painting kits

Partial drill kits are kits with a coloured background that are embellished by the diamond dots. They are often quicker and easier to complete and don't use such a large selection of colours. The background may be sparkly or shaped for extra interest, and allows for finer detail when printed rather than composed with the diamond drills. This partial drill Christmas diamond painting kit (affiliate link) has a painted background with diamond dots for extra sparkles.

Something a bit different

There are also some diamond painting kits that let you make something a bit different than the usual flat piece. For example this Santa diamond painting nightlight (affiliate link) which would make a brilliant Christmas decorations! There are also kits for diamond painting Christmas wreaths and other hanging decorations.

I hope that I've given you some inspiration for your Christmas crafting!

Monday, 21 March 2022

Using my leftover diamond drills and dots for some Easter Egg crafts

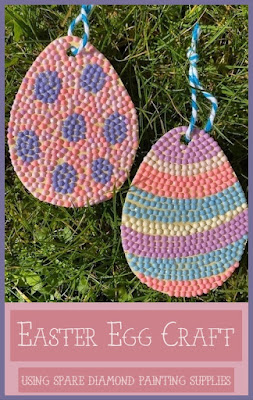
I love diamond painting, it's a really relaxing and satisfying craft and I'm very proud of my completed projects. But once you have finished a piece you can end up with lots of leftover drills and dots, and after finishing a few kits the amount of tiny coloured pieces of plastic can be overwhelming! I hate the idea of just throwing them away, so for a little while now I've been trying to think of crafts that I can do using these leftover pieces. A little while ago the children and I made some simple pictures using leftover diamond painting drills, and with Easter approaching I decided to use a similar method to create some hanging Easter egg decorations.

Leftover diamond painting supplies drills craft

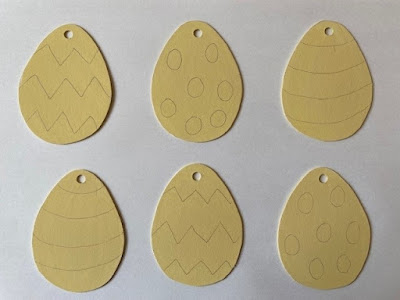
I was originally going to use the spare diamond drills to cover some simple wooden Easter shapes, but to keep in the spirit of working through my craft stash I cut out some Easter Egg templates from white poster board and gave them a quick coat of pale yellow acrylic paint, punching a hole in the top for hanging. I used a pencil to make some simple outlines to help guide the placement of the the drills.

Simple Easter craft shapes for decorating

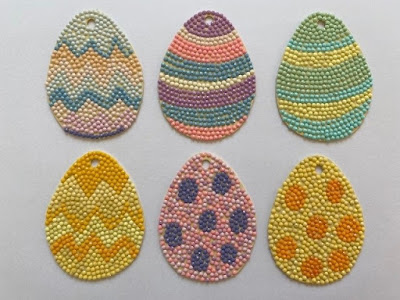
To stick the drills to the egg shapes I covered them with a thick layer of white PVA glue. You can also use double sided tape. I found that a thick layer of glue was needed to make sure that the drills stuck firmly and it also helps if you need to reposition the drills as it will stay wet for longer.

Easter egg craft with leftover diamond painting drills

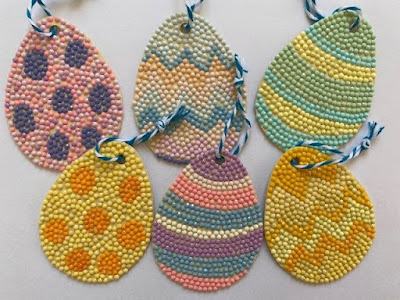
I chose diamond painting drills from my stash in pastel colours that went well together. The striped eggs are a great way to use up small quantities of dots, and for the background of the spotty eggs I mixed in the colours that I had in smaller amounts. Then I found some coloured twine to thread through the hole for hanging.

Hanging Easter egg ornaments with spare diamond painting drills

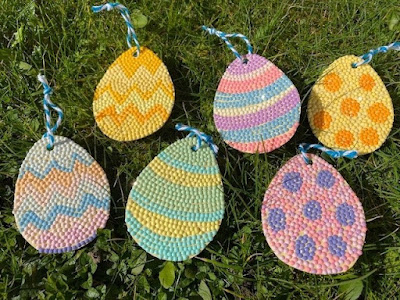
Here you can see them sparkling in the early spring sunshine! I'm planning to hang them on my homemade Easter tree for some fun seasonal decoration.

Crafts with leftover diamond painting drills and dots

If you are looking for some more ideas to use up leftover dots and drills then you might also like these pictures using leftover diamond painting pieces. They are very simple to make and are a great craft for young children. We used them as greeting cards for friends!

Diamond painting leftover pieces craft for children

Tuesday, 2 June 2020

My completed diamond painting - Starry Night by Van Gogh

This post contains Amazon affiliate links.

As a crafting challenge for 2020, I decided that each month I would aim to complete one of my unfinished projects. So far so good, and I present my finished craft project for May - my diamond painting of Starry Night by Van Gogh.

I bought this kit last year while we were on holiday in Florida. I'd been wanting to try a larger diamond painting for a while, and when I spotted this one on special offer I couldn't resist. I've always loved the painting, the blues and purples along with the contrasting yellows and oranges really appeal to me. The kit is available over here on Amazon and at Hobbycraft (see the link at the bottom of this post).

It's a fairly large diamond painting piece, the final design measures about 50 x 40 cm, and it's full drill which means that the entire area is covered with the sparkly plastic pieces. Diamond painting is very simple, all you need to do is place tiny pieces of coloured plastic into the correct place on a pre-printed, adhesive canvas. It's a great craft to do if you are looking for something relaxing that doesn't require too much concentration.

Diamond painting - Van Gogh Starry Night design completed

I must admit that this project wasn't on my list of planned projects for the year. I wasn't even anticipating starting it until next year, once I'd cleared my backlog of projects. But with the lockdown leaving me with some extra time for crafting, especially a simple craft that can be worked on around the needs of the family, I decided to make a start. It didn't take too long to complete and I enjoyed every minute!

I've ordered a frame which should be here in a week or two, then I just need to decide where to hang it.

Now I have an even larger collection of leftover diamond dotz, and I need to find a crafty way to use them up! Mia and I came up with this simple craft for using leftover diamond painting drills, I'm thinking that I might try something similar for myself.

Simple craft to use up leftover diamond painting dotz and drills

For my June project I'm thinking ahead to Christmas again with some little felt Christmas kits that have been sitting around for far too long!

Wednesday, 15 April 2020

My lockdown crafting projects

Our abrupt end to school in mid-March was followed by several weeks of high anxiety, trying to juggle homeschooling with work, and getting used to all the worry inducing changes around us. But over the last couple of weeks I've finally managed to calm myself down a bit and I've been trying to make the most of spending more time at home and having a bit more time to devote to my crafting and hobbies.

My goal for this year was to complete one unfinished craft project each month, and I'm already ahead of myself with April's craft completed. So to fill my time I've been working on a couple of longer term craft projects that I like to keep up in the background, and I thought I'd share them here.

My first is the cross stitch map (affiliate link) which I've been working on for couple of years now. I quickly stitched in the countries that I've visited, then discovered that there was a huge amount of white space left around the map which looked a bit bare and empty. So I decided to fill in the gaps with smaller pictures that represent things that I've seen on my travels with a sort of patchwork effect, partially inspired by the wall of postcards at my doctor's surgery! I'm very much making it up as I go along, but I'm pretty pleased with the effect so far.

I've already shared a couple of my smaller designs over here on the blog - the cross stitch cruise ship and the cross stitch Disney inspired castle. It's a bit of a mish mash but hopefully it will become a bit more cohesive as I add in more and more pictures. I have the next design drawn out for an anchor and some waves, and next I'm going to start filling in some of the smaller areas of sea with different shades of blue, as well as adding in some more of the borders. I'm intending for the whole piece to be fully stitched apart from the countries that I have yet to visit, so there's plenty of work to do yet!

Cross stitch map of my travels in progress

I've also made a start on my new diamond painting kit. This kit is Van Goghs Starry Night by Diamond Dotz (affiliate link). I bought it on holiday in the US last year, but it is readily available over here from Amazon and Hobbycraft. It's a large kit, about 50cm by 40cm, and as you can see I've still got plenty left to do. I enjoy diamond painting, it's very easy and relaxing. I'm not quite sure what I'll do with the finished picture when it's done but it will be lovely and sparkly and I love the colours, all different shades of blue and purple.

Van Gogh Starry Night diamond painting kit

Finally, one of my ten things to do in 2020 was to complete one hundred days of something, and this seemed like a good opportunity to find the time without interruptions from holidays or days out. I was inspired by the official 100 Day Project, although I'm a couple of days ahead of everyone else this year as I was so keen to get started! 

I decided that I wanted to try drawing and painting. I started off with some pencil sketches but they were very bad, so I started adding colour using a box of old but good quality watercolours that I bought a long time ago. I never learned how to use them properly at the time, so I've been watching a few tutorials and just getting used to them and how they work.

Here are my latest two pages, I don't pretend that they are any good whatsoever but I'm only nine days in so there is plenty of time to improve! I'm finding the colour mixing and the actual painting really relaxing, and it has felt good to carve out half an hour or so for myself every day to work on it.

First attempts at watercolour painting

I just hope that I'll still have plenty of time to devote to my crafting when the homeschooling starts back up next week!

Thursday, 19 March 2020

A craft using the spare dotz and drills from diamond painting

A craft that I'm really enjoying at the moment is diamond painting. After working on my diamond painting sugar skull last year, and helping Mia out with a unicorn kit that she received for her birthday, I've just made a start on a really large piece - Van Gogh's Starry Night - that is going to keep me busy for a long time!

Crafting with left over diamond dotz and drills from diamond painting

One thing that has been bothering me is all the tiny plastic diamond drills or dots which are left behind after the project is completed. I have loads of teeny plastic bags filled with little dots, all neatly sorted by colour. I don't think that you can buy the canvas for the kits by itself, and even if you could I probably wouldn't have all the colours that I'd need. So I'm keen to come up with some crafty ways to use up the leftover dots and drills once the original kit is complete.

Craft using leftover diamond dotz and drills

My first idea was these sweet little pictures that Mia made for her friends! We found some pictures online and copied them onto some white card - see below for my tutorial on how to simply transfer an image.

Then I covered the area of the drawing with double sided sellotape, or you could also use a thin layer of glue. She used the usual diamond painting tool to fill in the picture using the diamond dotz in the colour that she wanted. When she had finished I left the pictures underneath some heavy books overnight to make sure that the drills were firmly stuck down. Then we cut around the picture and mounted it on some contrasting coloured card.


I really like the way that the diamond drills work just as well when they are used to fill in the different areas - they don't need to be placed in a grid pattern like on the pre-printed canvases. These would make lovely greetings cards, and we are definitely going to be making some more for friends and family!

Crafting with spare diamond painting dotz and drills

Here's how I transferred the images to the white cardboard:

1 - First trace your image onto tracing paper (you can also use baking paper from the kitchen), either from a printout or directly from a computer screen. Make sure that you have a nice strong outline.

2 - Turn the paper over, place it onto some scrap paper, and scribble over the back of the outline that you have drawn.

3 - Turn the tracing paper back the right way up and position it where you want to transfer your image.

4 - Draw back over your original lines. You should be left with a faint impression of your drawing, which you can go over again if necessary. The tracing paper image can be reused several times, handy if you make a mistake!

How to transfer an image from screen to paper or card