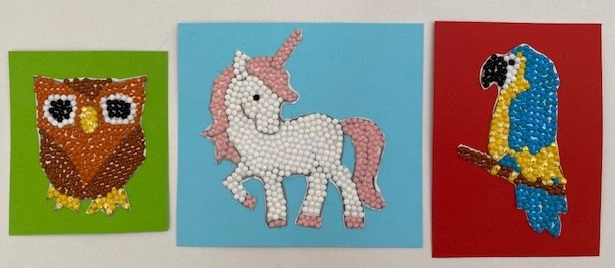
A craft that I'm really enjoying at the moment is diamond painting. After working on my diamond painting sugar skull last year, and helping Mia out with a unicorn kit that she received for her birthday, I've just made a start on a really large piece - Van Gogh's Starry Night - that is going to keep me busy for a long time!
One thing that has been bothering me is all the tiny plastic diamond drills or dots which are left behind after the project is completed. I have loads of teeny plastic bags filled with little dots, all neatly sorted by colour. I don't think that you can buy the canvas for the kits by itself, and even if you could I probably wouldn't have all the colours that I'd need. So I'm keen to come up with some crafty ways to use up the leftover dots and drills once the original kit is complete.
My first idea was these sweet little pictures that Mia made for her friends! We found some pictures online and copied them onto some white card - see below for my tutorial on how to simply transfer an image.
Then I covered the area of the drawing with double sided sellotape, or you could also use a thin layer of glue. She used the usual diamond painting tool to fill in the picture using the diamond dotz in the colour that she wanted. When she had finished I left the pictures underneath some heavy books overnight to make sure that the drills were firmly stuck down. Then we cut around the picture and mounted it on some contrasting coloured card.
I really like the way that the diamond drills work just as well when they are used to fill in the different areas - they don't need to be placed in a grid pattern like on the pre-printed canvases. These would make lovely greetings cards, and we are definitely going to be making some more for friends and family!
Here's how I transferred the images to the white cardboard:
1 - First trace your image onto tracing paper (you can also use baking paper from the kitchen), either from a printout or directly from a computer screen. Make sure that you have a nice strong outline.
2 - Turn the paper over, place it onto some scrap paper, and scribble over the back of the outline that you have drawn.
3 - Turn the tracing paper back the right way up and position it where you want to transfer your image.
4 - Draw back over your original lines. You should be left with a faint impression of your drawing, which you can go over again if necessary. The tracing paper image can be reused several times, handy if you make a mistake!


Thank you for sharing. I was looking at how I could use extra dots. I tried punching shapes out of double sided tape which was inconsistent. I'll give this a try!
ReplyDeleteThanks for the comment, I hope that it works well for you!
Delete