Showing posts with label fabric. Show all posts

Tuesday, 20 October 2026

Christmas mug rugs using stashed fabric

A few months ago I set myself a crafting challenge. I batched up five craft projects that I wanted to complete by the end of the year, and I'm proud to say that I've now completed the final project!

These Christmas fabric mug rugs were a second craft to use up the Christmas fabric that I had in my fabric stash. I really liked the fabric, but I had been struggling to find something to make with it. Last week I made some simple drawstring gift bags, and for these patchwork fabric coasters I used the remaining pieces along with some co-ordinating fabric.

Christmas themed festive mug rug

I used the tutorial here - Super simple mug rug tutorial for beginners. It is indeed a very simple tutorial, and I found it easy to follow. 

To prep the craft I cut out my fabric into strips and chose a fabric for the backing and some plain cotton for the batting. I'm terrible at cutting fabric neatly so you'll see that my strips don't line up perfectly at all, but I try not to let it bother me!

Batch prepped craft supplies for making mug rugs

I made four coasters and I'm really pleased with how they turned out. I love the different colours, and even though they aren't as beautiful as the ones in the tutorial, my sewing machine skills are definitely improving with each sewing project that I try. 

Festive Christmas fabric mug rugs

This was the final project that I had prepared. I loved this way of crafting, I found it really easy to get on with something when it was all ready to go, and I'm pleased to have found a use for some of the things that I was stashing. I'm definitely going to be doing this again with another set of crafts, I'm thinking ahead to the new year and what I might like to work on next.

Saturday, 11 April 2026

Consume less to create more?

There is a phrase that I often see shared on social media - create more and consume less. As well as going out and shopping, consuming also means the digital content we absorb, like scrolling social media feeds or binging television shows. It's a great motto to live by, because removing the clutter of consumption leaves your mind free for more worthwhile pastimes like writing, drawing, playing an instrument, gardening or baking.

I don't use social media a great deal, but one channel that I've recently rediscovered is Instagram. I've managed to curate my feed really well and it's filled with lovely scenery, tempting baked goods, pretty interiors and my new downfall which is craft tutorials. 

Recently I posted about how Instagram influenced me to buy a stamp punch and how much fun I was having with it. I'm pleased to say that it has not sat idly on my desk, I've used it almost every day to make little punched stamps from all my junk mail and food packaging. A recent travel brochure led to a page in my journal which I love.

Stamp punch to create journal layout using a travel brochure

As soon as I showed an interest in short videos of sewing projects I started to see lots of things that I wanted to make. I love the idea of this pen pocket which wraps around a notebook and is used to hold a pen - I have lots of lovely fabric and some basic sewing skills but I knew that I would need a pattern to make it properly. So I bought the pattern from the creator (you can find it here - Pen Pocket Bookmark) and I soon managed to make myself a couple.

Pen pocket pouches using stash fabric

I'm so happy with them, and I even managed to make them with the fabric going the right way up! I love making things that are both pretty and practical.

Simple pen pocket pouches

So even though Instagram has led to me consuming - both in buying the physical supplies that I needed for the projects and also the time that I've spent scrolling in order to find them - it has also led to me taking the time to create some lovely things.

And it's not just crafting. I often find myself thinking about the longer articles that I've read online and I've read many things that have spurred me on to learn more about a subject. Things that definitely wouldn't have popped into my head unbidden.

So I find that I need to consume in order to create, and that's something that I'm completely happy with!

Consuming to help with creation

Monday, 10 November 2025

Budget friendly craft projects

Crafting can be expensive hobby, especially if you get stuck in the trap of spending more time buying supplies than you do actually using them! But you don't need to spend a lot of money, or even any at all, to indulge your creative side and create something that allows you to enjoy both the creative process and the finished product. 

Here are some craft activities that are either free or very low cost.

Collage

You can use all sorts of things to create collage art. Even if you don't buy magazines, there are always free magazines and junk mail being posted through the letter box! There are plenty of places to find free magazines and leaflets, like supermarkets, tourist attractions, garden centres...or ask around among friends and family for ones that they've finished with. Then you can just have fun cutting out the pictures and text that you like and arranging them in a way that appeals to you. You can create mood boards, or collect images that appeal to you and stick in a scrapbook. Maybe you enjoy looking at relaxing beach scenes, or want to collect ideas for your home or garden. Or create fantastical collages, playing with perspective or mixing vintage with modern.

Magazines for making a collage
Photo credit Francisca Silva via Unsplash

Ephemeral art

Ephemeral art is created using natural materials and is not designed to last. You can create ephemeral art anywhere - maybe on the beach with stones and shells or in the forest with leaves and twigs. If you want to document the art then you can take a photograph, and then either destroy it or leave for others to enjoy. Just be careful not to do anything damaging to your surroundings, for example don't create sturdier structures like stone stacks which will not naturally disappear.

Pressed flowers

Don't go out picking flowers from parks or people's gardens, and you need to be careful picking wild flowers to avoid rare or endangered plants (see some guidance here - The rules about picking wild flowers). But if you have a garden or can collect things when you are out and about like fallen leaves then it's easy to press them. You don't need a proper flower press (although they do make it more convenient) you just need a few heavy books and some kind of tissue or blotting paper to prevent marking them. There are some great tips from the RHS here - Pressing flowers and leaves. I like to use pressed flowers in my journal as a reminder of some of the flowers that I managed to grow in my garden.

Pressed flowers and leaves in a collage
Photo credit Cary Bates via Unsplash

Recycled fabric crafts

Old t-shirts can be cut into strips to create a thick yarn that can be used for knitting or crochet, or you can use smaller strips to craft rag rugs You can also make quilts from old fabrics like clothing or bedding. Hunt through wardrobes to find clothes that are past their best but not good enough to pass on, or use fabrics with meaning like baby clothes or sporting memorabilia. Making a quilt doesn't need to be complicated and can be done by hand. English Paper Piecing is a style of quilting that uses paper templates and can be as simple or as intricate as you like - find some advice here - The English Paper Piecing Guide. 

Quilt made from old fabric
Photo credit Olga Ferina via Unsplash

Photography

Most people already own a camera of some sort, and it doesn't need to be a special one to take interesting photographs. You can get out and about in your local area and look for the things that others miss, or create still life groupings with things from around your home. Favourites can be printed and displayed around the home.

Digital art

Digital art is a great way to engage your creative side without needing expensive materials. An emerging form of digital art is AI generated art, where you can experiment with different prompts and see what you can come up with. Maybe start by thinking about somewhere that you've visited or a scenario that you've imagined.

Drawing

You may want upgraded supplies at some point, but to start with all you need is a pencil or pen and some paper, and most people have those lying around! If you don't know where to start then look for an online tutorial, there are many YouTube videos that can help with both technique and inspiration. Look for challenges too, maybe with a different starting point every day.

Black and white sketch of an eye
Photo credit DHANYA A V via Unsplash

Writing and journalling

You can write by hand in a journal or write on your computer or laptop. You can write just for yourself, in the form of a journal or diary, or write for a larger audience with a blog or website. Putting your thoughts on paper is a great way to get your thoughts in order, or you can experiment with poetry or creative writing.

I hope that this gives you some ideas for ways to bring out your creativity without having to spend a lot of money or invest in too many supplies!

Monday, 17 April 2023

A fabric stash update

I recently decided that I wanted to make a big effort to work my way through my fabric stash. It's not a huge stash compared to many fabric crafters, but it was starting to overflow the drawer space that I had available, and I was feeling bad about all the pretty fabric that I had stashed away. 

I've shared a few of my recent fabric stash projects here on the blog:

Drawstring bags for Disney cruise gifts

Drawstring shoe bags for travel

Crumb patchwork phone case

Scrunchies for cruising

A selection of my fabric stash projects

My latest project was another travel related project - I wanted to make myself a simple eye mask to wear for sleeping on a plane. There are lots of tutorials online but I settled on this one from Tilly and the Buttons as it has a free pattern, a video, and also written instructions if you need to slow down a bit!


The tutorial was fairly easy to follow, and I think that I managed to make myself a reasonable eye mask!

First attempt at sewing own eye mask

It's definitely far from perfect - the process was very fiddly and I ended up having to take it all apart and start again which meant that it all ended up a little smaller than it should be! I was particularly pleased with the fabric elastic covering which took me ages to work out, it's easy to sew up a narrow tube but not so easy to turn it the right way round!

I'll be trying it out on our next holiday but I think that I may need to revisit this project and have another go to improve it a little! I know that I'm supposed to be working through my stash, but I'm tempted to see if I can buy some cheap fleece material (or perhaps recycle an old blanket) to make a fluffy eye mask.

Monday, 6 March 2023

Sewing some simple scrunchies for our upcoming cruise

I almost always wear my hair in a pony tail, with just a plain band. But sometimes special occasions call for something a bit more standout, and recently I've been having lots of fun making some simple scrunchies!

My favourites are these two sets that I made for an upcoming cruise - a larger one for me and two smaller ones for Mia's plaits. The first set uses some anchor fabric that I received to review a few years ago. I used most of it for the lining of my beach themed tote bag and the leftovers were the perfect size for scrunchies. I found lots of tutorials for the scrunchies online but I ended up making my own version, it's basically just a long tube of fabric (14" in length and 4" or 5" in width for the smaller and larger scrunchies), a piece of elastic threaded through and the ends sewn together. It's not perfect but when it's tied in the hair you can't see the join.

Disney Cruise themed scrunchies

The pirate scrunchies are made using Disney pirate fabric. If you go on a Disney Caribbean cruise they usually include a pirate themed night and you each receive a pirate bandana to wear. I used the fabric from some previous cruises to make the scrunchies so they will match our new bandanas and those of the other passengers. It's a little difficult to see the fabric, but everyone else on the cruise will recognise it!

I have lots of fabric in my stash which I'm slowly working through, and this is a great way to use up odd scraps of fabric. Scrunchies might not be a desperately cool fashion accessory these days but that  doesn't bother me!

Monday, 20 February 2023

A fabric stash project - drawstring shoe bags for travel

One of my goals this year is to make a decent dent in my fabric stash. I have a huge drawer filled with fabric of all sizes and patterns, some given to me and some that I've bought. I have a number of larger pieces which I've been trying to work through, and my latest project was some fabric shoe bags for travel.

We are lucky enough to travel quite a bit, and I've got the packing down to a fine art. I always pack a spare pair of shoes for each member of the family, and I usually pack them in a plastic carrier bag. But these days I don't have such a stash of plastic bags, and it feels so wasteful to use them, especially as I don't like to reuse them after putting dirty shoes inside.

So the obvious thing to do was to make some fabric shoe bags. They hardly take up any extra room in the suitcase, and they are made in different colours and patterns so that they can be used to identify shoes belonging to various family members. They can be put in the washing machine after a trip ready to use next time, and when we are away at our destination they can be used to store the spare shoes neatly in the wardrobe or on a hook.

Simple fabric drawstring shoe bags for travel

There are lots of tutorials for simple drawstring bags available but I just made mine up as I went along! I used a piece of fabric that measured 15" by 34" which makes for a roomy shoe bag. I sewed a seam for the ribbon along the long side, then folded it in half and sewed up the sides. The drawstring is a piece of long ribbon from my stash, threaded through and tied in a knot. They were so easy to make and I'm really looking forward to using them on our next trip!

Wednesday, 4 January 2023

A year of crafting from my stash

Over the years I've accumulated quite a stash of crafting supplies. I do love having lots of materials that I can pick and choose from, and it's true that I usually have the right button or length of ribbon on hand to finish a project perfectly. But I also have some supplies building up that I really need to do something with. In particular I have lots of fabric and felt, and also a sizeable quantity of Hama beads and normal beads. 

So I have decided that this is the year when I will really make an effort to craft from my stash. I made a start this summer when I started to work through my fabric stash and I made some projects that I was really pleased with. In particular I learned how to make zipped pouches, and I've found them really useful for all sorts of purposes. I also made some really handy laundry bags which we have taken away on holiday with us.

Zipped fabric patchwork pouches

I've spent some time brainstorming by listing the supplies that I have and thinking about the projects that I want to make. I've also been browsing on Pinterest and I've created boards - one for my fabric stash and one for my felt stash - filled with ideas of projects that I could realistically attempt. This helped me to make an initial list in my new Bullet Journal of things that I could start to work on.

In September I challenged myself to complete ten craft projects by the end of the year and I found having a list written out really motivated me to get things completed. So to start myself off I have made myself a list of stash projects that I want to complete by the end of March. Here they are:

* Scrunchies - these are intended for an upcoming cruise. I want to make six in total, two for me and four for Mia, in anchor and pirate themed fabrics.

* A set of stretch beaded bracelets in red/brown/gold - similar to the ocean themed stretch bracelets that I made last year.

* Four adult trainer sized drawstring bags to hold spare shoes in the suitcase for holiday. 

* A sleep mask to wear on planes

* A small fabric case for my sunglasses

* Some felt Easter hanging decorations

I think that this gives me enough to be getting on with for now!

Friday, 30 September 2022

My sea themed simple tote bag

It's definitely getting cooler now here as we head towards the end of the year, and I'm busy working my way through my list of ten craft projects to complete by Christmas.

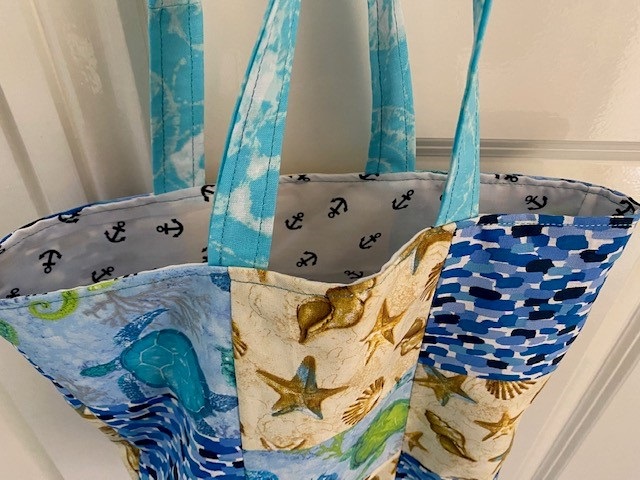
Next up on my list was a sea themed fabric project. I bought some lovely fabric while I was in the US this summer, and I intentionally chose some that had a beach or ocean theme or was blue and green in colour. Most of the fabric in my stash was pink and flowery and so I wanted something a bit different. I wasn't sure what to make, but after searching for inspiration online I decided to try a simple tote bag.

Simple beach themed fabric lined tote bag

From my new fabric I chose the blue camouflage, seahorses and turtles and different shells. I already had some fabric with anchors on which I knew would be perfect for the lining.

Making my first simple tote bag with my sewing machine

I searched for simple tutorials and found this one from Skip to my Lou - How to make a tote bag. It's an excellent tutorial for a simple lined and reversible tote bag and I found it pretty easy to follow. The only place I got a bit caught out was with the straps, I'm not very good at visualising how a pattern will come together, and it took me a while to work out how I needed to place them! Next time I would manage the placement a bit better with an extra twist.

A simple lined tote bag craft

And there will definitely be a next time because I was so pleased with how this turned out! I already have an order lined up for Mia, and I'm thinking about making a few smaller ones for some younger family members. It's gong to be a great way to work through some of my fabric stash!

Thursday, 7 July 2022

Things that I have in my craft stash

Over the last few weeks I've been making a real effort to craft only using items from my stash. Like most crafters I have a rather large stash. Over the years I've collected lots of things, some from my own shopping but also many things that have been passed on to me or that I've received as part of blog collaborations. 

These are the things that I have most of:

Felt - I have a massive plastic drawer full of felt in a huge range of colours. My felt projects are small so I don't get through it very quickly. But I love working with felt and I have lots of ideas for things to make!

Scraps of coloured felt from stash

Fabric - I have another massive plastic drawer packed with fabric. I've been writing recently about some of the things that I've made with my fabric stash. It doesn't feel like I've made much of a dent though! I have a few larger pieces but mainly smaller cuts which would be great for patchwork.

Buttons - Many of these came from a collaboration that I did with a button company a few years ago, although I also save buttons that come as spares with clothes. Most of them are in lovely bright colours and I have some really pretty ones. They are sorted in plastic pots by colour and in a gorgeous button tin that I bought years ago (which also came full of buttons).

Button stash

Beads - I've always collected beads and I've had a few happy shopping trips to the bead shop in Brighton. I was recently lucky enough to be given a box of beads along with a book on beading and I'm definitely inspired to get on and make something. I love wearing bracelets but I always forget to put one on, so I quite fancy having a go at making a few, I definitely have everything that I need.

Ribbon - I save any ribbon that I encounter, from hanging loops in clothes to ribbon from fancy boxes of chocolate. I also have some from ribbon blog collaborations and a few reels that I've bought for various projects. 

Ribbon stash in box

Embroidery thread - I have masses of embroidery thread in every colour that you can think of. I have very rarely bought it, most of it I have been given or it is leftover from various embroidery and cross stitch kits. This part of my stash is brilliant because I can always find exactly the colour of thread that I need for any project!

Hama beads - I have so many Hama beads and pegboards, both the mini and the midi sizes. I need to work on some more mini Hama bead projects because I really love how they look.

In addition I also have lots of crafty bits and pieces that I don't consider to be part of my stash. I have paints, pens, pencils, coloured paper and card. I also have my in progress cross stitch projects - two large and a few smaller ones. Finally there are the craft books - but not too many and I love browsing through them for inspiration.

In many ways it is great having such a large and varied stash, because it means that I usually have something on hand when I'm looking. It also inspires me when I hunt through my stash. But I definitely need to challenge myself to complete some projects by working through what I have.

Do you have a craft stash?

Thursday, 23 June 2022

Working through my fabric stash

Recently I wrote about my fabric stash, and I've also shared some of the projects that I have been working on. I thought I'd do a little round up of some of the things that I've made so far!

My fabric stash

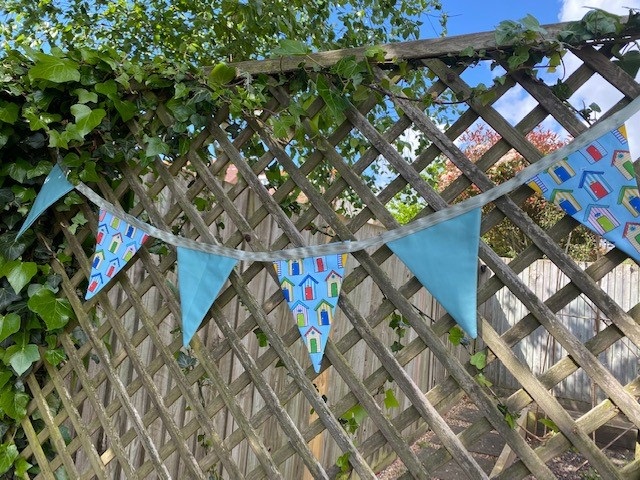
The garden bunting was my first project. It hangs at the entrance to my vegetable patch and I love seeing it when I go in to do the watering. I know that it won't last forever but I'm hoping it will make it through a few seasons.
 
Beach hut bunting for the garden

These were my first large zipped pouches and I'm very pleased with them. They make great project bags, and use up scraps of fabric which I really like to look at. The flowery one is for Mia, she uses it to take her iPad and notebooks round with her if we are going visiting. I am using the other one for my current long term cross stitch project.

Patchwork fabric large zipped pouches

I've already shared these next projects - the first is a small fabric storage bin. I'd like to make more of these although I will need to buy some more interfacing. Interfacing isn't too expensive, but I want to work with what I have already first! These are a pretty way to store things, and I might also use some of my less loved fabric to make storage bins for inside drawers.

Small fabric storage bin

Secondly, these laundry bags were a great way to use some of my larger pieces of fabric. They look a bit mismatched but they are very practical, I've been using the smaller one to store the dirty clothes for my weekly white wash instead of having a heap inside the wardrobe. They are very sturdy and will be great for travelling as they can be washed when we get home.

Large fabric laundry bags for travel

Then I made a third patchwork zipped pouch which you can see in the picture below. I'm using to store my current craft project. It's made using smaller strips of fabric, I sewed a selection of long strips together to make each side, then cut each piece in half and swapped them over (I think it's called strip piecing if that description doesn't make sense!). It makes it look more complicated than it really is!

Two large zipped fabric pouches

I really love my beach hut fabric and I wanted to use it for something for the home, so I decided to attempt a fabric bowl. I used this tutorial Charmed Fabric Bowl and it's very simple, basically you just cut out a circle of outer fabric, interfacing and lining fabric, sew them together then gather the edges to pull it up into a bowl shape. You finish the bowl by sewing around a long strip of fabric to hide the gathers at the top. I didn't manage to get the neatest finish on this bowl, but it looks fine from most angles!

Simple fabric bowl attempt

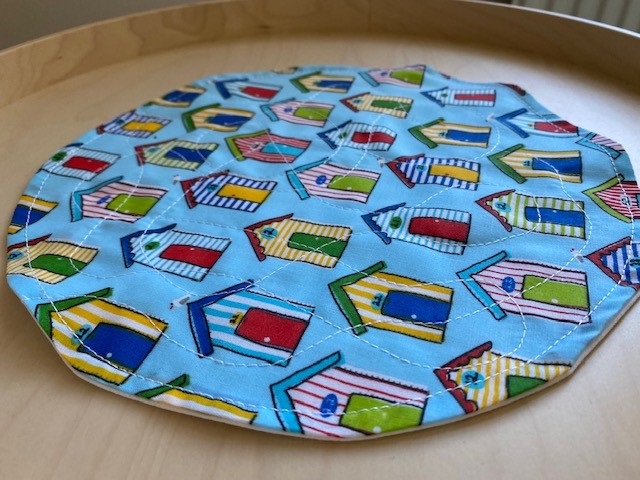
While making the bowl I really liked how the fabric looked when it was sewn together in a circle before it was gathered up. So I decided to make a small circular mat for my round table. There's no interfacing in this one, it's just two circles of fabric sewn together. But then I decided to try stitching some random loops across the top to practice using the sewing machine for curves. I was really pleased with how well it worked!

Small round fabric placemat with beach hut fabric

I'm rather impressed with how well I've managed with these projects. I've learned some new techniques - how to use a zipper foot, sewing curves, simple patchworking. I've also become a lot more confident with using my sewing machine, for example how to thread the machine and how to wind bobbins.

I still have an unopened Christmas print fat quarter bundle which I bought with a voucher last year. I have a few ideas but I'm a bit nervous because I really like the fabric! I'm wondering about a patchwork table runner or place mats, or perhaps some way of incorporating a display for the gorgeous Christmas cross stitch kits that I need to get on and finish. 

I also now have a bag of fabric scraps which need using up, so I can see some more patchwork projects in my future!

Thursday, 9 June 2022

I've been crafting away

I didn't realise that when I recently pulled out my fabric stash it would lead to a sudden influx of ideas for craft projects that I wanted to make! Over the last couple of weeks I've been crafting away like mad, and I wanted to share some of the things that I've been working on.

I've already shared my beach hut bunting for the garden and my zipped pouches. I have some zippers left and I'm planning to make some more pouches which I can use as project bags for my crafts in progress.

Beach hut bunting for the garden

Once I had the sewing machine out I was inspired to try some new things. I started with a small fabric storage bin using this tutorial - DIY Storage Bin. I was really pleased with how well it turned out, especially because it taught me how to box the corners of a bag, a technique which I'm intending to use when I make some smaller zipped pouches.

Small fabric storage bin craft

Then I was looking for a project to use up some of the larger pieces of fabric in my stash, and I decided to make some fabric laundry bags. I usually take old plastic bags to store dirty washing while we are on holiday but I thought that fabric ones would look tidier in a hotel room, be more durable, and are also washable. I used some strong ribbon from my stash for the drawstring. 

The dark pink fabric is some vintage Laura Ashley fabric which I was given a few years ago when my mother-in-law was having a clear out. The bags are a little mis-matched and they are very rough and ready, but I'm glad to be able to put the fabric to a good use! I may also make some smaller sized drawstring bags to hold shoes or smaller items in the suitcase.

Drawstring fabric laundry bags

Then I moved on to my felt drawer. I started by using up some of the scraps to make some simple felt heart bunting, then I started thinking ahead to some Christmas crafting. These crafts will be shared in full on my blog later in the year, but in the meantime here's a sneak peek! I used a cross stitch snowflake pattern that I've been working on to make some felt wreath style designs which I will turn into Christmas bunting.

Felt and cross stitch Christmas ornaments

I've also made some sweet little felt Christmas tree ornaments which are decorated with gold ric rac and buttons. The design of the trees was inspired by this craft - DIY Felt Christmas Tree Ornaments - but instead of ornaments I'm planning to use them for bunting. I'm working on some baubles in a contrasting colour which will all be hung together on ribbon.

Felt Christmas tree craft

I'm still bursting with ideas, and I'm starting to feel overwhelmed by how much I want to get done! It's a really nice feeling to have :) Although I must admit that I don't feel as though I'm making much progress working through my various stashes, there is still plenty left to work with!

Tuesday, 7 June 2022

Using up scraps of felt to make simple felt heart bunting

Recently I wrote about my fabric stash and my plans for fabric based crafting to work my way through some of it. What I didn't mention is that I also have a huge stash of felt. In 2014 I collaborated with Viking and I received 100 sheets of felt in a variety of colours, and although I gave some away to friends and family I still have loads. I also have felt which I've purchased for various projects over the years, and a large amount was made up of small leftover scraps which I couldn't bear to throw away.

Pieces of leftover felt scraps for crafting

So I decided to use some of these gorgeous colourful pieces of felt to make some simple felt heart bunting. I found several different tutorials online, but my favourite was this Easy DIY Felt Heart Garland. That garland uses a Cricut to cut out the felt hearts which would make the project much easier! I cut out my hearts by hand using a paper template.

Selection of colourful hearts cut from leftover felt

The hearts are sewn together using a sewing machine. It's best to work from the dip at the top of the heart rather than the pointy end, and my hearts are placed very close together. Before starting this project it's a good idea to make sure that your sewing machine is well loaded up with thread - it looks much neater if you don't run out of thread halfway through. It's a bit fiddly at first but I soon got into the swing of it, and it didn't take long at all to sew the bunting together. I used mainly larger hearts with a few smaller ones mixed in.

Using a sewing machine to make simple felt heart bunting

I love that I had so much felt in such a beautiful selection of colours, I think it looks gorgeous!

Simple felt heart bunting tutorial

I've hung the bunting across my mantlepiece for a beautiful summer decoration. I made enough to loop it across twice, and it mixes in well with the fairy lights that I string there year round.

Simple felt heart bunting DIY craft

This project didn't make much of a dent in my overall felt stash, but it did feel good to use up some of the smaller pieces, and it inspired me to come up with some other felt crafts.

Friday, 27 May 2022

Making plans for my fabric stash

Over the years I seem to have accumulated quite a bit of lovely fabric, even though I'm only at a very basic level when it comes to using a sewing machine. Some of it has come from past blog collaborations and some has just caught my eye when I've seen it on special offer. I now have a large plastic drawer filled with fabric, and I really want to use it for some cool projects.

Pile of different fabrics

There are so many tutorials online and on YouTube that there is really no excuse for not crafting with it. I have a sewing machine which I was given by friend's Mum, I have a huge collection of embroidery silks, I have interfacing and stuffing as well as ribbons and buttons galore. I'm thinking that there are lots of things that I could make without even needing to buy anything extra.

I like the idea of using the red, white and blue London themed fabric for a travel bag, as I'm always looking for storage to help with my packing when we go away. I would love to learn how to make some zippered or drawstring pouches, or perhaps a padded case for electricals.

The anchor fabric would be great to make some things for a cruise gift exchange if we are lucky enough to cruise again, as would the London Underground fabric and the beach huts. I bought some Christmas fabric last year which I want to get crafting with for this year, maybe making some Christmas bunting or tableware. 

I recently made fabric bunting for our garden and there is lots of space to hang some more. I also have many smaller pieces of fabric which would be perfect for some patchwork. I'm thinking about simple patchwork coasters or a case for my phone. I also want to make a cover for the monitor in my study, both to keep it dust free and to keep it out of sight when I'm not using it. 

So I have lots of ideas, I just need to start hunting down some simple tutorials and get started!

Friday, 20 May 2022

Making some new fabric bunting for the garden

A few years ago I made some fabric bunting to hang across the entrance to our vegetable patch area. It was never intended to last forever, and as spring approached it was looking decidedly scruffy so I knew that it was time for an upgrade.

I had some gorgeous beach hut fabric in my fabric stash, and as I'm intending to make it into a seaside themed area I knew that it would be the perfect choice. I alternated the patterned flags with some plain green so as not to be too overwhelming, and it is all sewn to a length of green ribbon for hanging.

Garden fabric bunting with beach huts

This is the third set of bunting that I've now made for the garden, and although my method is a bit rough and ready I'm really pleased with how it looks! I have a cardboard triangle template which I've used before, and I cut out a front and back piece for each flag. Then I turn the good sides together, sew around the long edges and turn them the right way around. I trim across the tops so they are all even and then I just sew them to a length of ribbon.

This time I sewed the flags to the top and bottom of the ribbon to hopefully keep them lying nice and flat and stop them twisting too much. I leave a long length of ribbon at each end for tying to the trellis, and sometimes I secure with a drawing pin or two if they are blowing about too much. They look so bright and colourful, and will hopefully keep looking good for a few more years at least!

Simple fabric bunting for the garden with beach huts