Showing posts with label flowers. Show all posts

Wednesday, 31 July 2024

The flowers in my garden

I've mentioned before that we are having some building work due to start shortly. It's very exciting! But it meant that when I was starting to think about my garden earlier in the year I wasn't sure how much access we would have to the garden over the summer. I planted my vegetable patch a little later than usual, and so unfortunately my tomatoes aren't doing that well this year. There will be a few but not as many as usual. 

When I had more idea as to timescales I did a trip to the garden centre and bought lots of bedding plants which I planted out in pots. I decided that pots can be moved around whatever is left of our garden! At the moment they are mainly lined up along my back fence, and they make a beautiful splash of colour.

Flowers and petunias in pots in the garden

Petunias look beautiful once they get going! I also love poppies and we have some growing in our new 'wildlife area' which has been created by the temporary removal of our hot tub. I planted some poppies from seed a few years back, and since then they pop up from time to time over the summer.

Poppies growing in the garden

My favourite flowers are sunflowers, and I always make sure to plant some. They are in full bloom in the vegetable patch at the moment.

Sunflowers growing in the vegetable patch

And my final flowers aren't mine at all, they are borrowed from our neighbour and growing over the fence. This is the kind of plant that I want to grow across our back fence, something that grows quickly, covers up the bare fence, and produces lovely flowers. I need to find out what it is and how to grow it!

Purple flowers growing over fence

Now I'm just hoping that summer grants us a few more warm and sunny days so that I can sit out in the garden and enjoy all this loveliness!

Wednesday, 4 August 2021

Getting the summer back on track

I mentioned in my last post that I'd been letting the poor weather this summer get to me a bit. 

It all started off so well, and at the beginning of the year I was making great plans for the garden. I ordered my seeds and had them all planted out on the windowsill. But it took ages for the weather to warm up enough to plant them outside, and they went spindly trying to reach the sunshine through the window. Then the weekend that I did plant them out we had such awful cold winds that the poor surviving plants had most of their leaves blown off. 

Plants suffering in bad weather

We did of course have a lovely heatwave in July which coincided with our week away, and that was amazing. It really felt like a proper summer holiday and we were so lucky. But then I came back and found that most of my plants in the garden had died due to the lack of water.  

I found it all a bit depressing and so I've hardly been out in the garden this week. I ventured out today and it's such a mess. The grass and the front hedge desperately need a cut, but our garden waste collections have stopped due to a shortage of drivers, and I don't want to create piles of garden rubbish everywhere. 

I'm stuck in my head thinking that it just hasn't felt like a proper summer this year. We've hardly had any outdoor pizza or barbecues, we've barely used the firepit and we've not even been out in the hot tub because it always seems to be raining in the evening. Even when it's not raining it's just not pleasant sitting outside when the sky is grey. 

But I need to keep reminding myself that it's only just the beginning of August. There is plenty of summer left, over a month of school holiday to go, and there's every chance that we will have some warm and sunny weather over the next few weeks. I need to work on appreciating what we do have, instead of mourning what we don't!

I've made it one of my goals for this month to get out in the garden every day and try and bring things back under control. I was heartened to see my first sunflower in full bloom today, and I have a few others that have managed to survive and will be flowering soon. A couple of my tomato plants are thriving, and my sweet peas are looking lovely. 

So it's time to think positive. I'm making the most of exercising outdoors as it's the perfect temperature - not too hot and not too cold. Last week I went to the gym and swam in the outdoor pool, perhaps it wasn't that warm but it was really refreshing. We've been having fun doing indoor activities like baking and playing with the forgotten Nintendo Labo sets. It's also nice not to have to trek around watering all the plants every evening, I just wait for the daily rain shower. 

Fingers crossed for just a few more warm days to come before the schools go back!

Wednesday, 19 May 2021

Hama bead flower magnets

Hama bead flower magnets tutorial diy

Following on from my tin can flower with Hama bead flower decorations, I was looking around for different ways that I could use these sweet Hama bead flowers. I realised that they would make lovely magnets! So here's a little tutorial for Hama bead flower magnets. 

I made my flowers using the Hama bead small flower pegboard. It's not easy to buy this pegboard individually but is can be bought as part of this three board set - Flower, Pony and Princess pegboard set (affiliate link). I used just the top flower part of the design, not the leaf area. 

If you don't own this specific pegboard then that's not a problem at all. If you scroll to the bottom of this post I have included some similar flower designs using the small square and hexagonal pegboards which most Hama bead crafters will own.

Hama bead small flower pegboard designs
 
If you are new to Hama beads, you might want to have a look at this post - Ironing tips for Hama beads. I like to iron my beads lightly so that you can still see the holes in the beads, and while they are still warm from ironing I leave them resting between some heavy books for just a few minutes so that they cool flat. Then it's time to turn them into magnets!

Hama bead small flower pegboard to make magnets

I've made Hama bead magnets using a variety of different adhesives and magnets and I've found that the most successful method is to use magnetic tape (affiliate link). You can cut it to size and then peel off the backing to stick to the back of the Hama bead design. This won't produce a very strong magnet but it will stay firmly attached to the plastic beads. If you want to make a stronger magnet I have also had success with a small neodymium magnet (affiliate link). Through trial and error I have found that the best way to attach these magnets is with a glue dot, although a glue gun also works well.

Simply affix a small strip of magnetic tape to the back of the magnet. You might find that the magnetic tape curves away slightly even when stuck down after being rolled up tightly. To prevent this I flatten the finished magnets underneath some heavy books for a day or two to make sure that the magnet will lie flat.

Hama bead flower magnets tutorial

If you don't have a small Hama bead flower pegboard then you can make similar looking flowers using both the hexagonal and square Hama bead pegboards. Here are a couple of designs that you could use:

Hama bead flower on hexagonal pegboard

Hama bead flower on square pegboard

If you are looking for some more ideas using the small Hama bead flower pegboard then you might also like these Hama bead craft ideas:


Hama bead flower magnets tutorial

Friday, 7 May 2021

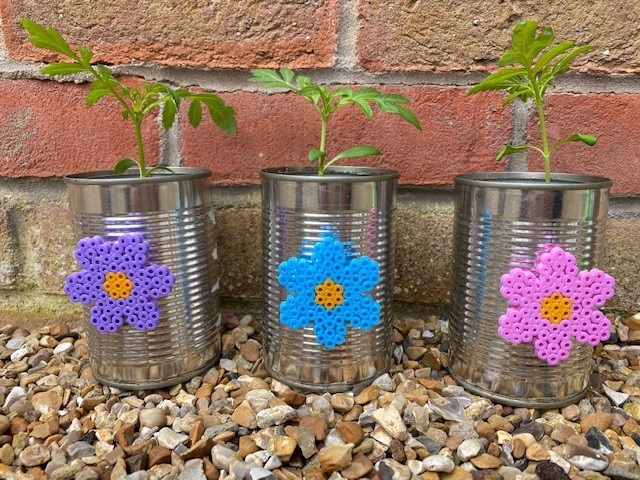
Tin can flower pots with Hama bead decorations

Upcycled tin can flower pots with Hama beads tutorial

I've been collecting old tin cans for a while now as I have a plan to make a tin can planter for the garden this summer. Here's how I brightened up some of the cans with a simple Hama bead flower design!

Tin can flower pots upcycled with Hama bead flower decorations

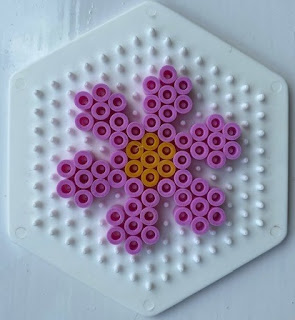
For this design I used the Hama bead small flower template. It's expensive to buy individually but is available as part of this lovely set of boards - Flower, Pony and Princess pegboard set (affiliate link). I chose to make my Hama bead flowers using just the top flower part of the design but there would be plenty of space on the tin can to add in a design including the leaves. 

If you don't have this specific pegboard then that's not a problem at all. Just scroll to the bottom of this post where you can see similar flower designs using the small square and hexagonal pegboards. There is also a large flower pegboard which is commonly found in Hama bead sets. Although bigger, this pegboard would also work really well, especially if you want to decorate a larger tin or planter.

The petals of the flowers can of course be made in any colour or design that you choose. I made mine using pastel Hama beads. The best value way to purchase these is in a Pastel mix Hama Beads bucket (affiliate link) which contains a massive 10,000 beads, plenty to keep you going! You can also buy bags of Hama beads in individual colours if you are working on a specific colour scheme. 

Hama bead flower designs on pegboard

To create your Hama bead flower simply place the beads onto the board. When you are happy with your completed design you need to iron the beads so that they fuse together. If you are new to using Hama beads you might find this post helpful:


If you are looking for some different designs using this small flower pegboard you might like my Hama bead flower wreath where I tried out some different bead patterns.

Hama bead completed flower designs

When you've made as many Hama bead flowers as you will need then you can glue them to the tin cans. If you are using the plant pots indoors then a blob of Blu Tack or a large adhesive glue dot will be sufficient. If you want to use the plant pots outdoors then you will need some stronger glue. I'd recommend using a glue gun as you can make a large blob of glue to compensate for the curve of the tin.

Hama bead flowers

I made my flower designs in a range of different colours so that they will have a colourful impact when viewed together.

Upcycled tin cans decorated with Hama bead flowers

I really like how the bright colours contrast with the colour of the tin. I can't wait to see how they look in my tin can planter when it's finished! I've planted my pots with marigolds, I grew marigolds in tin cans last year and they worked really well. They will be kept indoors for now and placed outside when the weather has warmed up, probably mid to late May. If you wanted you could punch drainage holes at the bottom of the tin, although mine have been fine without them.

Plant pot with Hama bead flowers

Hama bead flower tin can decorations

If you don't have a small flower Hama bead pegboard then you can easily make some similar flowers using either the hexagonal pegboard or the square pegboard. Both of these pegboards are readily available and are often included as part of Hama bead starter kits. 

Small Hama bead flower design on hexagonal pegboard

Small Hama bead flower design on square pegboard

If you are looking for more ideas using the small Hama bead flower pegboard then you might also like these Hama bead craft ideas:


Upcycled tin can flower pots with Hama bead flowers tutorial

Tuesday, 5 May 2020

My 100 day project - a quarter of the way through

One of my goals for 2020 was to take part in a 100 day challenge. This is an official challenge, but I always intended to pick my own time of year to take part. I've been put off in the past because we are often away at regular intervals and I didn't want my challenge to be interrupted. So with one holiday cancelled and the next very likely to be, lockdown seemed like the perfect opportunity to give it a go!

I decided that I wanted to do drawing and painting and complete a page in my sketchbook each day. More specifically I wanted to try watercolours. I have a box of good quality watercolours which were bought while I was doing my Art A-Level a long time ago, and they are still in excellent condition.

It took me quite a while though to find the direction that I wanted to take. I was very inspired by this lady's sketches of her daily life during lockdown, but after attempting to draw my own children I realised that I wasn't at all pleased with my results.

So I moved on to trying to do some realistic drawings of the things around me. I was quite pleased with my paintings of the colourful leaves that fall on our driveway, and the blossom from a beautiful tree which overhangs our garden.

First nature watercolour paintings

Then I spotted these lovely illustrations by Penny Neville-Lee on Twitter. The brightly coloured, abstract flowers in the final drawing really struck a chord with me, and for a couple of days I had a go at my own versions.

Watercolour abstract flowers

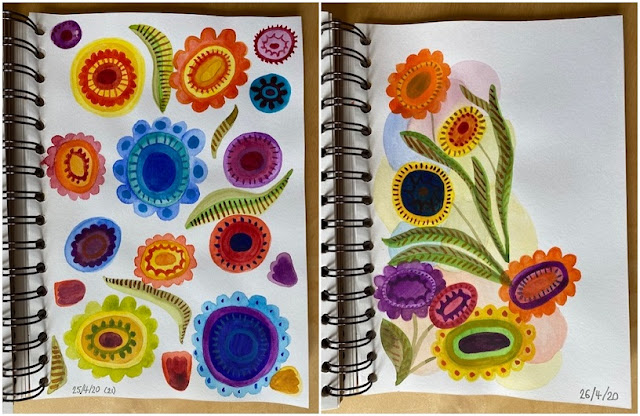
I decided that painting more abstract flowers was something that I wanted to continue, and so I turned to Pinterest for some watercolour flower tutorials. I found this tutorial for painting wild flowers with wet watercolours, and I used the technique to make first my own copy of the painting and the next day my own version with different colours. I was really happy with these paintings, I like the scribbled style of the drawing even though it doesn't really fit in with my own, neater style. I also enjoyed trying the splattering over the top of a painting with wet paint, I really like the effect.

Watercolour doodled flowers

So for the last few days I've been trying out some different ways of painting my own style of flower, and that's something I'm going to be continuing for a bit. I find it easier to just paint from my own head, and I'm experimenting with different colours, different styles of flower, and different layouts. I'm trying not to get too hung up on perfection and just treat it all as a learning process.

It's really interesting to see how much my style has changed over just 25 days! I find the painting really relaxing and it's nice to set aside a bit of time for myself everyday to work on it. Mia has also been enjoying painting with me, it's so nice to sit down together and paint. I'll update on my progress when I'm halfway through!

In the meantime, here is some colourful painting inspiration from my new Pinterest board: