Thursday, 19 March 2015

How to make a simple Easter tree using wire and tissue paper

I've been eyeing up Easter trees for a couple of years now. Something that I've only come across recently (with Pinterest to blame once again!), Easter trees are a way of displaying hanging Easter decorations, and usually take the form of a painted white branch, or wires formed into the shape of a simple tree. This year I almost considered poppping down to Hobbycraft and purchasing one, but when I discovered that prices started at £20 I thought that there had to be a way that I could make one myself.

Homemade Easter tree tutorial

The obvious Easter Tree DIY is to just find a suitable branch and paint it white, but I feel a bit uncomfortable at the idea of wandering around in woodland armed with a saw, so I decided to use some thick wire that I had on hand to fashion my own tree branches.

How to make a simple Easter tree with wire

Here's how I made my tree:

Materials:

Small flowerpot and a saucer, terracotta works best as it's heavy and will be sturdier
Thick wire - I used thick florist aluminium wire which is very soft and easy to bend and cut. You could also use the wire from wire coat hangers
Play doh or florist foam
Tape
White or cream tissue paper
Plenty of PVA white glue
White paint
Raffia, shredded paper, ribbon and so on to decorate the flowerpot
Decorations to hang from the branches

Instructions:

Cut about twelve lengths of wire, I cut four each of three slightly different lengths. My longest length was about five times the height of the flower pot. Tape all the lengths together firmly at the bottom.

How to make a simple Easter tree with wire

Fill the flowerpot up with old play dough or florist foam and push the taped together end of the wire bundle in firmly. I discovered that it's a good idea to use a neutral coloured play dough if you can! Glue the flowerpot into the saucer with plenty of glue.

Then shape the branches of your tree. You might need to play around with the design for a while until you achieve something that you are happy with. My tree has three main branches coming up from the centre, and I've twisted the wires around to make shorter and longer branches which hang at different heights. I've also made the Easter tree with the plan of hanging small ornaments in mind, so the branches are looped with shallow hooks to hang things from.

How to make a simple Easter tree with wire

Then cover the wire branches with tissue paper. I cut long strips of tissue paper, covered them in white PVA glue, and wrapped them around the wires, making sure to completely cover the sharp ends at the top of the branches. When the tree was all covered I added an extra layer of glue and also some glue on top of the play dough, just to make sure that it all held in place.

How to make a simple Easter tree with wire

Then paint the tree white. I used white gloss paint and it needed two coats. Make sure to cover your work surface while painting and drying to protect from drips, and keep an eye on the tree as it dries to make sure that there aren't any drips hanging down from the branches.

How to make a simple Easter tree with wire

When it was all dry I decorated the flower pot. I put plenty of glue into the top of the flowerpot and filled it up with cut up pieces of raffia. Then I found some pretty ribbon to glue around the rim. I tried to keep it neutral so that it doesn't detract from the decorations, and I can use it with different colour schemes. I was so pleased that I was able to make this tree entirely with materials that I already had on hand, and I'm really proud of it!

How to make a simple Easter tree with wire

The decorations currently on the tree were ones that I received as part of an Easter crafting project from The Works, and I have plenty of ideas for making our own decorations now that we have somewhere nice to display them.

If you don't want your Easter Tree to sit in a cupboard for the rest of the year, you can easily re-theme it. I turned ours into a Halloween Tree, and you could also use it at Christmas, perhaps as an Advent calendar with hanging pockets.

How to make a simple Easter tree with wire

Tuesday, 17 March 2015

Gardening Tuff Spot sensory play

Recently, Emma from Adventures and Play invited me to join in with her Tuff Spot A-Z Challenge. During March and April 2015, every weekday a blogger shared a blog post on either their own site or as a guest blog on the Adventures of Adam featuring sensory play based around a different letter of the alphabet. If you're not familiar with Tuff Spots here's an example -Tuff Spot (affiliate link) - it's basically a large mixing tray which you can use for all sorts of messy play and activities.
Gardening themed sensory play activity for children

For our Tuff Spot play I chose G for Gardening. Of course, indoor gardening play isn't a substitute for real gardening, but while it's still too early in the season to start actual planting outdoors, we've been doing the next best thing!

Gardening themed sensory play activity for children

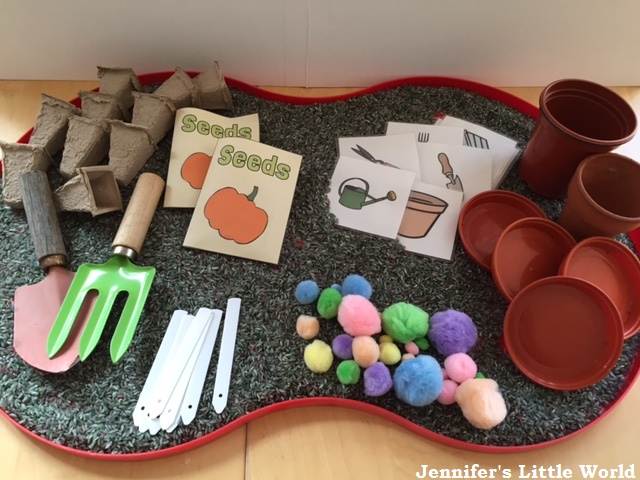
I'm bending the rules of the challenge a little bit, as we don't actually have a real Tuff Spot. Instead, for our large scale sensory play I use a big tray, which is the lid from our outdoor sand and water table. It has a nice rim around the edge to keep everything reasonably contained, and it's the perfect shape for two children to use at once. I usually place it on the floor on top of an old table cloth, or else I have an old shower curtain that I use if we are playing with wet materials. You can also see it in action as Dinosaur Island.

Gardening themed sensory play activity for children

The base material for our sensory play was cheap rice which I dyed black. It's very easy to dye rice, just mix it all up with some food colouring and leave to dry for a very short while. Dyed rice keeps for years and you can always reuse it - even if lots of different colours get mixed together the children don't mind at all!

One thing I've learned about sensory play is how much little children enjoy spooning and mixing different materials. So I provided plenty of plant pots for them to fill. There's a little terracotta one (obviously keep breakable ones for older children to use!), a few plastic ones and lots of new cardboard seedling pots. I put in a couple of our child-sized garden tools, and I also added some spoons for easier filling. I also added some seed markers and some different sizes of coloured pom poms.

Gardening themed sensory play activity for children

Then I gathered together some old pumpkin seeds still going strong from my Halloween sensory tub and made some little seed packets to present them in. For the seed packets I used this fab printable from Twinkl - Create your own Seed Packets (free download). There are several different packets to choose from, and they have a blank front so you can add your own pictures. I found some pumpkin pictures in this Twinkl resource Editable Halloween Pumpkins (free download), and I printed off a couple of pumpkins to glue to the front of the seed packet.

Gardening themed sensory play activity for children

Finally I once again turned to Twinkl to make some simple cards to use for matching game. I created this resource myself using the Twinkl Create function which is available to Premium users. I chose a selection of garden themed pictures, printed them out to make pairs and laminated them. 

I used the cards with Mia to play a memory matching game, and we hid them in the rice to hunt for pairs which she really enjoyed. 

Both children were so excited to see the gardening play all set up, and it reminded me that I should do this sort of play much more often! They both dug straight in, quite literally, and were soon completely absorbed. 

Gardening themed sensory play activity for children

Harry was very interested in the seed packets and he took his play very seriously, filling up his plant pot and planting his pumpkin seeds. 

Gardening themed sensory play activity for children

He wanted to know how we would remember what had been planted, so I gave him a pen to write the names of the plants on the seed markers. A great way to sneak in some writing practice, and his writing was so neat that he'll definitely be helping me when it comes to writing out the real ones!

Gardening themed sensory play activity for children

On the other hand, Mia's first reaction upon seeing the cardboard plant pots was 'ice creams'! She busied herself with filling the pots up with the rice and popping a pom pom on top to make ice cream cones. Perhaps not quite the play that I had imagined, but I loved seeing her little thought processes at work and she had such fun! She also caught on that the pom poms could represent flowers that had grown, and was busy filling up flower pots. She came home this week from nursery with a real bulb planted in a flower pot and is most annoyed that it hasn't started growing yet, so at least this was some instant planting gratification for her!

Gardening themed sensory play activity for children

I must admit that I had worried that at 6 Harry was getting a bit old for sensory play, but I was wrong. Both children played beautifully together for ages, even though they tended to play their own games independently with the shared materials! They both sat their narrating their own play, yet enjoying the other's company. 

Saturday, 14 March 2015

Making an Spring Picnic Easter bonnet

For Easter 2015 I was challenged by The Works to use some of their products to create an amazing Easter bonnet and inspire entries into their Easter Bonnet Competition. We had never actually made an Easter bonnet before so it was a really fun challenge for us, and luckily we received a lovely hamper full of crafty goodies from The Works to help us. Our starting point was this basic Easter hat, which cost just £1.

How to make an Easter bonnet with chicks

And below is our finished Easter bonnet - an Easter chick Spring picnic hat! Harry, Mia and I worked on it together and we are so proud of it!

How to make an Easter bonnet with chicks

The Works has loads of Easter crafting products in store, and you can see a selection of the products from this year below. With quite a lot of fluffy yellow Easter chicks in our hamper we came up with the idea of a Spring picnic for them.

Our first step was to cover the entire hat in green tissue paper so that it would look like a grassy green hill. I removed the ribbon from the hat, and first cut a large square of tissue paper. I used long strips of double sided tape to cover the bowl of the hat, and then we smoothed down the tissue paper before trimming neatly around the edges.

To cover around the brim I cut two long lengths of tissue paper about 10cm wide. I squeezed out a thick line of white PVA glue around the base of the bowl on top of the tissue paper and then we stuck the strips around the brim of the hat. I used lots of glue and we all pressed it down firmly before leaving it to dry. Then I folded the edges of the tissue paper underneath the brim and again used the PVA glue to stick it firmly.

How to make an Easter bonnet with chicks

We used a wide strip of Easter egg paper ribbon from the Easter Bonnet Decorating Kit to make a hat band. While the hat was drying Harry made a cheerful gingham style tablecloth from a piece of white paper and red pen, and we made the cake for the top of the hat.

How to make an Easter bonnet with chicks

To make the cake we used the end of a cardboard tube that had contained sweets. Harry tore up squares of tissue paper to make balls and glued them over the entire tube, with a red one on top for a cherry. We added some pretty Easter ribbon around the sides. Then we glued it on top of the table cloth.

We finished off the decoration of the Easter bonnet with some larger yellow chicks enjoying the cake, and plenty of smaller chicks having fun around the brim of the hat.

How to make an Easter bonnet with chicks

Finally we used some pretty decorative artificial flowers. I pulled them apart so that we could use the flower heads at the base of the brim, and we tucked the long leaves into the hat band so that they looked like grass growing up around the picnic spot.

How to make an Easter bonnet with chicks

Here is Harry proudly wearing his creation. We had such fun making this bonnet together, I think that a yearly Easter bonnet is definitely going to become a family tradition!

How to make an Easter bonnet with chicks

I received a hamper of craft supplies from The Works in exchange for this post.

Thursday, 12 March 2015

Hama bead photo frames

As I mentioned earlier in the week, as a part of my recent decluttering I've been sorting through some old photos. I keep them all in boxes, and it seemed a shame when they made me so happy to look through them, so I thought that I'd make some frames so that I can keep a few favourites on display. Of course it had to be Hama beads!

How to make some Hama bead photo frames

To make a frame large enough to display a standard photo I found that it was best to use two large square pegboards, which are designed to slot together so that you can make a design across both boards. You could use a single square board but you'd only be able to display smaller photographs. For more complicated designs I map them out on graph paper beforehand. Be warned, these frames use up a lot of Hama beads!

Assemble the frame on the boards as usual and iron. After ironing, it's important to place the frame underneath something heavy for a few minutes while it cools, to prevent it from warping. I always iron the design more on the side that will be at the back to keep it sturdy, as I like the look of the beads when they aren't ironed too much.

I made a back for the frames using thin cardboard which I taped to the back of the frame at the top and bottom, leaving the sides open to insert the photograph. I used white cardboard, in case I want to frame a photograph that isn't large enough to fill the frame. I've been propping them up on the mantlepiece, but they are light enough to stick easily to a wall, or you could make a flap from a second piece of cardboard so that they can stand up.

Hama beads are available in a huge range of colours so you can pick out those that match your decor, they don't need to be garish, there are some lovely subtle shades available.

Pastel Hama bead frame

This frame is displaying my current favourite picture that I found while sorting out, my sister and I bathing dollies in the garden. I showed the photo to Mia and she wouldn't stop going on about it until I let her take her dolly in the bath with her that night!

Hama bead photo frame purple and green


This is the template for the design.

Hama bead photo frame purple and green

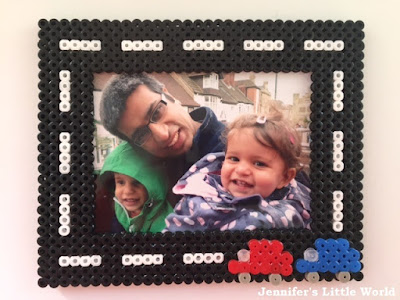
Cars Hama bead frame

You can see this in my Transport post. This photograph was taken on the top of a bus, so it's the perfect subject matter for a road themed frame! Harry has his eye on this one.

The basic Cars Hama bead frame is just made to look like a simple road, then it incorporates some little cars that are glued onto the bottom of the frame to make them stand out. It's hard to show in a photo, but it looks pretty cool! I just used white PVA glue to stick the small designs to the frame.

Hama bead transport themed frame


This is the template for the design - super simple!

Hama bead transport themed frame

Stripy Heart Hama bead frame

This is a really simple frame, made more interesting with a striped heart in the corner. For the heart I used a basic cross stitch heart design. Some of the beads in this frame are my stripy Perler beads which I bought on holiday in the US. Perler beads are almost identical to Hama beads, the only difference I've found is that they seem harder somehow, but they are fine to mix with branded Hama beads. I'm not sure where you can easily buy them from in the UK, I'll definitely be keeping my eyes open because I do love the stripy beads. I completed the frame with one of my old baby photos!

Hama bead frame with stripy beads

Here is the design for the frame. You could add another heart on the opposite side or corner, and use all sorts of different colours.

Hama bead frame with stripy beads


I hope that you liked my Hama bead frame ideas! I've also made Hama bead frames previously. You might like my Hama bead frames inspired by Roman mosaic designs or my Hama bead heart frames.

For all my Hama bead designs visit my Hama bead page.

Tuesday, 10 March 2015

The Life Changing Magic of Tidying by Marie Kondo (and sorting out my photographs)


I recently had a sort through of my possessions, and as a little reward to myself I treated myself to a new book (for my Kindle of course to avoid more book clutter!) which I'd seen talked about in various places - The Life-Changing Magic of Tidying by Marie Kondo (affiliate link).

The Life Changing Magic of Tidying by Marie Kondo - Photographs

Now I am regretting that I didn't buy it in paperback, because this little book has inspired me so much that I just want to run out and lend it to everyone! Marie Kondo's methods don't align exactly with the way that I've been decluttering, as she advocates doing a big sort out in a short period of time rather than getting rid of things gradually, but the way that she focuses on choosing things to keep rather than to give away really resonates with me.

Related article - Some organising and decluttering books that I've enjoyed lately

Marie Kondo's method is to examine each item from a particular category, starting with the easier categories like clothes and books and moving on to more personal ones, like photographs. You should take out one item at a time, touch it, and say to yourself 'does it spark joy?'. If the answer is no then you should get rid of it. Many items that you keep around have served their purpose, and so you should thank them and then pass them on. You'll learn to appreciate your remaining possessions because you have chosen them, and therefore your home will be happy because it is filled only with the things that you love.

You can find plenty of information about Kondo's methods online, and there are many videos on YouTube showing her folding techniques for clothes as well of course as the recent Netflix documentary. But I'd really recommend getting hold of the actual book if you can, I can honestly say that it's been a life-changing read!

Related article - Marie Kondo and managing without things that you've decluttered

This week I tackled one of Kondo's more challenging categories - Photographs. My Mum recently gave me a big stack of old photographs of me, and I loved looking through them, they were definite keepers. All my photographs are stored in two photo boxes, and I was going to just add them in, but I couldn't help going through my old photos while I had the boxes down from the top of the wardrobe.

Box of old photographs

To my surprise, with Kondo's voice in my head, I found it easy to go through them year by year and discard heaps of photos - many that I took when I was younger of random, blurry wildlife, along with duplicates and unidentifiable landscapes. I got rid of photos taken at various university events, where I can't remember the name or even the face of anyone in the photograph, and photos taken of stages at festivals in the dark where there is no hope of recognising a singer or band.

I kept many of the photos that contained either me or a family member though, as long as they weren't duplicates. Some of them were a little blurry, and others weren't that great but they all triggered a happy memory. We hardly ever print out photos any more, so there was plenty of space to store them, along with making room for any more that might crop up. Now that they aren't quite so crammed in it's easier to leaf through them, and I enjoyed revisiting them so much that I'm determined to keep them in a more accessible location.

I picked out a few favourites to put on display by my desk, with the plan to rotate them around. It inspired me to make some cool Hama bead frames for them and I also saved some of my many duplicate baby photos for other crafty projects, like a page for each of the children's baby books and for my smash book.

Finally I purchased a small photo album which holds 100 photographs. I chose my favourite photos to keep in this album in chronological order, and it now sits on my desk where I can easily pick it up and leaf through it. This was something that I was inspired to do having read Marie Kondo's second book, Spark Joy (affiliate link)

Related article - My Marie Kondo approach and Sparking Joy

I'd love to hear from anyone else that has read Marie Kondo's book and how it has worked for them, because it has really been amazing for me!

If you enjoyed this post, you may like some of my other articles about how the Marie Kondo method has inspired me:

My approach to Marie Kondo and Sparking Joy

Working out my own interpretation of the Marie Kondo method

How to keep on top of your clutter

Sorting through some of my sentimental things

Some organisation and decluttering books that I've enjoyed lately

Minimalist cactus in a white pot

Sponsored post - The benefits of making purchases using contactless payment

A contactless bank card can be used to make small payments of up to £20 (a limit which will increase to £30 in September 2015) for goods or services without needing to enter a PIN. All you need to do is to touch your card to the card reader, and many high street shops across the UK are able to take this form of payment. You can tell if your card is a contactless card, and whether a contactless payment option is available, by looking for this symbol on your card and at the till:

Contactless payment symbol

There is quite a lot of variation among banks when it comes to the issuing of contactless cards, and unfortunately our bank is one of those which is lagging behind and we've yet to be offered one. Many other banks are much more forward thinking, and TSB in particular have seized the opportunity for their customers to embrace the technology. Last summer TSB bank announced that all their eligible debit card customers had been issued with new cards with contactless functionality, which has led to a huge surge in customers making use of the facility. The average contactless payment is between £6 and £7.

I'm starting to feel as though we are really missing out. One area in particular where contactless payment would really benefit us is when paying for our travel when we visit London. You can use a contactless payment card to travel by tube, tram, bus, DLR, London Overground and most National Rail services in London, and it would be so much easier than having to remember to top up our Oyster cards in advance, and remembering to keep an eye on our remaining balance.

Contactless payment is quick and easy, the whole transaction is faster and you don't need to worry about carrying the correct change. Because the functionality is available on an existing card, you don't need an extra one.

You can only make small purchases though because no PIN or signature is required. The idea might sound risky, but in reality the chance of fraud is low because there are a number of security measures in place. The card can only be used a certain number of times consecutively before it is required to enter a PIN, and your PIN will also be required if more than £40-£50 is spent on the card within a certain time frame. Use of the contactless feature is completely optional, as the card can also be used in the usual way with chip and PIN.

Having read all about the benefits, I'm thinking that we need to badger our bank to send us one! Do you have a contactless card? I'd love to hear your experiences!

This is a sponsored post.

Monday, 9 March 2015

Our Transport day - with crafts and activities

Harry's school topic at the moment is Transport, and with a day to fill while Ram was out running and recuperating I thought I'd gather together a few related ideas to keep them busy for a few hours.

How to hold a transport day for children

We started by making some Transport headbands with cut out pictures for them to wear during the day. I don't know what it is about headbands and crowns and so on, but children really love making them and they are so simple!

I made the headband using a wide strip of black card. The children used white stickers to make road markings down the middle, then glued on some pictures of various different types of transport. These particular pictures are part of a brilliant set of cut out pictures that I bought in Tesco years ago, but see below for a fab resource from Twinkl that would also work really well.

How to hold a transport day for children

Then we looked through all their toys and books and Harry put together a little display. He managed to find examples of many different types of transport, I was quite surprised by how much we've collected over the years! He loved grouping them all together and arranging them nicely, just like they have in his classroom at school.

One thing that we didn't have was hot air balloons, so next we made a hot air ballon craft. I cut a large balloon shape out of thick cardboard and the children decorated it using bits and pieces from my collage baskets (which we are still using over three years on!) A few pom poms and sequins made their way on as well. Then I printed out a photograph of the two of them well wrapped up in their coats and hats, and they decorated a basket to put themselves in and hang underneath. Although designed as decorations, they had a lot of fun playing with the balloons as well, and flying them around the house!

They really liked the idea of having themselves in the balloon, but you could also print out pictures of favourite television characters, or perhaps make the basket with a sturdy bottom so that some of their little toys and characters could go for a ride.

How to hold a transport day for children

I can also always find some brilliant resources on the Twinkl website to help support topics that we are looking at. Although some resources require a Premium subscription there are plenty of resources available for free and ones that are suitable for even the youngest children. When Mia was younger she was happy with colouring sheets while Harry worked on more complicated activities, and now she enjoys the pencil control worksheets as well as size ordering and sorting tasks.

Our favourite activity was the Wheels or No Wheels Sorting Activity (Twinkl subscriber resource). There is a sheet with pictures of different types of transport (which you can print in colour or black and white), then the children cut them out and sort them into two boxes - Wheels or No Wheels.

Both children, even Mia, managed really well with this activity, but there are also so many ways that you could use the little transport pictures for other activities too. I remember when Harry was small searching everywhere for pictures of different types of vehicles that he could colour to make matching activities for him, and a sheet like this would have been perfect. You could also use them for the transport headbands as above.

Mia enjoyed some of the Transport Colouring Pages (free download) while I played the Transport Roll, Add and Colour Game (free download) with Harry, which is similar to some of the maths homework that he is currently bringing home from school. I also printed out a Transport Word Mat (free download). I love the word mats, they've been great while Harry has been learning to read and they are really useful if your child wants to write words related to a topic but needs a bit of help with the spelling.

We also did a few worksheets that even Mia could join in with. She did some simple Colour, Trace and Connect pages (Twinkl subscriber resource) and a basic Dot-to-Dot Activity Sheet (Twinkl subscriber resource) and they both enjoyed cutting up and putting together the Transport Puzzle (Twinkl subscriber resource).

Finally, our transport theme inspired me to make a Hama bead photo frame! It's so easy to do that even little ones can make it, and you can add your own embellishments like these little 3D cars. I've also made a few more Hama bead photo frames which you can see here.

How to hold a transport day for children

If you feel inspired, here you can find the posts about our other themed days:

Space Day
Antarctic Day
Under the Sea Day
Dinosaur Day
Australia Day
Roman Day
Disney Frozen Day Beach Day

And some tips on how to hold a themed day at home for children.