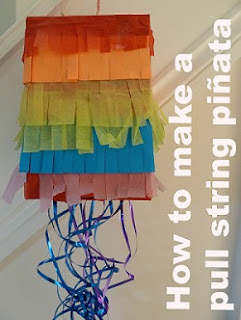
Firstly I have to admit that I have never actually seen a piñata in action. But we are having a little birthday party for Harry this weekend, and I wanted to do something a bit different so I thought I'd have a go at making our own piñata. I wasn't sure about having a piñata to be bashed about with sticks (what a waste of my hard work!) so I thought that I would have a go at a pull string version, with the added bonus that I am hoping it can be re-used year after year! Harry's party is going to have a rainbow theme (all based around a certain pinnable masterpiece of the cake variety, which I am hoping to pull off) so I went with rainbow colours.
I was at a bit of a loss with how to begin, as all the piñata tutorials that I found were very fancy and involved papier mache and balloons. However this pull-string pinata tutorial gave me the confidence to have a go at a simple version using a box.
I used one of the many rectangular cardboard boxes that we have hanging around after Christmas. Harry helped me to paint it red all over, then I made fringed strips from tissue and coloured paper (whatever we had about) in rainbow colours to glue along the sides. I added a loop of string to the top so that it could be hung up.
The bottom of the piñata is one large flap, which we also painted red. I found it best to make the flap open over the entire bottom of the box, so that nothing gets caught inside.
To make the pull strings I used some of that metallic ribbon that I keep for decorating wrapped presents and never use. I made 15 strings. The winning string is knotted firmly in place, with extra tape for good measure. The other strings are just threaded through using a large needle and pull out easily. To uncurl the ribbons, the piñata spent the night on the dining table with the ribbons stretched out and flattened under large books.
I filled it with various sweets and treats. This is a delicate process, as of course the weight of the sweets inside forces the flap open, so you need to secure it in place. After a few experiments, I found that four strips of tissue paper, each about 1cm wide, glued into place around the edges of the flap worked well. Then hang it up (or pass to a tall, responsible adult) and let children take it in turns to pull a string and see who is showered with goodies!


Just brilliant! Such a clever idea to make one you can use again. The kids are going to LOVE it x
ReplyDeleteThank you, I hope so!
Deleteooooh this is great! looks quite easy even for me too x
ReplyDeleteThank you, it was very easy!
DeleteI've always fancied making a Pinata.I think I'll make one for one of my kid's birthdays
ReplyDeleteGood luck, it was a big hit!
DeleteLove this idea!
ReplyDeleteI'm hosting a "Party Party" at Mums Makes Lists for all birthday party related posts - would love for you to link up http://mumsmakelists.blogspot.co.uk/2013/01/party-planner.html
Thank you, I will link up!
DeleteThat's an excellent idea - we have a Pinata that we've brought out twice now and bashed for ages and never managed to actually demolish! :D
ReplyDeleteThank you! The real pinatas do always look very solid to me, I'm not sure that little ones would have the strength to actually break it anyway!
Delete