Showing posts with label house. Show all posts

Tuesday, 2 September 2025

Review - Rolife Miniature Craft Kit - Silent Corner Study from the Book Nook and Wonderland series

I received this miniature craft kit in exchange for a review

A little while ago my husband and I had a lot of enjoyment completing a miniature craft kit from Rolife - Cathy's Flower House. It occupied us happily for quite a while, and I love admiring the finished model sitting on the bookshelf. So I was really pleased to be given the chance to review a couple more miniature kits from Rolife.

I began with the Silent Corner Study, which is part of the Book Nook and Wonderland series. The assembly level is 3 stars which makes it slightly easier and quicker to complete than Cathy's Flower House, which is a more advanced kit with a 4 star rating. The Silent Corner Study kit doesn't even require any glue - all that you need in addition to the kit contents are two AAA batteries for the light.

Silent Corner Study Book Nook from Rolife box

Inside the box are a selection of wooden sheets with press out pieces, a printed cardboard sheet, a printed sticker sheet, a lighting kit and a few other accessories. Then a large instruction book which I found clear and easy to follow. 

The first thing to do is to find some batteries and check that the light works, then you can get started. What I really liked about this kit was that one of the first parts to complete was the battery box and lighting wires - I find this part of the kit a little intimidating so I like to get it out of the way early! It was really easy to install though so I didn't need to worry.

Silent Corner Study book nook from Rolife kit contents

To assemble the kit it's just a case of working through the instructions in order, and pressing out the pieces as you need them. Most of this kit is made using pre-printed and cut wooden pieces, which are really good quality. The finish of the printing is excellent, and all the pieces popped out easily and slotted together well.

Starting a Rolife miniature book nook kit review

When I first saw the picture of the kit I thought that it would take a lot longer as there are so many books to make. But it is deceptive, because many of the books are just printed onto a wooden or cardboard piece which slots into place on the shelf. There are still a few books that need to be assembled individually, and then it's just a case of carefully placing a book cover sticker onto the correct wooden piece. It's easy to reposition a sticker if you get it slightly out of alignment. 

There is never any doubt when it comes to assembly because most of the time pieces can only be placed in one position, and if it's more complicated then there are either guide arrows or extra help in the instructions to make sure that you get it right. 

In progress Rolife miniature Book Nook kit review

I love the bookshelves crammed with not just books but also small paintings, vintage suitcases, a clock and even a cat walking along the shelf! There are so many tiny details. 

Although this kit doesn't require any glue, there is still some sticking to be done with supplied pieces of double sided tape. I did find that I wanted to add a dot of glue on a couple of occasions just to make sure everything was stuck firmly, so it's worth having some on hand just in case.

Rolife Silent Corner Study miniature kit review

As I mentioned above, the lighting for this kit is very simple. There is only one bulb which is positioned outside the window, and the wires run neatly up the back and are later covered by the back panel. The battery box is at the top with a hinged flap which allows you to easily access the batteries. The switch for the light is affixed to the bottom of the wooden floor piece, and when you touch the discrete power symbol it turns the light on.

Installing lighting on a Rolife miniature kit

I found that this kit was a really good level of difficulty - easy enough to not need to worry about getting it wrong, but complicated enough to make for a satisfying craft project that kept me interested and engaged in the process.

Silent Corner Study book nook close up image

I spent about a week working on this kit from time to time. I would imagine that you could probably finish it in a couple of evenings if you sat down to work on it, but I liked taking my time and enjoying the process!

Review - Silent Corner Study book nook kit from Rolife

I've completed a few miniature kits now, and I think that this is definitely my favourite so far. I love the theme - anything to do with books is a winner for me - and it fits beautifully on my bookshelf. The kit was simple to put together but also very satisfying, and I enjoyed every minute working on it. I loved that I could work on it a little bit at a time without having to sit down for hours - it's perfect for busy people that need to snatch some time to themselves when they can. The quality and finish of the kit was excellent and I love admiring the finished product.

If you are interested in trying out a Rolife kit for yourself I have a discount code which will give you 10% off kits from the Rolife website. Just use the code Jennifer10.

Rolife Book Nook kit on book shelf with light

The second kit that I have received to review is a DIY Miniature House called Elsa's Tailoring. The kit is a vintage sewing studio with plenty of tiny details, and I'm really looking forward to making a start. It's a larger kit and a higher difficulty level, so I'm anticipating that it will take me a little longer to complete. I'll be sharing my progress soon!

Rolife Elsa's Tailoring kit box miniature kit

Wednesday, 2 October 2024

A hole in the side of the house

Update June 2025 - The orangery extension project is finally complete! You can watch a time lapse of the full build and garden below.

I may have been a little quiet on the blog recently, but it hasn't been at all quiet in our house!

We are currently carrying out a project which we have been planning for a long time - we are adding an orangery extension. We've been half thinking about it since we moved in, and so we never did any other work to the house in case it would turn out to be a waste of time and money. 

Finally at the beginning of the year we started to plan more seriously and began to put some ideas together. We had to wait for it to go through planning permission because we are joining to the garage, but fortunately it was accepted with no problems. 

It's the first time that we've been involved in a project like this and we haven't really known what to expect. We've been watching time lapse videos of similar projects on YouTube to get a feel for the order in which things will happen. This also inspired my husband to buy his own time lapse camera to record the progress which is fantastic to watch back and I'll definitely be sharing it when it's all done!

It seemed to take a while to really get going - we had problems with unexpected pipes in the wrong places and then the weather was atrocious. For a long time all we had to look at was a muddy back garden full of holes. But then the beautiful red brick walls went up, and this week the wooden structure is being built, and that has really given us a feel for how it's going to look. 

Halfway through an orangery extension build

Currently most of the back of the house is missing, with wooden boards and tarpaulin the only protection from the elements. It was fine at first, but as the weather has got colder and windier it has felt a little bit as though I'm preparing food outdoors! Luckily the front of the house has escaped unscathed so we have the living room to retreat to, and we've not suffered at all with any dust or mess.

We are a couple of weeks away from having a sealed structure, and then the work will move indoors with plastering, tiling and a new kitchen. It should all be complete well before the end of the year, and I'm really looking forward to a Christmas at home with a new kitchen to cook in and stars to gaze at through the ceiling!

Wednesday, 2 February 2022

Our new hedgehog house and our hedgehog visitor

We've known that we have hedgehogs in our garden for a while. We often see them scooting about on our security cameras, sometimes I spot them when I go to the garage at night to put washing in the tumble dryer, and once we were in the hot tub and were treated to a half hour or so watching two hedgehogs snuffling around us.

So a couple of weeks ago we decided to try and entice a hedgehog to stay for a little longer, and we bought a hedgehog house for the garden.

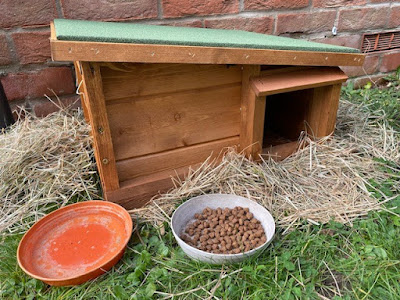
This is the hedgehog house that we bought - Predator Proof Hedgehog House and Hibernation Shelter. We also purchased a pack of hedgehog food from the same company, although I think we'll move to cheaper cat biscuits when it's finished. Then we bought a pack of hay from Amazon. The entire sleeping area of the hedgehog house is filled with hay, then we left some piles outside as we read that hedgehogs like to build their own nests with it. We put a small bowl of food inside and scattered some about. There's a saucer of water too.

Hedgehog house in garden, UK

The house is located in a sheltered part of the garden that we don't go in very often, tucked away from the main part of the garden between the house wall and a fence. Then we have one of our Ring security cameras opposite so we can watch what the hedgehog is up to.

Harry made this video for me of the first night that the hedgehog visited the house, about a week after we placed it. If you watch to the end you'll be treated by the gently steaming gift that the hedgehog left behind for us!


Over the next week the hedgehog kept coming back to snuffle around, eat the food and explore inside the house. Then last night we saw him go into the house at about 6.30am and stay inside for the whole day which was very exciting! It's great to have the camera so that we can see what it's up to!

Do you have hedgehog visitors to your garden?

Monday, 3 July 2017

Taking part in a garage sale trail

At the weekend we took part in a Garage Sale Trail which was brilliantly organised by a lady in our village. The first one was last year when we were away and I really wanted to take part, so I was delighted that we could make the day this year!

Over 50 houses in our village took part, and the organiser made a map showing the locations of all the houses along with a list showing what they were selling - she did a brilliant job! We are tucked away a little bit so I made posters with arrows pointing to our house, and our neighbour took part too so people hunted us out.

I admit that I was a little bit worried that no-one would come, but we had quite a steady stream of visitors all morning. It was advertised to continue until 4pm but we didn't see anyone after 2pm apart from a little gaggle of children that live up the road. They kept buying things and then going home to get more money and coming back, probably because we were selling things very cheap!

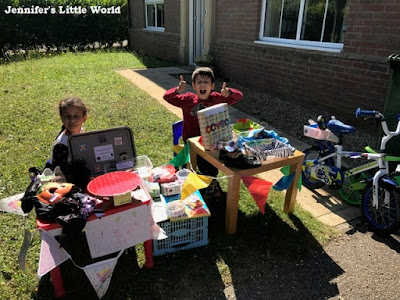
The children were really enthusiastic and they each made up their own little stall. Harry made some flower keyrings from Hama beads and Mia made some Hama bead Minecraft magnets which were  popular! Their top seller though was their brownies and cookies - they each made a nice amount from those even if Harry did end up spending most of his profit and more elsewhere!

Children doing a garage sale

I'm quite good at decluttering and I make regular trips to the charity shop, so I didn't have a huge amount to sell. A friend who lives a bit out of the way came along to share our driveway so she bolstered the stock a little bit, and she did very well. I did a lot better than I expected though, I made over £35 and cleared quite a few larger items that were taking up space.

For me it wasn't just about the selling, it was a really fun way to get talking to the neighbours and it was a lot more relaxed than a car boot sale - there was no haggling over prices and people seemed genuinely pleased with their purchases. Fortunately it was a nice sunny day so it was nice to sit out in the front garden and enjoy the sunshine!

I'm hoping that it takes place again next year, I've saved some of the bits that didn't sell and I'll be adding to the pile over the year so we have a few bits put together!