Showing posts with label house. Show all posts

Monday, 3 August 2026

Review - Oxygen Oasis DIY Miniature House from Rolife

I received this kit in exchange for a review

Oxygen Oasis is a brand new miniature house kit from Rolife. This advanced miniature kit is a beautiful glass house, packed with luscious tropical plants, flitting butterflies, and filled with gorgeous tiny details. The kit contains 1168 pieces, is recommended for ages 14+, and comes with a six star Master difficulty level. 

You can find full details of the kit here - Rolife Miniature House - Oxygen Oasis.

Rolife Oxygen Oasis miniature house kit review complete

The Oxygen Oasis kit was definitely the most complex miniature kit that I've assembled. In my Rolife reviews I always say that before you attempt one you should check the difficulty level because there is a large variation. My first kit was Cathy's Flower House, and I've since discovered that it is one of the most difficult Rolife kits along with Elsa's Tailoring! If you are new to miniature modelling kits then this might be one to save until you've gained some practice.

Building the Oxygen Oasis took me several weeks, working on it almost every day. Almost everything is built from scratch, with tiny leaves to be glued to twisted wire stems, delicate wooden pieces that slot together, and plenty of opportunity to put your own stamp on the build.

Oxygen Oasis challenging kit from Rolife review

I must admit that I felt quite intimidated when I opened the box! There are lots of pieces, including plenty of plastic sheets that form the windows. Some of the pieces are very intricate, and I could tell from the contents that there were going to be lots of plants to make - something that I've found very fiddly with these kits in the past.

Oxygen Oasis miniature kit from Rolife box contents

However the instructions are clear, easy to follow, and lead you in gently. The first part that caught my eye in the main picture was the dome - it looked so complicated with all the curved grass and detailed frames! However by the time I reached it I had already built the simpler back door and the slightly more difficult front door, and so I felt ready to tackle it. And of course it was fine in the end, I just took it slowly, made sure that I had all the parts that I needed ready, and followed the instructions carefully.

Rolife miniature kit Oxygen Oasis dome and doors

The next part of the kit involved making the main base. I always enjoy this part of the kit because you begin to get an idea of the size and shape of the finished piece. As always I got all the parts ready before I started, and there are lots to prepare for this section. It is mostly constructed with wooden pieces but there is also some paper cutting to be done carefully by hand - you'll want a pair of sharp scissors with small points for easy snipping.

Rolife Oxygen Oasis pieces ready to assemble the base

Just a note on the glue that is included - most of the Rolife kits that I've worked on aren't supplied with glue, instead you adhere pieces using tiny strips of double sided tape. This kit does include glue and it's fantastic - it has a tiny little nozzle to help with the application and it dries really quickly. Double sided tape is still used for some areas, and again this works very well.

Here is the base section made from the pieces on the tray above:

Rolife miniature kit Oxygen Oasis base completed

Next come the various components to add to each side of the base. Some of the work on this kit is quite fiddly and I often found that I needed to use the included tweezers. But there is so much more satisfaction to be gained from building a tiny set of stairs from scratch than just slotting in a pre-made plastic piece!

Working on the Rolife Oxygen Oasis miniature greenhouse kit

Oxygen Oasis kit from Rolife base section complete

One the main base is complete it's time to return to building the actual greenhouse, this time by assembling the two side pieces. These were straightforward to put together - the pieces for this section are made of plastic and they snap together easily, then you add plastic sheets to the inside to form the windows. You also add some tiny strip lighting underneath the roof, and all the wires are neatly hidden inside plastic tubing which is glued to the inside.

Oxygen Oasis from Rolife glasshouse section complete review

Now that the structure is assembled it's time to move on to the plants and trees. I knew that this would be the most time consuming part of the build, having spent a lot of time making plants for the Cathy's Flower House kit. You are provided with lots of sheets of pre-cut, double sided paper printed pieces, and some of these leaves are very tiny!

Oxygen Oasis kit from Rolife tiny leaf paper cuttings

The plants are assembled in groups. Some are fitted into their final sections straightaway and some need to be set aside for a later step. They are labelled by letter and so I found it helpful to lay them out on a sheet of scrap paper against their letter so that I could easily identify them later on.

Rolife kit Oxygen Oasis plants being put together

These plants did take a long time to make! Each of the sections above took several hours. The assembly can be very fiddly - first you have to bend wire into the correct shape, then fold tiny leaves and petals and glue them carefully into place before leaving them to dry thoroughly. I was really grateful here for the excellent glue included in the kit. 

Once I got going the process did speed up. I worked in batches, first getting all the wire bases ready then gluing on the leaves one plant at a time. I used a long strip of Blu-tak on my desk to hold the plants upright while they were drying which was really helpful. 

I found that the labels for the plants were so tiny that I couldn't read them, so I didn't worry too much about making sure that the correct one was attached to each plant. I also tried not to get too frustrated if I was having trouble with the fiddly parts, I think they still look good even if some parts are a little wonky.

Next came some larger plants and trees to build, each of which involves winding together different sized pieces of wire to create stems, trunks and branches, wrapping with coloured tape, and then gluing on the leaves. These pieces took a lot of time to complete, especially waiting for the glue to dry on one side so so that you could add leaves to the other side. It took me over an hour to build the two monstera plants! But I really enjoyed making them, and they all look amazing when they are complete!

When all of the individual pieces had been built it was time for the final assembly. First you need to attach all the plants to the base piece. I'll be honest, this part wasn't easy. Some of the leaves fell off and needed to be reattached, and there was a lot of fiddling around to make sure that the plants all fitted neatly around each other. The kit comes with plenty of a green filler type material that you can add around the base of the plants, but I found it so difficult to get to stick that I didn't use as much as I should have. Luckily you can't really see it from the outside anyway!

Rolife Oxygen Oasis miniature kit review base section complete

Finally you need to fit the glass house structure around the plants, make sure that it all firmly glued down, and add a few final touches around the sides. The wires for the lighting need to be connected to the battery box, a large tree is positioned to the side, a cute cat with a butterfly stuck to its nose stands at the front and some paper parrots add some extra colour.

Adding the vine across the top was one of my favourite parts of the build. I left it until the end, and I really enjoyed placing the last leaves and making it all look exactly how I wanted it to.

Rolife miniature house kit Oxygen Oasis review

The lighting in this kit is rather magical. As well as a larger central light there is also a small light strip underneath each side section. The lights are bright, and I love the way that you can see everything inside really clearly. The clear windows also cast gorgeous shadows on the space around it. The lights are powered using two AAA batteries which you need to supply.

Oxygen Oasis review kit from Rolife lighting kit view

I really loved the opportunity to get stuck in to working on this kit. I found that I could sit for ages carefully twisting wire into the required shapes, adding the leaves with dots of glue, and even just sitting waiting for the glue to dry while admiring what I had built. 

This is probably not the kit to start with if you are new to miniature kit building, but I would absolutely recommend it if you fancy something a bit more challenging. It will definitely feel like value for money when it comes to the time taken to complete it!

Rolife Oxygen Oasis miniature kit complete on bookshelf

What puts a Rolife kit into the more advanced category?

This kit definitely falls into the category of the more difficult Rolife kits. Here are some of the things that make a kit more difficult:

The kits contains a lot more pieces, and most of them are very small and delicate.

Some of the paper cuttings and other materials are not pre-cut, so you need to cut and measure them yourself. There are few, if any, stickers and so most paper pieces need to be glued together.

Overall there is a lot more gluing involved, sometimes quite fiddly. Most of the components need to be built from scratch by attaching tiny pieces together.

Most of the kit is made of natural materials like wood, paper and fabric - there is very little plastic.

There are a lot more steps to the assembly and some stages can take a bit of time, for example if you need to wait for glue or paint to dry.

Note - some of the older kits have been re-issued and are now less challenging than the original kits. 

What I like about working on a difficult kit

For me a craft is all about the process, so when a kit takes longer to put together you have plenty of time to enjoy it. I don't mind waiting for something to dry, it feels much more satisfying than just snapping pieces together.

I feel like a have a little more creative control, for example when it comes to the shaping of plants or the positioning of individual pieces.

Tips for working with a more complex kit

Don't get overwhelmed, and take your time. You will initially open the box to see a huge number of pieces, but each step only uses a few at a time.

Stay organised. Don't remove things from the numbered bags until you need them, and get all the pieces ready for each section before you begin. Set up a workspace with an area to store completed components until you need them.

Work on one step at a time and don't be tempted to skip ahead unless you are completely confident in what you are doing. 

If you aren't sure which piece to use you can double check them against the parts guide. This is very important as some pieces can look very similar.

If you fancy trying one of the more complicated Rolife kits you can find a good selection here - More difficult kits from Rolife.

You may like to see my other Rolife Miniature Craft Kit reviews:

Cathy's Flower House - another complicated kit with lots of plants and flowers to build

Elsa's Tailoring - an intricate kit with lots of fabric pieces to measure and display

Corner Bookstore - a lovely bookshop with assorted tiny books to put together

Silent Corner Study - a really sweet book nook, perfect to display on a bookshelf

Super Creator Kits - Fascinating Bookstore, Lovely Pink Bedroom and Sweet Sips Tea - some simpler kits which are great for older children and those new to this hobby

Gingerbread House - a gorgeous festive shop filled with Christmas treats

Christmas 3D Frames - lovely Christmas decor frames with intricate details

Rolife Corner Bookstore miniature kit completed
Rolife Corner Bookstore kit

Wednesday, 8 July 2026

Review - Rolife Super Creator kit - Pop Bubble Bathroom and lighting kit setup

I received these items in exchange for a review

A few months ago I shared my review of some new kits from Rolife in the Super Creator series. These miniature house kits are part of a modular series that can be completed as individual rooms and then stacked together to create a larger miniature world. The kits can be stacked together in a variety of ways, and you can use the roof accessory kit to add ceiling lighting.

These kits are quite simple kits and they don't take very long to build, so they are ideal for beginners or younger miniature crafters. My daughter is 15, and she loved the Lovely Pink Bedroom kit, so she was delighted to be able to work on the Pop Bubble Bathroom and connect it to the bedroom.

Rolife Pop Bubble Bathroom kit review

This gorgeous bathroom features a free standing bath with bath shelf for decor and a book - a perfect fantasy bathroom! There's a shelf unit with toiletries and other bits and pieces and a lovely raised sink. There are gold fittings, a little mirror, and all sorts of other tiny details. The kit is mainly assembled by slotting together the plastic accessories. All the sticking is done using tiny double sided adhesive dots, or you can use glue for smaller areas to give a neater finish.

Rolife Pop Bubble Bathroom detail

I love the tiny hair dryer that sits on top of the laundry basket, and the little toilet roll perched on top of the opening and closing toilet. Although the kit suggests how the accessories could be positioned you are of course free to arrange the room exactly as you would like it. If you chose not to stick everything in place then it would be sturdy enough for an older child to play with.

The Pop Bubble Bathroom comes with a side light which is powered by a USB-C power cable (not supplied). This is great because you don't need to worry about supplying and replacing batteries.

If you would like to install the ceiling light then you will either need the separate roof accessory kit, or you can install the light on the bottom of another room kit which is positioned above. We used the roof accessory kit to add the ceiling light. 

Rolife roof accessory kit

The roof accessory is pre-built and is very easy to slot onto the room kit. The ceiling light and wiring box is supplied with the individual room kit. The light slots underneath with the cable running down the outside of the house to a small wiring box attached to the outside.

First we added a roof and ceiling light to the Lovely Pink Bedroom and she was so pleased with how it looks.

Rolife Lovely Pink Bedroom with ceiling light installed

Then we installed the roof and lighting kit to the bathroom. As you can see, this kit has two lights - one on the ceiling and also a wall light. The side light can be used without requiring the separate roof kit.

Rolife Pop Bubble Bathroom with lighting kit installed

Then we joined the two kits together so that the bedroom now has an en-suite bathroom! You will need to supply power to the lights using a USB-C cable which is not supplied. However the kits do come supplied with a short USB-C to USB-C cable to connect two or more rooms together. So you only need to supply one power cable which can be used to power lighting to several kits that are joined together.

For now we have chosen a side by side connecting option, but it is would be very easy to rearrange the kits so that they are the other way around, or one sits above the other.

Two Rolife Super Creator kits attached together in modular system

We love the kits in this series, they are simple to put together but have lots of detail and they look lovely when out on display. You can see the full range here - Rolife Super Creator kits.

Thursday, 18 June 2026

Review - Rolife Miniature House Kit - Corner Bookstore

I was sent this kit in exchange for a review

I love working on Rolife miniature kits, and when I was given the chance to choose another kit to complete I knew straightaway which one I would like to try. The Corner Bookstore miniature house kit is a tiny bookstore, crammed with books and other knick-knacks along with cosy corners and intriguing little nooks. 

This kit is perfect for book lovers, and just like the Silent Corner Study it's a great model to display on a bookshelf. I really like the muted colours, and I love the piles of books and plants.  

Rolife Corner Bookstore kit review

The miniature kit comes with everything that you need for assembly, you just need to add two AAA batteries for the lighting kit. Small strips of double sided tape are provided, but I found that it was helpful to have glue on hand, just to make sure that everything was stuck down firmly enough to withstand slight knocks. 

DIY Miniature House Corner Bookstore from Rolife review

The Corner Bookstore kit has a difficulty rating of 2 1/2 stars and I assembled it in a few hours over about a week. It's always worth checking the difficulty rating of Rolife kits as they do vary, and this is a medium difficulty kit. There are a lot of tiny wooden and cardboard components to slot together and some gentle force was required to get everything into place, there is also a small amount of measuring and modification of parts.

I felt that this was one of the more open-ended kits that I've worked on - you can move away from the instructions a little and really make it your own by arranging the pieces to suit you. Although there is some plastic in the kit, many of the components are made with more natural materials like wood and paper.

Rolife miniature craft kit contents

The first step is to lay out all the pieces, but don't remove items from the bags as you will use the bag number to find a piece. If you do this by accident there is a materials list and part guide to identify similar looking pieces.

The instructions are really easy to follow and guide you through the assembly process. Each section has a clearly labelled list of the parts required and step-by-step directions. I found it helpful to set aside an area for components after I had finished them - the box works well for this. I also removed rubbish as I went along to keep my workspace clear.

Rolife miniature Corner Bookstore kit in progress

With these kits I try to make sure that I don't rush, I slow down and enjoy the process of putting them together. It's a very meditative activity, and a wonderful way to switch off as you concentrate on what you are doing.

Rolife Corner Bookstore Kit review

It's a great moment when you can fix the walls in place and the whole thing begins to take its final shape. I really like the way that this kit fits into a corner, and all the tiny props are really imaginative and full of detail.

Rolife kit small components created

As you would expect, even a miniature bookstore is going to be filled with books, and I had a lot of fun making the heaps of tiny books to stock the store. This is just a handful of them! They are made by covering a tiny wooden piece with a printed sticker - these books each measure around 1cm across. There are many familiar titles - Pride and Prejudice, Jane Eyre and The Old Man and the Sea - as well as non-fiction books and a variety of interesting and attractive covers. It seems such a shame that when assembled many of the covers are hidden! 

Miniature books from Rolife bookstore kit

There is a suggested way to arrange the books, but I found it much easier to just work it out for myself, especially making sure that my favourite books had more prominent positions. But one tip for this kit in particular - take care to keep the different sized books separately as they can appear quite similar.

Review of Rolife Corner Bookstore kit

When the assembly is complete, it's lovely to take a step back and have a proper look at what you've just built - sometimes it's difficult to appreciate the whole when you've been concentrating hard on all the tiny details! I loved assembling the Corner Bookstore kit, and it is a wonderful addition to my miniature house kit collection.

Tuesday, 10 March 2026

Garden update - is it dead or alive?

Last year we completely transformed our garden, and for the first time I actually did some proper gardening. Over the summer we came back from the garden centre almost every weekend, gradually filling the empty beds and making some long term gardening plans. 

As winter approached I started to get nervous, desperately hoping that all the time and money we had invested wouldn't go to waste when the frosts kicked in. I didn't dare to venture outside for most of the winter, feeling sorry for all my plants suffering out there in the cold.

Now that the garden has finally dried out a bit and the temperature is slowly increasing I've been stepping outside to check on things, peering closely at developing shoots and anxiously trying to work out what is starting to revive and what is definitely dead. Fortunately, some of the plants that I had lost hope for have turned out to be just resting, and things are starting to come back to life.

I was very relieved to remove the fleece from my canna lilies and discover new shoots. I loved them last summer, and they produced beautiful flowers for months. Fingers crossed they will give me another lovely display. I'll cut back the dead stalks when it is a little warmer, I'm just giving them a bit of extra protection from the cold for now.

Canna lilies growing new shoots from the ground

We bought this photinia (Carre Rouge) to go along our back fence, where the view is dominated by other houses and their sheds. I'm hoping it will grow out to screen the area, and I love these gorgeous red leaves.

Photinia Carre Rouge red leaves in spring

I'm also pleased to see that my Acer is sending out new shoots for the spring. It is in an exposed bed which isn't the best position for it, so it looked a little scraggly after we planted it. Hopefully as it matures, and as the vegetation grows up around it, it will begin to look a bit happier.

Small Acer with a spring shoot

I was positive that my new fuschia was dead, but then I had a good look and saw new growth at the bottom! Likewise there are a few other small shrubs that didn't look well at all a few weeks ago but are starting to show signs of life.

Fuschia with new spring growth

I also thought that my clematis was a goner, but it is coming back beautifully! I'm really hoping that it will get going this year, as it stayed rather spindly last year. Behind it you can see a honeysuckle which my mum gave me and has really grown well over the winter. I want to cover this trellis and our pergola with greenery, and I'm so impatient for everything to grow up.

Clematis coming back to life in spring

Unfortunately it looks as though my dahlias were not strong enough to survive the winter, I've not given up hope quite yet. but they aren't showing any signs of life. I've also lost two of my three delphiniums, and I'm not hopeful for my salvias.

At least this year I've got more of an idea about what I'm doing, and it's a case of building on what we have rather than starting from scratch. I've already got flower seedlings growing, and I'll be planting more over the next few weeks. I'm hoping for a second year with a garden filled with flowers!

Canna lilies in flower in the garden
The canna lilies last summer

Tuesday, 2 September 2025

Review - Rolife Miniature Craft Kit - Silent Corner Study from the Book Nook and Wonderland series

I received this miniature craft kit in exchange for a review

A little while ago my husband and I had a lot of enjoyment completing a miniature craft kit from Rolife - Cathy's Flower House. It occupied us happily for quite a while, and I love admiring the finished model sitting on the bookshelf. So I was really pleased to be given the chance to review a couple more miniature kits from Rolife.

I began with the Silent Corner Study, which is part of the Book Nook and Wonderland series. The assembly level is 3 stars which makes it slightly easier and quicker to complete than Cathy's Flower House, which is a more advanced kit with a 4 star rating. The Silent Corner Study kit doesn't even require any glue - all that you need in addition to the kit contents are two AAA batteries for the light.

Silent Corner Study Book Nook from Rolife box

Inside the box are a selection of wooden sheets with press out pieces, a printed cardboard sheet, a printed sticker sheet, a lighting kit and a few other accessories. Then a large instruction book which I found clear and easy to follow. 

The first thing to do is to find some batteries and check that the light works, then you can get started. What I really liked about this kit was that one of the first parts to complete was the battery box and lighting wires - I find this part of the kit a little intimidating so I like to get it out of the way early! It was really easy to install though so I didn't need to worry.

Silent Corner Study book nook from Rolife kit contents

To assemble the kit it's just a case of working through the instructions in order, and pressing out the pieces as you need them. Most of this kit is made using pre-printed and cut wooden pieces, which are really good quality. The finish of the printing is excellent, and all the pieces popped out easily and slotted together well.

Starting a Rolife miniature book nook kit review

When I first saw the picture of the kit I thought that it would take a lot longer as there are so many books to make. But it is deceptive, because many of the books are just printed onto a wooden or cardboard piece which slots into place on the shelf. There are still a few books that need to be assembled individually, and then it's just a case of carefully placing a book cover sticker onto the correct wooden piece. It's easy to reposition a sticker if you get it slightly out of alignment. 

There is never any doubt when it comes to assembly because most of the time pieces can only be placed in one position, and if it's more complicated then there are either guide arrows or extra help in the instructions to make sure that you get it right. 

In progress Rolife miniature Book Nook kit review

I love the bookshelves crammed with not just books but also small paintings, vintage suitcases, a clock and even a cat walking along the shelf! There are so many tiny details. 

Although this kit doesn't require any glue, there is still some sticking to be done with supplied pieces of double sided tape. I did find that I wanted to add a dot of glue on a couple of occasions just to make sure everything was stuck firmly, so it's worth having some on hand just in case.

Rolife Silent Corner Study miniature kit review

As I mentioned above, the lighting for this kit is very simple. There is only one bulb which is positioned outside the window, and the wires run neatly up the back and are later covered by the back panel. The battery box is at the top with a hinged flap which allows you to easily access the batteries. The switch for the light is affixed to the bottom of the wooden floor piece, and when you touch the discrete power symbol it turns the light on.

Installing lighting on a Rolife miniature kit

I found that this kit was a really good level of difficulty - easy enough to not need to worry about getting it wrong, but complicated enough to make for a satisfying craft project that kept me interested and engaged in the process.

Silent Corner Study book nook close up image

I spent about a week working on this kit from time to time. I would imagine that you could probably finish it in a couple of evenings if you sat down to work on it, but I liked taking my time and enjoying the process!

Review - Silent Corner Study book nook kit from Rolife

I've completed a few miniature kits now, and I think that this is definitely my favourite so far. I love the theme - anything to do with books is a winner for me - and it fits beautifully on my bookshelf. The kit was simple to put together but also very satisfying, and I enjoyed every minute working on it. I loved that I could work on it a little bit at a time without having to sit down for hours - it's perfect for busy people that need to snatch some time to themselves when they can. The quality and finish of the kit was excellent and I love admiring the finished product.

If you are interested in trying out a Rolife kit for yourself I have a discount code which will give you 10% off kits from the Rolife website. Just use the code Jennifer10.

Rolife Book Nook kit on book shelf with light

The second kit that I have received to review is a DIY Miniature House called Elsa's Tailoring. The kit is a vintage sewing studio with plenty of tiny details, and I'm really looking forward to making a start. It's a larger kit and a higher difficulty level, so I'm anticipating that it will take me a little longer to complete. I'll be sharing my progress soon!

Rolife Elsa's Tailoring kit box miniature kit

Wednesday, 2 October 2024

A hole in the side of the house

Update June 2025 - The orangery extension project is finally complete! You can watch a time lapse of the full build and garden below.

I may have been a little quiet on the blog recently, but it hasn't been at all quiet in our house!

We are currently carrying out a project which we have been planning for a long time - we are adding an orangery extension. We've been half thinking about it since we moved in, and so we never did any other work to the house in case it would turn out to be a waste of time and money. 

Finally at the beginning of the year we started to plan more seriously and began to put some ideas together. We had to wait for it to go through planning permission because we are joining to the garage, but fortunately it was accepted with no problems. 

It's the first time that we've been involved in a project like this and we haven't really known what to expect. We've been watching time lapse videos of similar projects on YouTube to get a feel for the order in which things will happen. This also inspired my husband to buy his own time lapse camera to record the progress which is fantastic to watch back and I'll definitely be sharing it when it's all done!

It seemed to take a while to really get going - we had problems with unexpected pipes in the wrong places and then the weather was atrocious. For a long time all we had to look at was a muddy back garden full of holes. But then the beautiful red brick walls went up, and this week the wooden structure is being built, and that has really given us a feel for how it's going to look. 

Halfway through an orangery extension build

Currently most of the back of the house is missing, with wooden boards and tarpaulin the only protection from the elements. It was fine at first, but as the weather has got colder and windier it has felt a little bit as though I'm preparing food outdoors! Luckily the front of the house has escaped unscathed so we have the living room to retreat to, and we've not suffered at all with any dust or mess.

We are a couple of weeks away from having a sealed structure, and then the work will move indoors with plastering, tiling and a new kitchen. It should all be complete well before the end of the year, and I'm really looking forward to a Christmas at home with a new kitchen to cook in and stars to gaze at through the ceiling!

Wednesday, 2 February 2022

Our new hedgehog house and our hedgehog visitor

We've known that we have hedgehogs in our garden for a while. We often see them scooting about on our security cameras, sometimes I spot them when I go to the garage at night to put washing in the tumble dryer, and once we were in the hot tub and were treated to a half hour or so watching two hedgehogs snuffling around us.

So a couple of weeks ago we decided to try and entice a hedgehog to stay for a little longer, and we bought a hedgehog house for the garden.

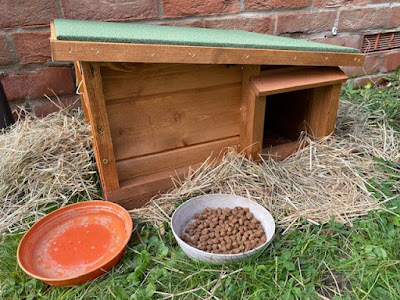
This is the hedgehog house that we bought - Predator Proof Hedgehog House and Hibernation Shelter. We also purchased a pack of hedgehog food from the same company, although I think we'll move to cheaper cat biscuits when it's finished. Then we bought a pack of hay from Amazon. The entire sleeping area of the hedgehog house is filled with hay, then we left some piles outside as we read that hedgehogs like to build their own nests with it. We put a small bowl of food inside and scattered some about. There's a saucer of water too.

Hedgehog house in garden, UK

The house is located in a sheltered part of the garden that we don't go in very often, tucked away from the main part of the garden between the house wall and a fence. Then we have one of our Ring security cameras opposite so we can watch what the hedgehog is up to.

Harry made this video for me of the first night that the hedgehog visited the house, about a week after we placed it. If you watch to the end you'll be treated by the gently steaming gift that the hedgehog left behind for us!


Over the next week the hedgehog kept coming back to snuffle around, eat the food and explore inside the house. Then last night we saw him go into the house at about 6.30am and stay inside for the whole day which was very exciting! It's great to have the camera so that we can see what it's up to!

Do you have hedgehog visitors to your garden?

Monday, 3 July 2017

Taking part in a garage sale trail

At the weekend we took part in a Garage Sale Trail which was brilliantly organised by a lady in our village. The first one was last year when we were away and I really wanted to take part, so I was delighted that we could make the day this year!

Over 50 houses in our village took part, and the organiser made a map showing the locations of all the houses along with a list showing what they were selling - she did a brilliant job! We are tucked away a little bit so I made posters with arrows pointing to our house, and our neighbour took part too so people hunted us out.

I admit that I was a little bit worried that no-one would come, but we had quite a steady stream of visitors all morning. It was advertised to continue until 4pm but we didn't see anyone after 2pm apart from a little gaggle of children that live up the road. They kept buying things and then going home to get more money and coming back, probably because we were selling things very cheap!

The children were really enthusiastic and they each made up their own little stall. Harry made some flower keyrings from Hama beads and Mia made some Hama bead Minecraft magnets which were  popular! Their top seller though was their brownies and cookies - they each made a nice amount from those even if Harry did end up spending most of his profit and more elsewhere!

Children doing a garage sale

I'm quite good at decluttering and I make regular trips to the charity shop, so I didn't have a huge amount to sell. A friend who lives a bit out of the way came along to share our driveway so she bolstered the stock a little bit, and she did very well. I did a lot better than I expected though, I made over £35 and cleared quite a few larger items that were taking up space.

For me it wasn't just about the selling, it was a really fun way to get talking to the neighbours and it was a lot more relaxed than a car boot sale - there was no haggling over prices and people seemed genuinely pleased with their purchases. Fortunately it was a nice sunny day so it was nice to sit out in the front garden and enjoy the sunshine!

I'm hoping that it takes place again next year, I've saved some of the bits that didn't sell and I'll be adding to the pile over the year so we have a few bits put together!