Today I'm sharing a simple Autumn themed craft - how to make a paper pumpkin table decoration to use as a centrepiece for your table this fall.
You need:
Coloured paper or card in a variety of shades of orange
Green tissue paper
A circular cardboard container, I used the lid from a container of cheese triangles but you could use any circular plastic or cardboard lid
Fabric Autumn leaves (or cut your own from fabric or felt)
Acrylic paint
Bostik White Glu
Bostik Glu Dots
Instructions:
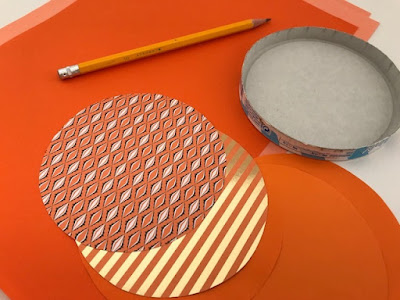
Use your circular base as a template to cut circles for your pumpkin. Use as many different shades of orange as you can to add plenty of variety, and if you have patterned paper that also adds some extra interest. Cardboard is best for stability but you can also use paper as it will be glued together. Take care to make sure that all your circles are the same size. I made eight circles.
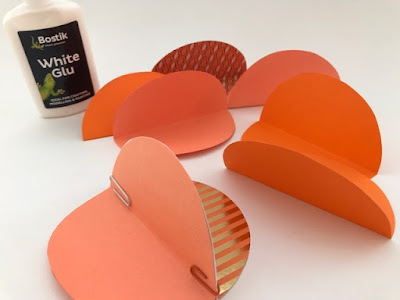
Fold all the circles in half. If you are using paper which is only coloured or patterned on one side make sure to fold it so that the coloured side is on the inside fold.
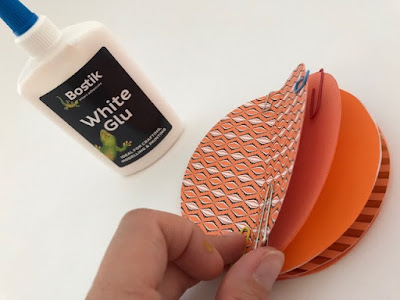
Glue your folded circular pieces together to form the pumpkin using the Bostik White Glu. Make sure to use only a thin layer of glue, especially if you are using paper, so that it doesn't get too wet. The White Glu is perfect for sticking paper because you can apply it exactly where it needs to go and it will hold the paper together firmly. It also dries clear, just in case you end up with any where it shouldn't be!
It's a good idea to lay out your pieces in advance so that you can make sure you are balancing out the different shades, and use paperclips to hold the pieces together until the glue is dry so that they stay in place while still wet.
Wait for it to dry and then remove the paperclips. Check the pumpkin to see if there are any edges which need to be trimmed slightly. Fold the pieces out so that they are evenly spread to form the sides of the pumpkin.
Cut a small section out from the bottom, so that when the pumpkin is stood up it has a flat base to stand on. Don't cut too much, but just enough so that the paper pumpkin can stand by itself.
To make the stalk, cut a strip of card and curl round to form a tube, secure in place with tape. Cover with green tissue paper, stuck in place using the Bostik White Glu, and use scrunched up tissue paper to fill the hole at the top. Cut eight small slits in the base of the tube so that it slots on to the sides of the pumpkin, and this will also ensure that the pumpkin sections remain well spread out. It should stay in place but if not it can be secured with a small blob of White Glu - this will dry clear so you don't need to worry about it showing.
Paint the base for the centerpiece. You can either choose to paint it in a neutral colour like I did, or a contrasting colour for some extra interest. I used acrylic paint to make sure that it covered well with a bold colour.
Finally use the Bostik Glu Dots to stick the fabric leaves around the base.
To adhere the Glu Dots you need to peel off one side of the plastic, stick the dot to one of the surfaces, then remove the second side of plastic and stick them firmly together. I found it easiest to stick the Glu Dot to the leaf first, then I could position the leaf where I wanted it.
The Glu Dots are great at sticking together all types of surface, and because you don't need to wait for them to dry they are perfect if you want to see your finished result quickly. They are very sticky but can also be re-positioned if you don't get the placement exactly right first time.
To finish, position the cardboard pumpkin inside the base. Use a couple of Glu Dots underneath the bottom to make sure that it is firmly in position and can be easily transported. Just stick them to the inside of the base, and press the pumpkin down gently but firmly.
Your pumpkin centre piece is finished! These can be made in all different sizes to suit your table, or you could make a row for your windowsill or mantelpiece.
This is a collaborative post in association with Bostik


Such a cute Autumn craft
ReplyDelete