Showing posts with label baking. Show all posts

Friday, 5 August 2022

The two edible things that I successfully grow in my garden

I always try to make an effort with planting fruit and vegetables, and I've had a few successes over the years as well as quite a few misses. But there are two things that I've consistently been able to grow, use and enjoy.

Firstly we have a lovely apple tree in our front garden which must have been planted when the house was built about twenty years ago. I don't know what type of apple they are but they are cooking apples, and I'm guessing Bramley apples. Every couple of years I prune the tree back quite a bit in the Autumn and we don't get many apples the following year. Then every other year we get a bumper crop, and this year is one of them!

Apples growing in the apple tree

I offer bags to visitors and I use as many as I can for my own baking. I particularly love making apple crumble, even though I'm the only one that really eats it. I use a super simple recipe from BBC Good Food - Easy Apple Crumble although I halve the quantities because it makes loads. Delicious!

Homemade apple crumble

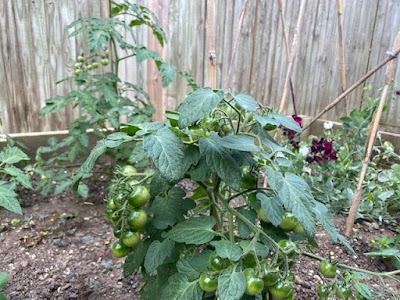
Then the second thing that I can grow successfully is tomatoes. Historically this part of the country has been good for growing tomatoes because apparently we get quite a lot of sunlight. I grow the plants directly in my main vegetable patch and also in large pots and I am quite lax about their care - I do  remove the side shoots and I keep them from getting overgrown but I always forget to fertilise them. They also often get neglected if we go away. But in spite of this they usually do quite well!

They are a little behind this year because we were away over Easter and I waited until we got back before I planted the seeds. There's a chance we may be going away in a few weeks time, and I'm really hoping that I don't miss the harvest!

Tomatoes growing in the garden

Wednesday, 13 April 2022

Making gingerbread houses for Easter

A few years ago we started a new Christmas tradition - homemade gingerbread houses. I would always make two houses, one for each of the children to decorate, and I made the gingerbread from scratch. A bit of a faff but the children loved making them (and eating them!) Last Christmas we were away for quite a bit of the Christmas holiday and I couldn't find the time to make them. This led to much disappointment, so I promised them that we would make Easter gingerbread houses instead. 

So the first day of the Easter holidays found me in the kitchen baking up shaped pieces of gingerbread ready to assemble into two houses! I make the gingerbread pieces a couple of days before so that the gingerbread has time to harden a little. The recipe that I use isn't available online any more but this one is very similar and also includes a printable template - Simple gingerbread house recipe

I cut out my pieces using some cutters which I bought in the US a few years back. Buying the cutters felt like a bit of an indulgence at the time but I've used them so often that it was definitely worth it, especially for the one year that I ended up making five houses for a gingerbread house decorating party!

So I present our Easter gingerbread houses! First up we have Harry. He's not a fan of sweets so chose to use chocolate buttons and chocolate eggs.

Simple Easter decorated gingerbread house

Meaning that there were plenty of sweets left for Mia, who covered every available space!

Easter gingerbread house decorated with lots of sweets

I just love how their houses are so different and reflect their little personalities. It's also great that as they get older they can manage more of the decorating themselves, maybe one day they'll be making gingerbread houses for me!

Friday, 27 August 2021

Adventures in Harry Potter baking

This post contains Amazon affiliate links.

My Mum knows that I like to keep busy with the children over the school holidays, as well as enjoying a challenge, and so this summer she treated us to a copy of The Official Harry Potter Baking Book. This book contains 40+ recipes inspired by the Harry Potter books and films, alongside lots of photos and trivia.

It's a lovely book to browse through, with plenty of pictures of the gorgeous (and slightly intimidating) bakes which are all beautifully styled. I sat the children down with a pack of post it notes so that they could pick out the ones that they wanted to try, then I went through afterwards and weeded out the ones that I thought we could manage to make a start with. Some of them are very complicated!

The Official Harry Potter Baking Book

I decided that we would start with the Wizard's Chess Squares, which are plain and chocolate flapjack squares arranged to look like a chessboard. I've made flapjacks lots of times before and already had most of the ingredients so I was feeling confident.

Harry Potter baking wizard chess flapjacks

We were very pleased with our finished display! I'd not made chocolate flapjacks before and this recipe was absolutely delicious. If you know your chess, you may notice that there should be an extra row to the chessboard. Unfortunately the finished bake went a bit crumbly so we didn't have quite enough squares to make a full board...it still tasted good when eaten with a spoon though!

Harry Potter baking wizard chess flapjacks

Next we tried another simple recipe - Wand Breadsticks. These were very easy to make and didn't need many ingredients. The children had fun making different shapes and styles, and they tasted good too.

Harry Potter wand breadsticks

Our most recent bake was these doughnuts. The Harry Potter connection? Imagine them piled up with sweets and chocolate frogs to produce a Honeydukes Haul Cake. I'd never made doughnuts before and I was very pleased with the result - they were delicious! And not nearly as difficult as I had imagined they would be. This is definitely a recipe that I'll be returning to!

Harry Potter doughnuts

We still have plenty of things left to keep us busy baking. I'm even wondering whether to change things up this Christmas and attempt a Hogwarts Gingerbread Castle using the templates provided in the book! 

Monday, 21 December 2020

This year's gingerbread houses

Every year I make a gingerbread house for the children to decorate. Last year I even made gingerbread houses for my friends and I to decorate one evening, in what I hoped might become a yearly tradition. But this year I just wasn't feeling the inspiration to make one and so I kept quiet, until Mia asked me when we would be making them. And I'm so glad that she encouraged me because it would be a shame to break the tradition, and I really enjoyed making them with the children.

I use an old Tesco recipe to make the gingerbread, which I have printed out and can't find it online anymore so I had better keep hold of it! I make the gingerbread pieces the day before so that they have time to harden, and I bought some gingerbread house biscuit cutters in the US last year which makes it easier when cutting out the pieces.

So here are this year's efforts!

Two children holding gingerbread houses

Yes, they are still in their pyjamas. Well it is 2020! I did decide not to incorporate any 2020 themes into the houses though, so we don't have any neatly piped facemasks or coronavirus shaped motifs. 

Close up of two gingerbread houses

Now I just need to persuade the children to share them with me!

Friday, 22 May 2020

My lockdown successes and achievements

I can't believe that it has been over two months since the children were sent home from school, followed by the lockdown a few days later. Those two months seem to have gone so quickly and there is a scientific explanation for this, it's to do with the fact that when every day is the same you aren't creating new memories, so when you look back you feel as though time really has flown (you can read more about the science here!)

However despite my anxiety being pretty high for most of that period, and finding it difficult to concentrate and get on with anything, I have actually been quite productive within my home and garden boundaries. So I thought I'd share a few of my lockdown successes and achievements!

Rainbow in the window of a house

* I have kept us all fed. I plan meals and can now keep us going easily on one weekly shop instead of popping to Asda every few days. I generally do keep our food cupboards quite well stocked, and we bulk buy when the food that we eat is on special offer, so luckily I was quite prepared when the initial food shortages happened. The lack of flour and yeast did catch me out though!

* I have upped my exercise. My husband was already working from home when the schools closed, so we had got into the habit of going for a daily run together. We have continued this over the weeks, and have recently been going out on our bikes which had been gathering dust in the garage.

* As well as this exercise, as a family we have explored the local area, going for walks on the golf course nearby, to the beach (only once, it turned out to be 40 minutes walk away), up the nearby hill and out into the fields around our village. 

* I have set up the vegetable patch and garden by myself, as my parents haven't been able to come down and help me with it. I've grown vegetables and other plants from seed as the garden centres were shut.

Seedlings in pot on windowsill

* With the lovely weather we have all spent lots of time in the garden, playing, keeping the weeds under control and enjoying pizza from the pizza oven, barbecues, and our fire pit. 

* I have been homeschooling the children. Some days go better than others but thanks to a comprehensive programme of work from the school I don't think we are doing too badly.

* I have been reading a lot. I've turned to comfort reading, I've worked my way through both the Anne of Green Gables and the Little House on the Prairie series of books!

* I started a 100 day project of drawing and painting and I'm enjoying setting aside half an hour a day or so to paint with watercolours and create some pretty pictures.

Watercolour flowers in sketch book

* I've also made some excellent progress with my other craft projects, including a large diamond painting of Starry Night by Van Gogh which is almost complete.

* I've managed to keep up with the housework. In fact having a housework plan has helped me with my weekly routine, as I know that certain chores need to be done on certain days!

So although the last two months do feel a little bit like an empty space with nothing to fill it, when I look back I am actually not doing too badly!

Victoria sponge cake with chocolate buttons on top

And in case this blog post sounds just a little bit too smug, look out for my post in a few days where I'll be sharing all my lockdown failures!

Wednesday, 20 December 2017

The 2017 Gingerbread Houses

This year the children broke up for the Christmas holidays well before Christmas - ten whole days in fact! It's been really nice, we've spent some time with family and had the chance for a bit of a tidy up and just general chilling out at home with Lego and Minecraft.

Yesterday we continued a tradition which is now in its sixth year and made our gingerbread houses. As always I used this recipe - How to make a gingerbread house - which I've adapted slightly to reduce the quantities of the melted ingredients. I also only use golden syrup instead of treacle, it seems to work out fine. That recipe also comes with a printable template, and if you reduce the size to 75% then there will be enough dough to make two smaller houses with a bit extra for some extra biscuits.

I always make the pieces the day before so that they have time to harden up a little bit before assembling the houses. This year I didn't bother with the boiled sweets for the windows as we never eat the ones that are left over. Here are the pieces all ready to go!

Gingerbread house pieces ready to assemble

I use Royal Icing to stick the pieces together and I just use the powder that you add water to, usually the Tate and Lyle one. I normally use an Icing Syringe set (affiliate link) which makes it really easy to get the icing where it needs to go and looking neat, it's also good for icing on some extra decorations if you have some spare icing. Unfortunately I was using up some Royal Icing from last year which had gone a bit lumpy and it kept clogging the syringe so I had to do my best with a knife! Then I just put out lots of different sweets and let the children loose.

Boy decorating a gingerbread house

Harry spent a lot of time planning the placement of his sweets and thinking about making it look like a real house.

Girl decorating a gingerbread house

Mia used her sweets to make a face on each side of the roof, and was most interested in making sure that there were some sweets left over that she could make a start on straightaway!

Here are the finished houses for this year!

Children holding their finished gingerbread houses

I'll leave them out for us to admire until tomorrow, then I'll break them up and put the pieces into cake tins for us to munch on. I shouldn't think that they will last very long - I'll be very surprised if there is any left for Christmas day!

I made our first gingerbread house back in 2012, and you can read about all of them here - Our yearly gingerbread houses.

Post contains an Amazon affiliate link.

Monday, 2 November 2015

Making a Gingerbread House with a kit from Village Workshop

A few years ago, I began a Christmas tradition of making a gingerbread house. You can see our latest efforts here - making gingerbread houses. It's very hard work though, especially baking all the gingerbread and cutting out the pieces to the correct sizes, so when I heard about Village Workshop via my Blog On Win goody bag I was very keen to try out one of their gingerbread house making kits.

Gingerbread house making kit

We were sent a small Santa's Stuck house kit. The kit contains everything that you need to make the gingerbread house - shaped pieces of gingerbread, icing, decorations a tray to stand it on and full instructions. The gingerbread pieces are very securely packaged inside.

First we emptied out the contents and I mixed up the icing to build the house. I know from experience that you need to make the icing quite thick so that it all holds together properly. You can use the plastic bag that the icing powder has been packaged in as an icing bag by cutting off one of the corners. The pieces are cleverly shaped with slots that fit together really easily and I had no problems assembling the house on the enclosed board.

Gingerbread house making kit

Normally I make my houses the day before and then let the children decorate, but the house felt pretty sturdy almost immediately, so I let the children at it straight away. It's not a huge house, but there was plenty of room for each child to take a couple of sides, and there were lots of different types of decoration for them to use.

Gingerbread house making kit

They had great fun decorating the house and took it very seriously. This kit comes with a pair of Santa legs that you can stick on the roof as if he's stuck in the chimney, which they loved.

Gingerbread house making kit

If you want to make a gingerbread house, either for yourself or especially with children, I'd definitely recommend this kit. It was really easy to put together, remained sturdy, and was a lot of fun. If you were having a family gathering around Christmas it would be a great way to entertain a small group of children, either with a smaller house each or a larger one to share. 

I received a gingerbread house making kit in exchange for this review.

Wednesday, 17 December 2014

Making Gingerbread houses with the children

This is the third year in a row that I've been making gingerbread houses. I remember how much I worried about making my first gingerbread house, and how proud I was of it! This year and last year instead of one I have made two smaller houses, so that the children can decorate one each.

I use a fantastic recipe from Tesco - How to Build a Gingerbread House. On the website you can find a video which is really helpful to watch first, and some templates that you can use for the pieces. To make two smaller houses I print the template at 75% of the size and the recipe makes enough gingerbread for the two houses along with extra for about eight gingerbread men or other decorations like little trees for the house.

The recipe is pretty straightforward. I never have any treacle so I just substitute golden syrup which seems to work fine. I also find that I don't need to add quite all of the melted butter and sugar to the dry ingredients, so I add it gradually and mix as I go. I make the gingerbread house pieces the day before and then store them overnight in a cake tin, separated by pieces of baking paper. This way they are nice and firm for when you come to assemble the house.

Making gingerbread houses with children

A trick that I learned from the video is to roll out the gingerbread directly onto the baking paper and cut the pieces out, then move the whole thing onto a baking tray. This means that the pieces don't become misshapen. You need plenty of baking paper!

I do find that the larger pieces that make up the roof need a little longer to cook than the window pieces. You need to remove the pieces from the oven as soon as they have started to brown slightly and then leave them to cool. They will still be quite soft when they first come out the oven, but they do harden up.

The windows are made using crushed boiled sweets, I find that I need about six large sweets for all the windows in the two houses. For a larger house you need one boiled sweet which you can place whole in the centre of each window before putting the pieces in the oven.

The next day it's time to assemble the house. The smaller houses each fit nicely onto a dinner plate, covered with tin foil. I use Royal Icing which you can buy in powder form and just add water. I don't follow the instructions exactly as I find it makes the icing too runny. I find about 300g of icing sugar and 40ml of water makes a nice thick icing, but just add the water gradually and keep mixing, it's best if you can use an electric mixer. This makes loads of icing, enough to assemble the houses and with plenty left over for decorating.

Making gingerbread houses with children

I use an icing syringe to pipe the icing onto the pieces, making sure to stick it to the plate at the bottom. Assemble the walls first and leave to set before adding the roof (it takes about 10-15 minutes to set firmly enough). I start with the back piece, icing a line along the plate and propping it up using a glass. Then I add the sides, again icing along the bottom to hold it in place. Then finally add on the front piece. I fill in any gaps with plenty of icing and if necessary I ice along the bottom sides again so it's nice and sturdy. Adding the roof is a little more tricky and you may need to hold it in place for a few minutes so that it doesn't slide off!

Making gingerbread houses with children

I make the gingerbread houses myself up to this point, as you do need a little bit of concentration! Then I let the children loose to decorate them. I find that chocolate buttons are good for decorating as they are light and stick down easily. Dolly mixtures add a bit of colour, and as I'm personally not a big fan of jelly sweets I always choose something that's nice and chocolatey too!

I helped the children decorate by piping them lines of icing that they could stick the sweets onto. They were so pleased with their finished houses!

Making gingerbread houses with children

The tradition continued! Here are our 2015 Gingerbread Houses.