A couple of years ago I upcycled some old tin cans to make some
summer tin can lanterns and I was really pleased with how well they came out. They looked lovely in the garden over the summer, especially when I was entertaining my friends outdoors in a socially distanced fashion! They hold a lit tealight candle and the high sides of the tin can make sure that the candle stays lit. You can create all sorts of designs in the sides of the can that are lit up and then projected out from inside.
(Some of the photographs below show the progress of my summer lanterns, I used the same process for the Christmas lanterns)
First I found that it was a good idea to fill the can with water and freeze. This prevents the can from becoming bent out of shape when you make the nail holes. Just take care not to overfill the can or else the side may split!
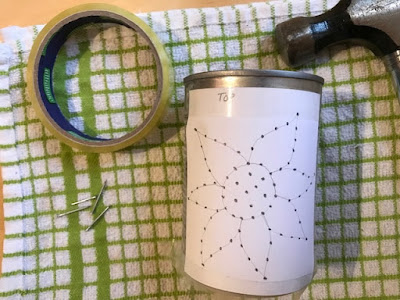
Draw out a simple pattern for your design on some scrap paper and tape it to the can in the correct position. If your can is wet because of the ice you can also use a rubber band or two around the can to hold the template in place. For my Christmas lanterns I chose a simple star and snowflake design.
Then use a hammer to bang a nail through into the tin can, and remove once the hole has been made. I used an old tea towel underneath to protect my table surface. You can make the designs as simple or as complex as you would like. It is quite hard work so I would recommend choosing a simple design to begin with!
When making the holes, make two additional holes close together under the rim of the can at the back. This will be where you affix the wire that holds the beads around the top of the lantern.
When the cans are dry use some wire and beads to make the decoration to go around the top. Simply thread the beads onto a length of thin wire, then tuck the ends through the two holes that you have made at the back of the can. Make sure to pull the wire nice and tight so that the beads don't sag. I used red, green and silver pony beads, along with some smaller clear plastic beads. You could also add further strings of beads at the bottom or around the middle of the can. Then they still look good even when not lit!
These cans are suitable for use with tealight candles and also battery powered tea lights. A little tip - to light a tealight candle that is at the bottom of the can use a stick of dried spaghetti - light it at one end and you can then use it to reach inside the can to light the candle! The lanterns make a great table centrepiece, or can be grouped around the fireplace or on the mantelpiece.
For this project I used some plastic coloured pony beads that I already had in my craft box, but they are easily available to purchase in all sorts of colours.


These look fantastic. What a great idea for Christmas. x
ReplyDelete